Currently I’m on the road traveling, but have some photos to share from our visit to Romania. While there, I was able to photograph the Bear Dancers whom parade through the streets of villages every year between Christmas and New Years in their bear-skin costumes. It was a privilege to photograph them in this way long before they will officially don the outfits.
This ceremony is a joyfulcelebration belying the fearsome appearance of the traditional costumes and demeanor of the dancers within. It is a tradition intended to scare away evil spirits – including an accompaniment of drums, flutes, and singing – with beginnings that have been difficult to pin-point due to sparse documentation of the region’s history.
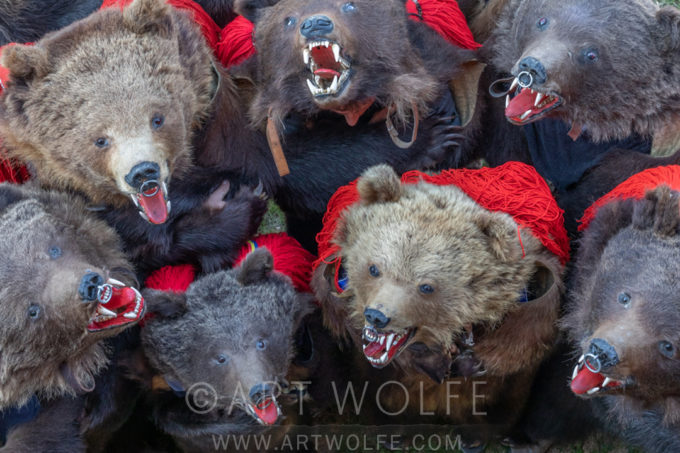
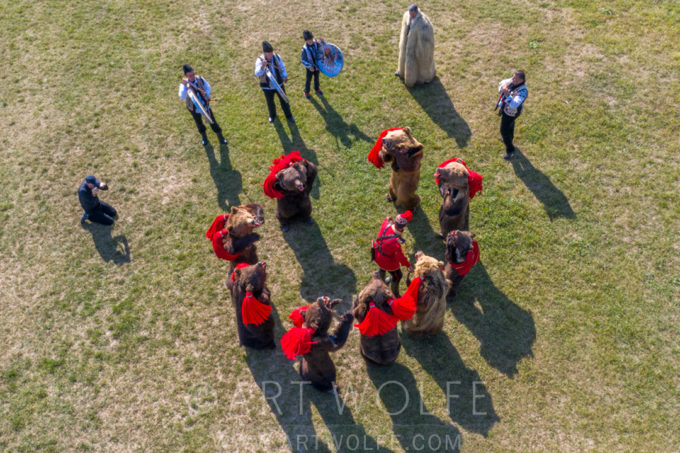
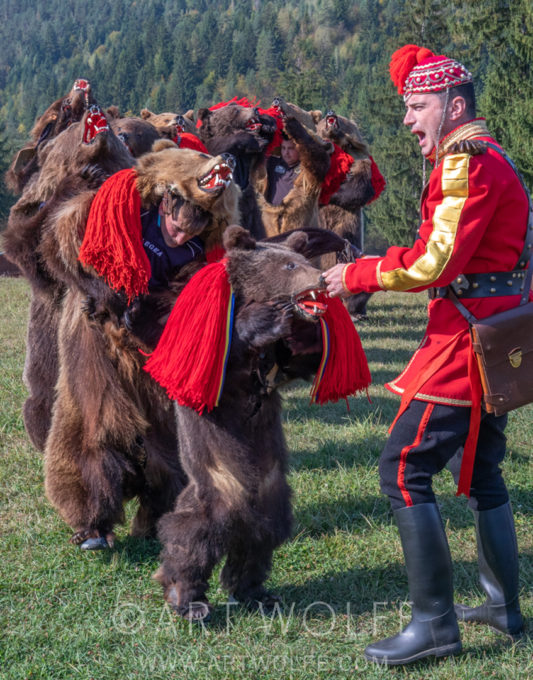
To begin with, we assemble the performers! Dressed in a red military uniform, the “Bear Tamer” leads his group of dancers while a wool-clad shepherd stands with the musicians in blue and white garb. A more overcast day may have been ideal, but you must work with the circumstances you are given. By closing in close on the group of dancers themselves, we can put the focus directly on the savage costumes.
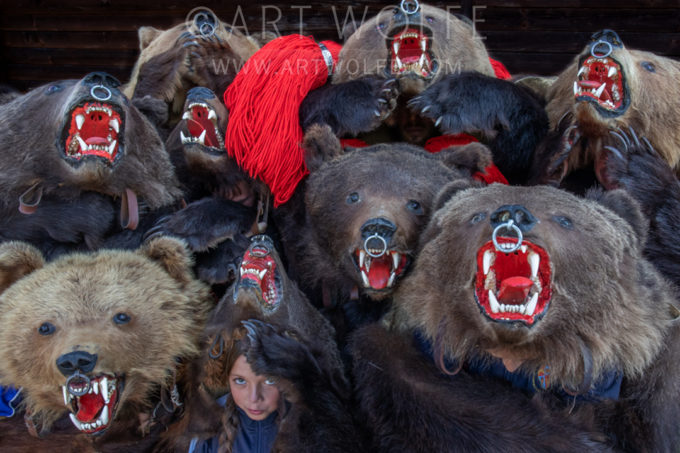
Here, a young girl peaks out from below her mask, giving us a great opportunity to capture a similar shot of the group, but with this reveal adding an extra sense of context to the photograph. The contrast of her face among the fierce, snarling bears only adds to the story.
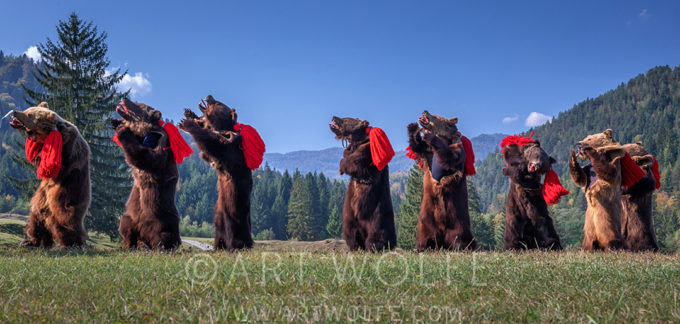
Again, I want to isolate and emphasize the costumes and the dancers themselves without any other outside information informing the story – the subjects here are the elaborate costumes, their muzzles silhouetted against the blue sky, and the shadowed faces of the dancers themselves.
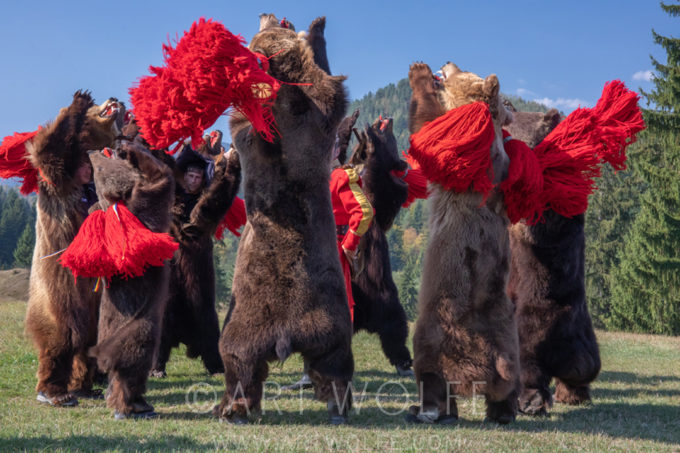
Of course, these ARE dancers after all – so action shots are necessary. Capturing the dancers in their furs against the rich evergreen background of Romanian landscape ties them together nicely. As complimentary colors, the rich reds of their costumes stand out against the forest green.
Here we focus on the procession of bears as they might appear in their journey through the village, usually ending up in a town square for further celebration. Whenever you are given an opportunity like this, take full advantage of it and get all the shots you possibly can – I’ll have more up soon along with the rest of our haul from Romania!
If you’re not already, now is a great time to make sure you’re following me on all my social media platforms. I try to offer a variety of content on each one, so collect the whole set of @’s! We have some upcoming contests and give-aways coming up, so get recognized and score some loot!
Follow me on Instagram for my latest photos along with camera information for my captures – and get inspired to post your latest and greatest – you never know If I might follow back!
. . . And last but not least, the blog here on ArtWolfe.com. Throughout all my social channels, I try to include tips, techniques, and much more. The social icons on the blog posts are for sharing – use ’em! If you’re not signed up for the newsletter, it’s a great way to get updates on upcoming workshop and speaking opportunities.
Have a great weekend and stay tuned for some great new pics from my recent trip to Greenland!
AW – Often students in my classes will bring work that shows an interesting subject, but without enough information to tell a complete story. I find that one effective tool for storytelling is using a wide-angle lens close to my subject, so that some of the background is included, creating a valuable sense of place.
I find elephant seal weaners, fattened up and then abandoned by their mothers, to be wonderfully cooperative photographic subjects. With this weaner, I laid flat on the ground in front of it to photograph it on its level.
The hot-spring-addicted macaques in the Japanese Alps are another fun subject. When their own hot springs were invaded by the furry monkeys, the human residents built a monkeys-only spring. This youngster hung around the side of the pool, making a perfect subject for a wide-angle shot, which allows me to add important background and context.
MH – Looking at us with its liquid black eyes, the seal pup seems to be hoping we are his mother coming to feed him. Weaned at three weeks, he seems a bit lost, even indignant, that the tap has suddenly been turned off. With the spectacular landscape of South Georgia in the background, this image creates a sense of loneliness, seeing this solitary pup by himself in this grand wilderness.
In the second image, the Japanese macaques are so human-like that it’s a little freaky. The monkey in the image seems curious, even mischievous, while his peers ignore his proximity to the camera and wallow in the thermal heat. I love seeing an animal in its environment, especially one as unique as this. It enlarges our understanding of how they live and sometimes gives us clues as to what motivates their behavior. Here, the slight distortion of the wide-angle lens enhances the drama of the scene.
Strong Leading Lines
Another important approach to using a wide-angle lens is to work with leading lines. Leading lines have long been important parts of painting and other two-dimensional forms of art. A leading line is simply something that creates a line from foreground to background and leads or directs the eye through the image. It can be anything that is visually distinct, that a viewer is going to notice, and helps define the composition.
You can find all sorts of leading lines in the environment: tracks in the sand, edges of roads, cracks in rocks, architectural structures, and so on. These can be used to direct the viewer’s eye through a composition and toward the main subject. They are an excellent way to help the viewer understand your picture as well as add a graphic element to the design of your image.
Wide-angle lenses help emphasize leading lines. This comes back to the concept of perspective. By getting in close to nearby parts of leading lines, you spread them apart, yet they still go to the same vanishing point in the distance. That creates a very strong change from foreground to background along those lines, something that will dramatically show off the elements of your photograph.
To understand this, think about a railroad track. If you stand on a hill and photograph railroad tracks in the distance so they start at the bottom of your picture and go to the horizon near the top, you will see them heading off to a vanishing point at the horizon. The railroad tracks will be a certain width at the bottom of your composition. If you then put on a wide-angle lens and get right down on the tracks, the width of the tracks will fill the width of your image. The tracks are still going to go off into the distance to a vanishing point, but now they go from the full width of your frame, creating an extreme change from foreground to background.
Don’t be afraid to get close to leading lines in order to emphasize how strong they are. So often photographers back off from subjects like this and lose some of the impact because they don’t have the same foreground-to-background perspective.
On the heels of my recent trip to Ecuador where freezing the action of the tiny and quick humming birds there was my primary goal, here is an excerpt on using fast shutter speeds from Chapter 7: Creative Options from The New Art of Photographing Nature. Enjoy!
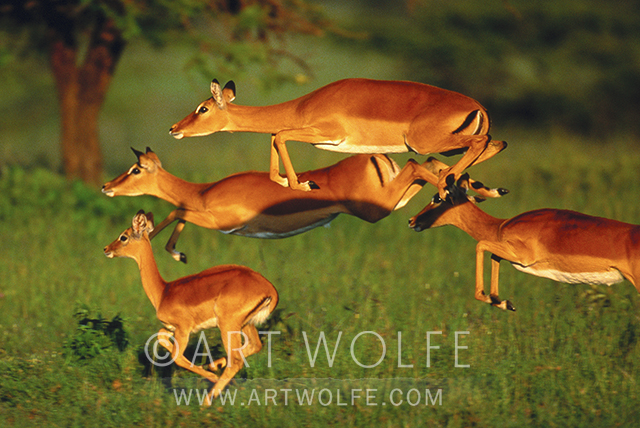
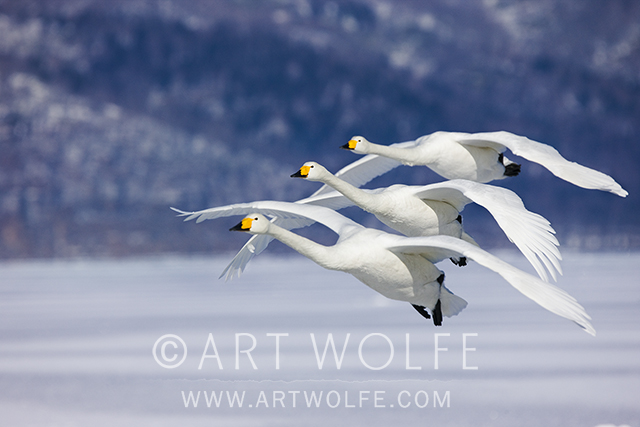
AW: In this final set of images—of a Gentoo penguin porpoising in Antarctica, of leaping impalas in Kenya, and of whooper swans coming in for a landing on a frozen lake–I have chosen the fastest shutter possible to stop the action, capturing a frozen moment in time rather than a more impressionistic view. In the age of digital, the ability to select higher ISOs and faster shutter speeds allows me to capture a lot more moving subjects in sharp focus in this way, although my preference is still for blurred motion.
Impala, Masai Mara National Reserve, Kenya EF600mm lens, f/8 @ 1/500 sec, Fujichrome Velvia 50
MH: The penguin shot is a wonderful example of allowing us to enjoy something unusual, in this case, a penguin “in flight.” This is a split-second event and takes remarkable timing to capture with a camera. The result allows us to appreciate the penguin’s torpedo-like shape, and understand a little better what makes them such speedy swimmers.
All of these images are examples of the camera being able to record something that is either too fast or too slow for the human eye to capture accurately. Fast shutter speeds enable us to savor moments of peak action at a later time and at our own pace. One of the greatest advantages of digital has been the ability to immediately see your results, allowing you to experiment and then make corrections on the spot. This can be especially valuable, for example, when testing different shutter speeds to gauge their effect.
Whooper Swans, Hokkaido, Japan EF400mm f/4 lens, f/6.3 @ 1/1250 sec, ISO 400
I spent some time down in South America recently, a trip that was initially conceived to photograph the solar eclipse in Chile but also turned into a fantastic opportunity to photograph birds and other wildlife in Ecuador with a focus on capturing tiny, agile hummingbirds.
There are numerous sources online you can go to to find technical information on shooting slight and/or speedy subjects such as these, so I won’t bore you with technical specs except to say that my photos were captured with a Canon 5D Mark IV, a 100-400 lens, and a shutter speed of 1/160th of a second. Instead, I’d like to focus on my approach to capturing these and other animals that can be hard to get a handle on.
There were two things I didn’t want to end up doing in this situation – chasing elusive birds around with my lens all day long, or firing off a bunch of shots in hopes of coming away with something good after spending hours and hours editing and cropping photos.
Instead, I took the approach of spending plenty of time observing these creatures long before I attempted to take any shots. I recognized patterns in their behavior and how they interacted with their surroundings and each other. This allowed me to anticipate their movements and come away with more focused and intentional shots rather than just releasing the shutter and hoping for the best. Instead of chasing, I let them enter the frame and do the work for me. In the end, I came away with shots I’m happy with, and didn’t have to sort through too many duds to get there.
Currently, I’m in Chile viewing the total solar eclipse visible from South America, and it makes me hark back to when I traveled to South Australia back in December 2002 to photograph a total eclipse there. At the time, I was photographing landscapes for my book Edge of the Earth, Corner of the Sky and I thought this would be an amazing opportunity. I’d seen many technically excellent photographs of total eclipses over the years, but quite honestly they all looked pretty much alike. My objective became capturing the eclipse in relation to the Earth.
The solar eclipse that occurred on December 4, 2002, was noteworthy when viewed in South Australia for a couple of reasons. First, the eclipse was unusually brief at 25 seconds. Also, it occurred less than 40 minutes before sunset, so the likelihood of an obscured view was greatly increased because clouds generally stack up along the horizon at that time of day. To maximize my chance of success, I decided to find the precise position from which to film the eclipse by experimenting exactly 24 hours before the eclipse. I also decided to try two cameras for two very different perspectives, so I used both a wide-angle and a 70–200mm lens, enabling me to take full advantage of the eclipse’s late hour by incorporating the landscape.
Most eclipses occur earlier in the day when the sun is much higher in the sky. For this book, I wanted to establish the connection of the eclipse with the Earth. I wanted the viewer to witness the eclipse as if they were standing there next to me under the gum trees. Since I could not determine exposure until totality began, I decided to use matrix metering on an automatic aperture priority setting. When totality began, I would simply engage the shutter using locking cable releases, hoping that the entire roll of film would run continuously through the camera. This would have happened had I not made one final decision: to auto-bracket my exposures. I discovered, too late, that the camera would not continuously advance while on the auto-bracket setting. After just three exposures, both cameras stopped advancing. By the time I figured out what was happening, totality ended. Fortunately, I did get proper exposures for both compositions. After the critical moment of the full eclipse, I continued to photograph as the eclipse continued, switching to other lenses and film.
To create these images I used two Canon cameras, an EOS-1N and an EOS-1N/RS, EF70-200mm and EF 16-35mm lenses, Fujichrome Provia 400 film, and a Gitzo tripods. For the images of the setting eclipse on the horizon, I used an EF500mm IS lens and Fujichrome Velvia film.
With a few extra days to spare, I met up with some friends in Yosemite. I was excited because there was no moon, but unfortunately, the clouds rolled in. I was able to get a few decent shots of stars and star-trails, but the most interesting nighttime image in this group is one that shows the climbers on El Capitan lit up like fireflies (final shot).
A few tips for shooting for the stars! (Sorry, I couldn’t help myself):
As far as equipment goes, in most cases you wont need anything special. Most of my shots end up being between 20-30 seconds in length. If you wish to shoot longer exposures you may need to use an intervalometer. It goes without saying, but I’ll say it anyways as an excuse to link my preferred band – you’ll need a tripod. Finally, your favorite wide angle capable lens to capture as much of the sky as possible.
Do your research! Find locations that have minimal light pollution. Here’s a handy map I came across. Checking moon phases is a must as well. The time period around a new moon is your best bet – you’ll never know how truly bright a full moon can be until you’re trying to shoot the stars! As mentioned above, a cloudy sky can also pose challenges. Ideally speaking you’ll find a place away from population centers on a clear night with the moon nowhere to be found, or at least in it’s most obscure phase.
As far as individual camera settings go, it’s impossible to give specific numbers because it will largely depend on the above conditions and the specific gear you’re working with. Most of my night shots fall into the ƒ/2.8 – ƒ/4 range and a focal length between 24-40 mm, with an exposure time of about 25 seconds. If you want me to take a stab at a starting point, 24mm and 25 seconds at ƒ/2.8 is probably a safe bet to give you at least enough information to make the proper adjustments.
That’s just the tip of the iceberg as far as photo tips go for shooting at night – but my garden needs me! For more information, check out CreativeLive – they have a few helpful courses on the subject!
It’s Technique Tuesday, and since the last little tip I shared was a very technical tutorial on creating panoramas in Photoshop and Lightroom, I figured we would go back to the basics with a more universal message that I think will help new photographers and those who may be struggling themselves with tunnel vision alike. With a recently added Abstract Astoria workshop happening soon, and my Photography As Art seminar happening in Seattle this fall, these are some basics I will find myself repeating!
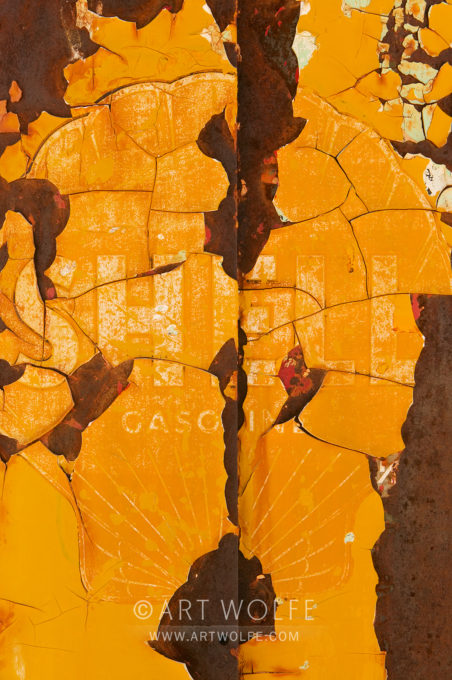
What are you seeing as you photograph? How do you perceive the world and what’s important to you? This is something that goes much deeper than thinking about getting the latest camera with the most megapixels. Good shots come from cultivating the eye. Scrutinize every subject without prejudice. A good photo can be found in rusting debris lying in an alley of a big city or out in a pristine environment. Finding images everywhere is how you practice, how you improve your work. It’s about the subject only in how you frame it, and in the message you send with the photo.
Do you shoot any possible subject, whether a rusting can in a gutter, a grand ceremony in a foreign land, or birds on a beach? Or do you define yourself as a “bird photographer” or a “landscape photographer”? Try not to limit your subjects or how you define yourself as a photographer. Photographing without prejudice opens up the world! You can’t even walk into a grocery store without finding a viable subject. And along the way, you gain practice that cultivates your eye.
Practice Matters
You might think that composition comes naturally for professionals like us. Naturally, perhaps, after many years of doing it! There is no question that if you are to succeed as a photographer, you have to take a lot of pictures. This is sometimes frustrating for people who have invested a lot of money in the latest gear and want instant results since you have to take a lot of both good and bad photographs to get better.
There is an old joke about a visitor to New York City trying to get to a concert at Carnegie Hall. After getting a little lost, he saw a man walking down the street with a large cello case. He stopped the musician and asked, “How do you get to Carnegie Hall?”
The musician looked sternly at the visitor and said, “Practice, practice, practice.”
A concert pianist rarely gets up on stage and gives a bad performance, but only because he or she has had years of practice. That isn’t to say that you can’t get good pictures at whatever stage you are in, but it does point out how important it is to get out and take lots of pictures. Practice does matter.
The Subject, or the Photograph?
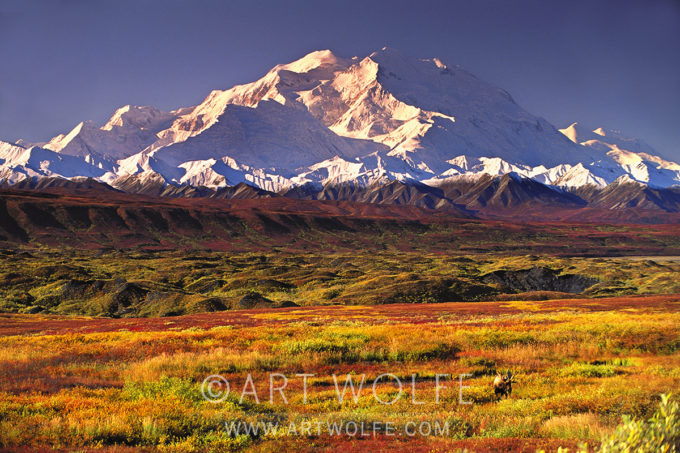
One thing that can hold photographers back from finding great images is that they focus too hard on finding the “perfect” subject. Whenever possible, try to avoid “trophy hunting” for subjects. That means going out and trying to find the same subjects that photographers like Art Wolfe shot, or going to major locations and photographing only the big, iconic subjects. Think about that. You can buy postcards of those big, iconic subjects that were shot under ideal conditions. When you start looking for subjects simply as trophies to be captured, you stop looking for the photograph.
If you simply look for subject matter, you’ll often be disappointed because the camera is not looking for subject matter. The camera doesn’t care what your subject is! The camera is simply looking at light and shadow and how to translate that into pixels. It is your job as a photographer to work with your camera to find interesting photographs, not simply capture a subject.
Looking at the art world outside of photography can be instructive. Painters have to figure out what the whole image is going to be, not simply the subject. They have to interpret a scene in a certain way on their canvas, rather than simply pointing a camera at a subject and pressing a button. Seeing through that “lens” can help you navigate the challenge of finding original compositions in the world you walk through every day.
In this book there are very few photographs of the big, iconic subjects that so many others shoot. Art looks for and finds subject matter that is going to translate into interesting photographs that appeal to him. He responds to the world around him as a place filled with photographic possibilities because he is not simply looking for an interesting subject. He is always looking for interesting photographs.
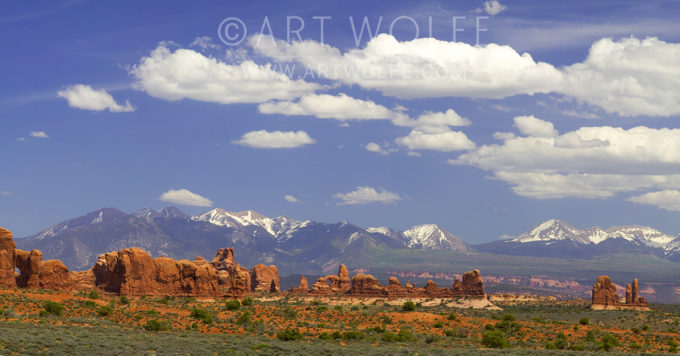
A topic that came up recently was just how easy it is nowadays to quickly create seamless panoramic images from stitched photos using Adobe Photoshop and Lightroom. It’s a simple process in either program, so if it’s something you haven’t tried or are just looking for a refresher on how to merge photos – this post is for you!
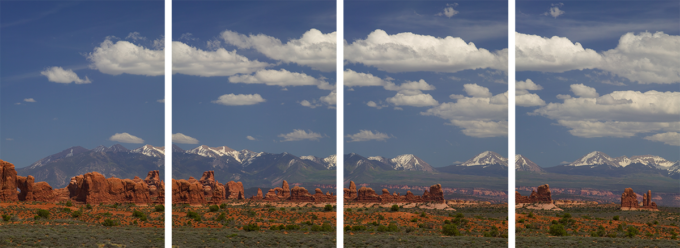
The first thing you want to do of course is choose the images you’d like to create a panoramic from. The photos should overlap just a bit, as the colors of the pixels are how the software will determine where to stitch the images together. Make sure you photograph your panoramas in portrait format to get the most amount of pixel real-estate for the highest resolution final image!
Once you’ve made your selection of images, you’ll then need to choose between using Photoshop or Lightroom to merge them together. The base Adobe Creative Cloud subscription includes both, so it’s really a matter of your familiarity with one or the other.
Both processes are simple enough. I’d say if you’re looking for quick and easy results the Lightroom method is a good starting point, but if you want a little more control the Photoshop method offers a little more. Better yet, give both a shot to see what you prefer!
In Lightroom:
1.) Import the images you wish to merge together
2.) From the top menu, choose the “Photo” drop-down and find the “Photo Merge > Panorama” Option
3.) In the Panorama Merge Dialogue box, ensure “Spherical” is selected for the
projection. You can also choose “Auto Crop” to automatically crop away the
transparent edges. Finally, ensure “Auto Settings” is checked.
4.) Click “Merge” and your panorama will be created!
In Photoshop:
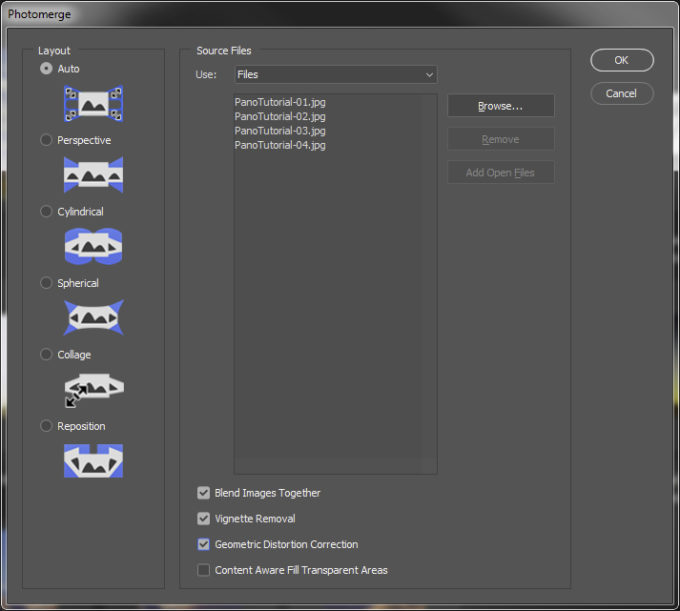
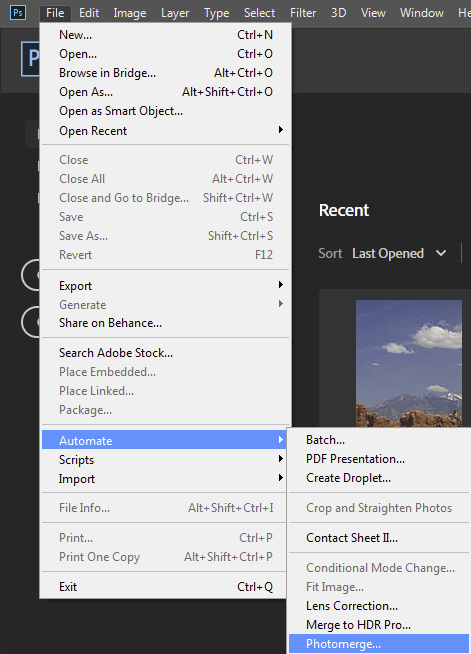
1.) From the “File” menu, choose “Automate” and then “Photomerge“. 2.) In the Photomerge dialogue box, ensure “Auto” is checked under “Layout“.
In the “Source Files” box, be sure “Use:” is set to “Files” and hit the
“Browse. . .” button.
Choose the files you wish to stitch together. In this case we will use four
PanoTutorial.jpg images in the Pano Tutorial Images folder.
Be sure that “Blend Images Together”, “Vignette Removal”, and “Geometric
Distortion Correction” are all checked.
You can also choose to check “Content Aware Fill Transparent Areas”, but this
will add to processing time and attempt to fill in edges with content sampled from
the image, which may require more advanced Photoshop experience to ensure
there aren’t repeated elements in your image.
3.) Click “Ok” and the Process will begin. Depending on the size of the images being
merged, it could take several minutes to process the images.
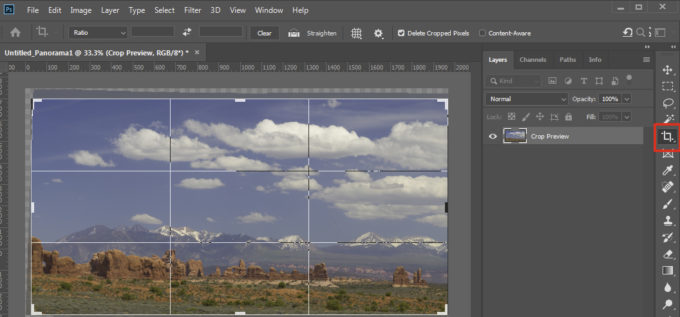
4.) Once the image has processed, from the top menu, choose the “Layer” drop down and
choose “Flatten Image“.
5.) Using the crop tool (highlighted in red below) crop the image to get rid of transparent
areas, and also use the rotate ability of the tool to ensure your horizon is straight.
Those are the basics – There are obviously a lot of other options in those dialogue boxes. . . I suggest experimenting to see what different settings do to come up with a process that works for you!
Happy #WorkshopWednesday! I’ll be presenting my acclaimed full-day seminar Photography As Arthere in my home city of Seattle this November, and time is running out to enjoy an early bird special discount. Sign up before May 1st and save!
This seminar is designed to completely change the way you view photography, and my intent is to inspire you to bring unique artistic visions to life using your camera as both brush and canvas. With an emphasis on the abstract, imaginary landscapes, and capturing metaphors the lessons learned here can be applied anywhere and with whatever equipment you have available – no globe-trotting or a plethora of fancy gear required.


 Once you’ve made your selection of images, you’ll then need to choose between using Photoshop or Lightroom to merge them together. The base Adobe Creative Cloud subscription includes both, so it’s really a matter of your familiarity with one or the other.
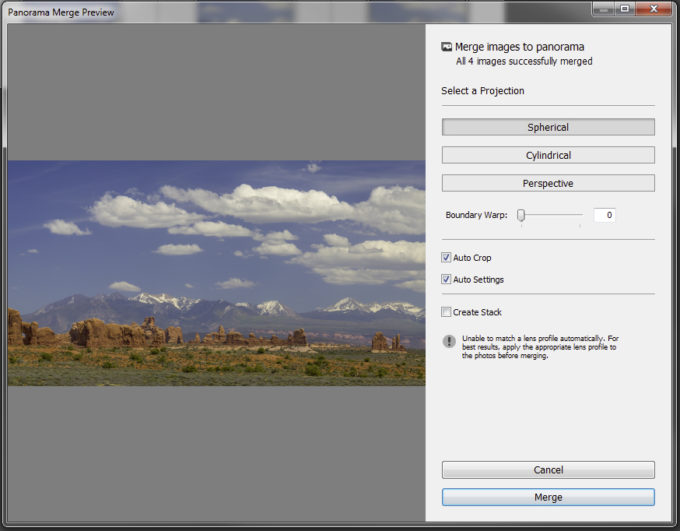
 2.) In the Photomerge dialogue box, ensure “Auto” is checked under “Layout“.