A big challenge for photographers is that the camera simply cannot capture the range of brightness in the world that we can see. When we look at a subject with our own eyes, we can see all sorts of detail, from the brightest areas to the darkest areas. Unfortunately, the camera cannot. And when there is strong contrast between bright and dark areas, the camera will emphasize, even overemphasize, that contrast.
This can be especially problematic with bright skies and dark landscapes. It can be impossible to get a single exposure directly from your camera that captures both a good sky and good ground at the same time. Another problem can occur when you are photographing a subject in the shade against a bright, sunny background; the exposure range can be so extreme that, once again, there is no correct exposure to get a good image.
The first thing to do is accept that sometimes you just have to say no to a particular picture, recognizing that it may be impossible to get a good image given the lighting conditions since no exposure will be correct. If you can recognize this, you will start looking around for images that you can say yes to. That’s an important decision to be able to make.
To get a better photograph, in certain situations, there are things you can do to control the way light comes into your camera. A traditional way for landscape photographers to deal with a bright sky is to use a graduated neutral density filter.
This filter is half clear and half gray with a blend, or gradient, through the middle. By placing the dark part of the filter over the bright part of the scene, such as the sky, and the clear part of the filter over the darker part of the scene, such as the ground, you can balance the light coming through your lens so the camera can get a good exposure.
The challenge with a graduated neutral density filter is that it creates a line through the image. If you have a mountain or tree going into the sky, it will be darkened as well as the sky, for example. Unfortunately, this is starting to be a very dated look for photography. A graduated neutral density filter can still be helpful in knocking down bright light or brightly lit areas in the picture to balance them with the rest of the image, but you just have to use it carefully so the effect is not obvious.
Another way to work with multiple image exposures is to shoot an exposure for the bright areas, then an exposure for the dark areas. These two images are then combined in the computer by using the best of each. Shooting two images like this is actually quite easy to do.
Exposure created for bright areas.Exposure Created for Dark Areas
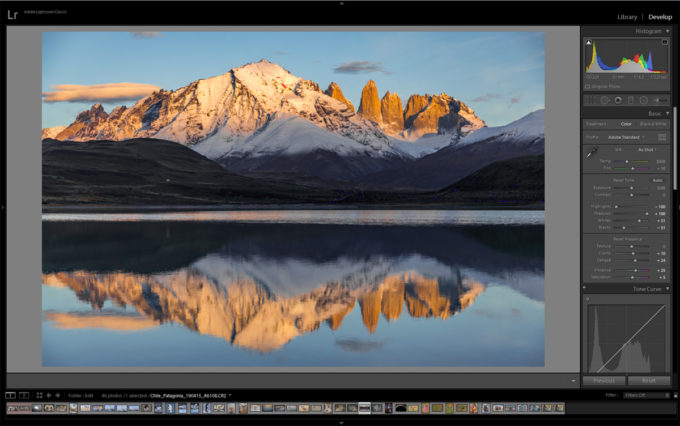
Start by locking your camera onto a tripod. Shoot one exposure that makes your sky look good, then shoot a second exposure that makes your ground look good. Bring the two images into Lightroom, where you can adjust the sky picture to make the sky look its best, and the ground picture to make the ground look its best.
Then you send the two pictures over to Photoshop as layers. Put the two pictures on top of each other as layers and make sure they are lined up. Then simply remove the bad part of the top picture, revealing the good area of the bottom picture in that section of the image. You can do this in two ways. The down and dirty way is to simply use the Eraser tool by setting it to a large size and 0 hardness (a very soft brush). You then erase the bad part of the picture.
Combined Result
The second way to do this is to use a layer mask. Add a layer mask to the top picture/layer and use a large, soft-edged (0 hardness) brush to paint black onto that layer mask and block the bad part of the top picture.
If you’d like to see the masking process in action as a future lesson for the blog, leave a comment below. Although there are a lot of helpful tools these days to help you auto-mask and adjust exposures, nothing beats knowing how to manually edit your photos without relying on automated tools that might not always give you the best results. A fundamental understanding of masking is an incredible tool for any photographer to have available to them.
Recently I posted about my amazing new Canon R5 Mark 2 and some of the features I’m loving about this camera. However for all the technology invested in capturing tack-sharp images and freezing action, its also important to remind yourself to slow down every now and again.
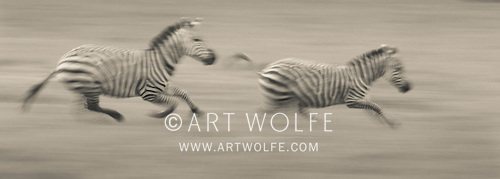
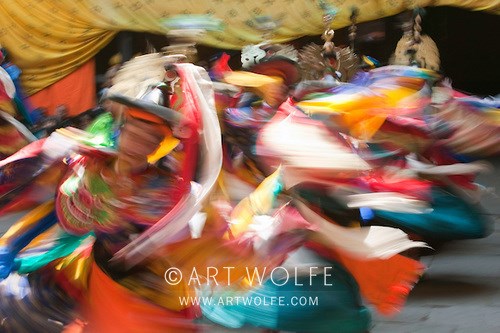
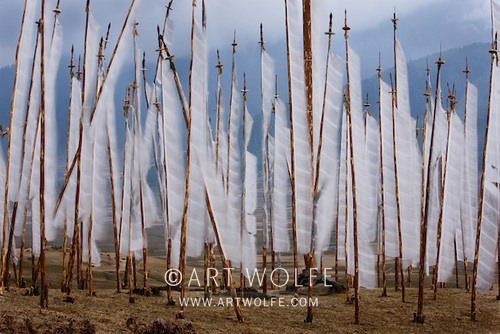
One of the techniques I employ often is dropping the ISO down to 100 and stop down the aperture and let the motion move across the image. This “intentional camera movement”, or “ICM” technique is a great way to convey the sense of motion in an otherwise still frame, inviting the viewer to imagine the subject in action as described by the blurred image. Ernst Haas was one of my early influences, a person who’s work I continue to admire. He was a pioneer of using this technique to show the motion in his subjects.
It takes some experimentation and often you won’t really know if you have any successful images until you’ve edited and evaluated them. Some may still show the eyes of the animal in reasonably sharp contrast to the blurred legs in motion – I like this look – but I also like those images that make me think of ancient drawings on a cave wall, where nothing is particularly defined and the entire animal is abstracted in it’s motion and the background a blurred canvas.
I won’t always see the potential in these images immediately. Some I shot on film many years ago I nearly tossed out but decided to file away at the last second. I pulled them out years later and found a new appreciation for their abstract qualities and I’m glad I did!
If you’re interested in more photos captured with this technique, check out Rhythms From the Wild.
The first decision every photographer must make is simply what to photograph. The best place to start, of course, is finding what appeals to you. If finding subject matter to photograph is easy, making it stand out is harder. Our first impulse when something catches our eye is to simply point the camera, center the subject, and shoot the picture. No surprise, then, that when we look at it later, we are all too often disappointed and wonder, “Why did I take that?”
The novelist and critic Henry James wrote, “In art, economy is always beauty.”
In a landscape, there is often a glut of information. For that reason, artists who sketch in the field will often take a piece of cardboard with a rectangle cut from the middle. By holding it
up to frame various sections in the scene, they can isolate what has potential to make a strong composition.
This can also be a valuable aid for photographers who have trouble visualizing the potential field of view of different focal length lenses. The closer you hold the hole in the board to your eye, the more it approximates the field of view of a wide-angle lens. The farther away you hold it, the more it resembles what a telephoto lens might see.
Isolating the subject is the first step in making a strong composition. This can be achieved in a number of ways-coming in close, backing up, looking down, looking up, changing the direction
of the light on the subject, waiting for another time of day, blurring the action or stopping the action, using selective focus to blur unwanted elements, putting a light subject against a dark background. All of these are potential creative solutions that We will address throughout this book.
Isolating your emotional response to the subject may be more complicated and take time and practice, but it is an important step for an artist. If you can analyze why you feel drawn to make a picture, and work to express the feeling clearly, chances are someone looking at it will ah respond with more than passing interest.
The image gallery above are all examples from my travels to Kenya in which I wanted to focus more on the emotions, textures, and compositions of isolated subjects and families. I’ll be heading back to Kenya in January – join me and make your own memories!
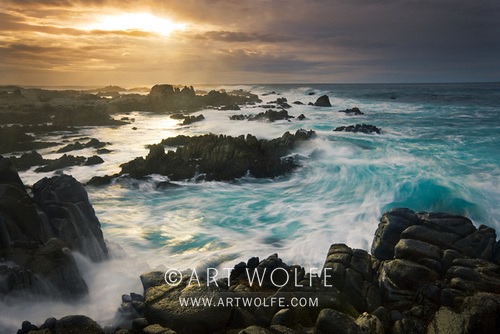
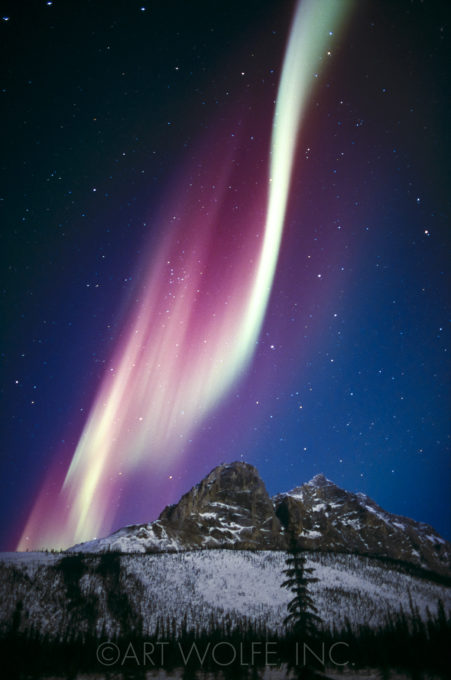
Recently my staff received the following question in regards to the above image:
“Was this photo a single shot, an HDR composite, or some other technique?”
Short Answer:
this is from the good ol’ days when you shot a slide (single exposure in this case) and waited a few months to see if anything turned out…
Medium answer:
All the details – Canon EOS-1N, Canon EF 17-35mm lens, f/2.8 at 30 seconds, Fujichrome Provia 400 film, Gitzo G1325 tripod.
Loooong Answer:
The aurora borealis, or the “northern lights” as they are often called is an atmospheric phenomenon that occurs as electrically charged particles from the sun make gases glow in the upper atmosphere. Despite the dryness of this scientific explanation, it is difficult to view the aurora borealis without experiencing a sense of wonderment and mysticism. It remains one of the most dazzling sights in the natural world.
To get this image, I flew to Fairbanks, Alaska, then drove eight hours north to the Brooks Range on the famous pipeline road to Prudhoe Bay. The Brooks Range lies within the Arctic Circle and thus provides a more predictable chance to see the aurora borealis. I timed my journey to coincide with a half moon because the snow-clad range would be properly illuminated by the half moon’s light. A full moon might actually have been too bright during the required 30-second exposure. I discovered that despite the fact that the aurora is in continuous motion, a 30-second exposure is usually fast enough to yield proper exposure and reasonably sharp lines within the displays. When I photographed this display, I was unhappy with its color, which appeared to be a dull, pale green. When I returned home and developed the film, I was delightfully surprised to discover that the film picked up the reds.
This photo is featured in the book “Edge of the Earth, Corner of the Sky” as well as being available as a fine are print.
Are there any photos in my collection you’d like to hear the story behind? Drop a comment below – your suggestion could spark an idea for a future blog post!
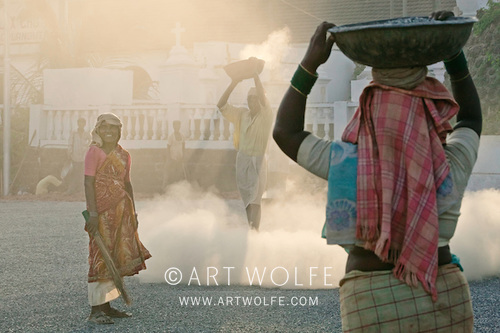
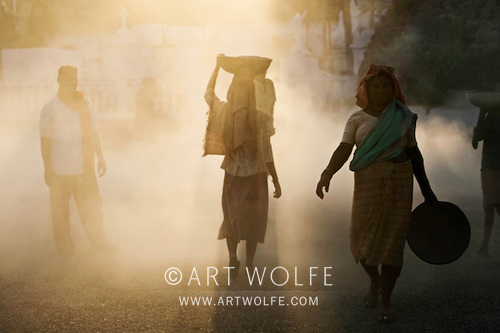
You never know what you will find when wandering around a city with a camera in hand. When light and subject and circumstance come together, magic can occur.
In this particular case, the facts behind the shot are nothing special. Workers had been putting gravel onto the parking lot of a restaurant in Panjim, Goa, which kicked a lot of dust into the air. Pedestrians were simply going about their business. However, when backlit by a late sun, the scene became street art–performance art. The activity of putting gravel down created an amazing atmosphere for a nicely layered image.
Standing back from the scene, I used a 70–200mm zoom, which enabled me to shoot a series of shots without interfering with the people so that they would not pay attention to my presence. I positioned myself looking directly into the late afternoon light so that the dust kicked into the air would be filled with light. I was not so much concerned about capturing details and faces of the people, as much as I was with the positions of the bodies within the frame. I kept shooting and reframing the shot as the scene changed every couple of seconds when the workers threw on the next load of gravel and different people came through the scene. I love the layering effect of the light and dust that comes from the backlight.
Photo tip: Dust, rain, humidity, fog, haze all add dimension to a scene when shot with backlight, light behind the conditions. It creates atmosphere and interesting changes in tonality and light, as well as creating layers in depth. Be careful that bright atmospheric conditions do not cause your camera to underexpose the scene.
Camera & settings used: Canon EOS-1Ds, EF 70–200mm F2.8 lens, f/7.1 for 1/160 sec., ISO 100
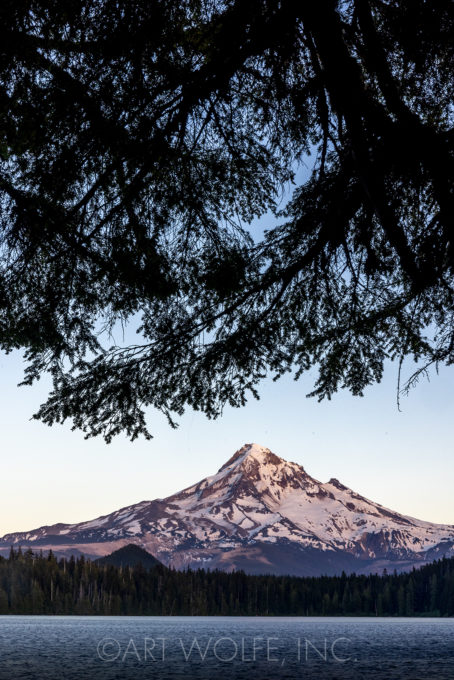
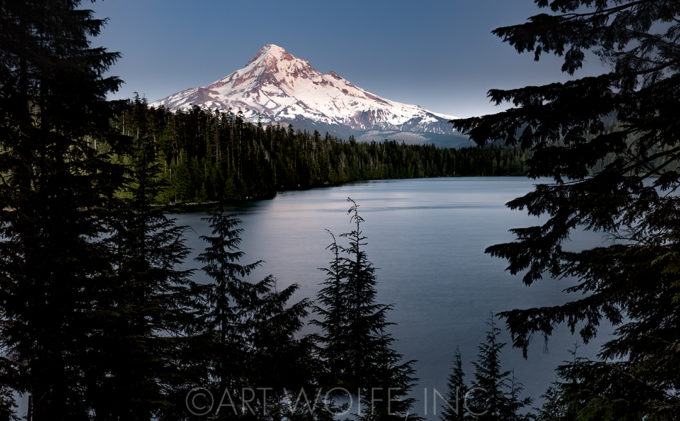
I’m in the midst of going through all my photos from several recent workshops – all back to back, so my editing time has been limited! I did pull a few of my favorite shots from Oregon’s Lost Lake, looking out to Mt. Hood – the tallest mountain in the state, and also a dormant stratovolcano.
I often talk about the many ways to shoot a subject, and even from essentially the same vantage point you can find ways to make even a giant mountain feel different, and tell a different story.
For starters, the environmental portrait! This is a great way to open when sharing your photos, giving context to the scene. Here the calm lake is prominent, framed by the iconic evergreens of the pacific northwest. We get a good sense of place for the looming mountain.
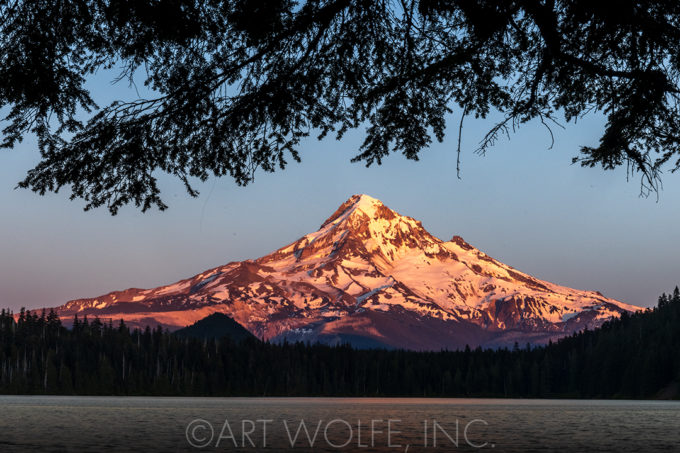
Here we have the same elements – the lake is still present as well as the trees, but the mountain has become front and center. The lower sun is casting warmer hues on the mountain, separating it from the background. We still get a sense of place, but the mountain has become the star!
Here, the mountain is definitely the star feature. The lakes and trees still inform a bit of the environment, but the great mountain is free of the framing branches that kept it from feeling quite as prominent.
And finally – a vertical that takes us back to the sense of place – standing under the shady limbs of the evergreens. From all these shots, you can see from the forms and patterns on it’s surface that my angle on the mountain hasn’t changed – just taken a few steps one direction or another, gotten down lower to the ground, or tried a different focal length. Small differences can completely change the results of your shot!
While I’m always adding new workshop location destinations to my list, it’s inevitable that I end up photographing in many of the same locations time and time again. Part of the draw of an Art Wolfe workshop – especially here in the Pacific Northwest – is the expertise we have on these locations. So how do you find new ways to challenge yourself while coming away with new images from a location that you’re already familiar with?
Aside from the obvious, try to find new conditions and lighting. A night shoot can completely change a composition as the light sky darkens and the scene becomes a study of star and moonlight. Go outside your comfort zone and toss a lens on your camera that you hadn’t really considered, like a wide angle or fish-eye trying different points of view and perspectives.
Most importantly – move! Depending on the lens you are using, moving a few feed can make a huge difference. Move around, turn your body – get low to the ground. Abstract your subject into studies of color, shape, and form. The ideas are endless! Just a small example – I spend so much of my time at home working in my garden, yet it’s always surprising even to myself when the inspiration takes me. I can grab my camera and spend hours seeing it from a new perspective.
How do you keep it fresh? leave a comment below with your ideas! And if you want to join me and explore them in person and see how I get the most out of a familiar subject, I’ve got a Mt. Rainier Fall Color workshop on the calendar!
In the good old days of film ISO 100 was considered fast and on the margins of the day with every increasing exposure times you had no choice but to pan with your subjects as they moved. Today we’re getting spoiled with digital cameras that yield acceptable images at exceptionally high ISOs.
So this is a reminder to dial back to good old ISO 100, even put on a polarizer to lose another stop or more and put some emotion and action back in your shots. It takes practice – try this technique with the wind blowing a field of flowers, a crowded market, street scenes… it’s not just for animals.
When using a tripod the contrast of tack sharp architecture and blurred people can be very effective. Share your results if you have some as well!
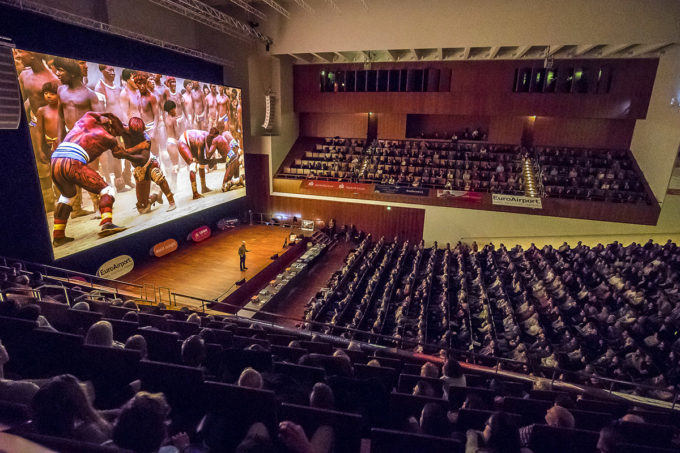
If you caught the recent episode of Tequila Time, I shared images from our recent Olympic Workshop and also discussed just a few of the many lessons we teach in this beautiful location. Sure, there are the typical scenic shots to capture- but anyone can set up a tripod and take the same old shot. This doesn’t help us grow our visual vocabulary, however. Fine if all you want are the token travel photos!
A keen eye that’s trained to find the beauty in the less-obvious is going to come away with the more interesting and unique shots. While each one may not be a masterpiece unto itself, every shot in which you are mindfully seeking compositions that hold the viewers eye in the frame represents a cognitive effort to improve your artistic eye.
Much like a truly invested fine artist will more often than not have dozens of sketch books of incomplete works, never intending to see the light of day, it’s through this practice of finding a shot where others don’t see one that will translate to taking ALL of your photos to the next level.
In the video above are just a few examples of learning to see beauty and something worth capturing in scenes that others might quite literally walk right by. While you may want the big picture of the old-growth forest, it’s really the misshapen lumps of knotted limbs saturated in moss that show the verdant and wild nature of this location. What appear to be simple shots of limbs and trees are intentionally composed to frame the leading lines to keep the viewer’s eye engaged.
Again, not every shot you take needs to be in consideration to sell as a fine art print. On the contrary, most of your shots, much like the sketches of master fine artists are simple tools to train your eye over time.
Hard to believe it’s been over a year now since we all buckled down to distance in an effort to curb the pandemic! When this whole thing began my staff and I put together this post of some tools that might be useful to help you continue to be productive and creative at home.
Since we aren’t quite out of the woods yet, I figured we could re-heat this post and also solicit YOUR comments below about the tools and processes you’ve been using to stay busy and continue to enhance your photography tool kit – and I can pass your tips along in a future blog post!
Ten Tech Tools of the Trade (In No Particular Order):
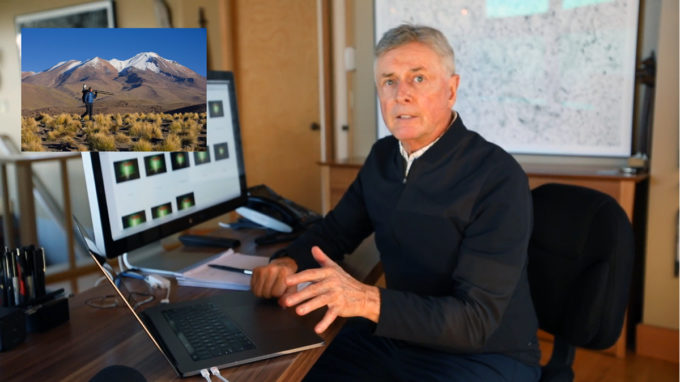
AW: Lets get the most obvious tool out of the way first as I’m sure most people are familiar with Adobe’s tools. I spend most of my time in Lightroom, where I use it as both an organizational tool, and to add some post processing to my photos. Most of the tools you’ll find here keep photography at the forefront, simulating many traditional practices in a much more simplified and speedy manner.
AW Staff Note: Art rarely uses Photoshop, however when I’m preparing his photos in final edit for a book project or print, it pays to have more control over the fine details. There are lots of tips out there for things like enhancing sharpness, reducing noise, and much more.
2021 Update: Check out Petapixel’s article on Adobe’s new “Super Resolution” tool for their Camera RAW app – create images 4x the resolution with virtually no loss in quality!
AW: This is a tool I’ve just recently started using. In the past, most de-noise tools operated roughly the same, or at least to my eye seemed to have similar results. This app from Topaz uses a new process to remove nose, and so far it works great.
AW Staff Note: It does take some time to process however, so make sure you have the time to spend getting everything just right, and pack your patience! Not that Art is ever impatient. . .
AW Staff Note: These are tools we use to edit audio and video. It’s not a huge part of what we do, but as they can come packaged with the other adobe tools we use it doesn’t hurt to have them. Premier is used primarily for cutting and editing video clips; AfterEffects is kinda like photoshop for video, and Audition is for editing sound clips to remove things like echo, mic popping, etc. . . they are complicated programs but just simple enough that most things you might need to do, you can find a tutorial online to get you through it.
AW Staff Note: Yep. Art doesn’t use this one himself either, but when we are working with video files, they are often for the web and therefore require slightly less fidelity than if we were say, creating an HD TV show with all the Audio/Video bells and whistles. But you also want to start with the best possible quality. That means huge video files. Handbrake is a great (and free) tool for taking huge video files and turning them into smaller video files that still look and sound great, with a lot of tuning available to get the result you want.
AW: Ah! Now we are speaking my language again. Currently I’m living in Keynote working on Pathways to Creativity, a new series of seminars that will be divided into chapters and made available for download, aiming for this fall! These programs are simple enough. I create all of my presentations in Keynote, whether it’s for an epic stage or a slide show at home. Lightroom does have a built-in slide-show feature as well, but Keynote gives me more control.
AW Staff Note: Powerpoint and Keynote are similar so if you’re on a windows-based computer, PP might be your option. They mostly play nice together, but aren’t without some small issues if you’re going back and forth.
AW: I don’t personally use Photoshelter often, but I have their plug-in installed in Lightroom. When I export my photos it can be pre-set to upload automatically to Photoshelter assuming I have an internet connection, so staff back home can see my latest photos.
AW Staff: Photoshelter is a great way to store, organize, and share your photos online. We use it to drive our stock site and host innumerable images. We’ve had very few if any service interruptions or down time in my experience with it. There are a lot of options for sharing your work, and also protecting it with watermarking and small file downloads.
AW: This one goes without saying – if you’re taking photos, share them! And follow me – maybe you’ll get a follow back – in fact, if you leave your handle in the comments below, I’ll be sure to do so.
AW Staff: One thing you’ll notice about Art’s Instagram page is that we try to avoid the square crop when possible and aim to preserve Art’s preferred aspect ratio for his images. We accomplish this in a simple manner – a square background slightly off white (RGB all set to 251), and then size the image to fit within the square.
AW Staff: YouTube gets more traction, but I find Vimeo to be more user friendly. The best solution is to use both if you’re using these tools for promotion. Don’t forget about the Handbrake tip – you don’t want to spend hours uploading a huge video that is going to soak up your storage space!
AW: Having a place to dump or receive files on the road or while travelling is incredibly useful. Both DropBox and Google Drive are good options and easy to use. Photoshelter is limited to just photographs, so having another way to store and transfer other file types online is necessary.
AW Staff: Another shout out to wetransfer.com as well, a free service (with some paid options) where you can send files to people to download via emailed link.
AW Staff: Last but not least with everyone working from home these days, we use GoToMyPC.com to connect to the office. We’ve never had any issues using it, and after the initial setup it’s very easy to use. There’s also a file-sharing option to make transferring files between computers easy and painless.
AW: Well, that rounds out today’s list, though there are plenty of other tech tools out there. Comment below if you have any additions or suggestions for things we should be taking a look at while we have the time to do so.


 You never know what you will find when wandering around a city with a camera in hand. When light and subject and circumstance come together, magic can occur.
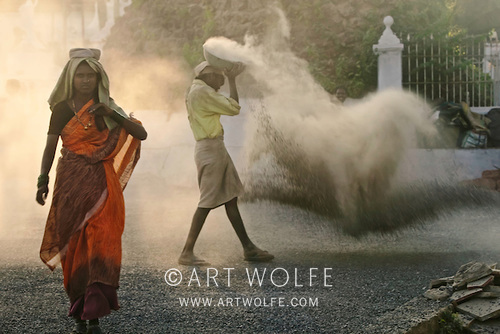

 Here we have the same elements – the lake is still present as well as the trees, but the mountain has become front and center. The lower sun is casting warmer hues on the mountain, separating it from the background. We still get a sense of place, but the mountain has become the star!
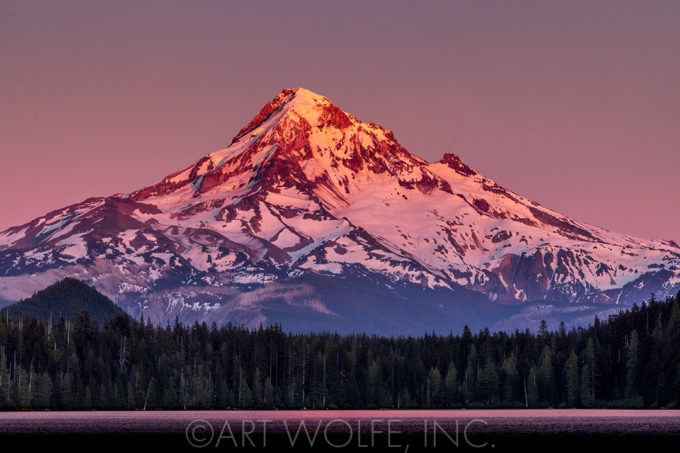 Here, the mountain is definitely the star feature. The lakes and trees still inform a bit of the environment, but the great mountain is free of the framing branches that kept it from feeling quite as prominent.