Currently, I’m in Chile viewing the total solar eclipse visible from South America, and it makes me hark back to when I traveled to South Australia back in December 2002 to photograph a total eclipse there. At the time, I was photographing landscapes for my book Edge of the Earth, Corner of the Sky and I thought this would be an amazing opportunity. I’d seen many technically excellent photographs of total eclipses over the years, but quite honestly they all looked pretty much alike. My objective became capturing the eclipse in relation to the Earth.
The solar eclipse that occurred on December 4, 2002, was noteworthy when viewed in South Australia for a couple of reasons. First, the eclipse was unusually brief at 25 seconds. Also, it occurred less than 40 minutes before sunset, so the likelihood of an obscured view was greatly increased because clouds generally stack up along the horizon at that time of day. To maximize my chance of success, I decided to find the precise position from which to film the eclipse by experimenting exactly 24 hours before the eclipse. I also decided to try two cameras for two very different perspectives, so I used both a wide-angle and a 70–200mm lens, enabling me to take full advantage of the eclipse’s late hour by incorporating the landscape.
Most eclipses occur earlier in the day when the sun is much higher in the sky. For this book, I wanted to establish the connection of the eclipse with the Earth. I wanted the viewer to witness the eclipse as if they were standing there next to me under the gum trees. Since I could not determine exposure until totality began, I decided to use matrix metering on an automatic aperture priority setting. When totality began, I would simply engage the shutter using locking cable releases, hoping that the entire roll of film would run continuously through the camera. This would have happened had I not made one final decision: to auto-bracket my exposures. I discovered, too late, that the camera would not continuously advance while on the auto-bracket setting. After just three exposures, both cameras stopped advancing. By the time I figured out what was happening, totality ended. Fortunately, I did get proper exposures for both compositions. After the critical moment of the full eclipse, I continued to photograph as the eclipse continued, switching to other lenses and film.
To create these images I used two Canon cameras, an EOS-1N and an EOS-1N/RS, EF70-200mm and EF 16-35mm lenses, Fujichrome Provia 400 film, and a Gitzo tripods. For the images of the setting eclipse on the horizon, I used an EF500mm IS lens and Fujichrome Velvia film.
With a few extra days to spare, I met up with some friends in Yosemite. I was excited because there was no moon, but unfortunately, the clouds rolled in. I was able to get a few decent shots of stars and star-trails, but the most interesting nighttime image in this group is one that shows the climbers on El Capitan lit up like fireflies (final shot).
A few tips for shooting for the stars! (Sorry, I couldn’t help myself):
As far as equipment goes, in most cases you wont need anything special. Most of my shots end up being between 20-30 seconds in length. If you wish to shoot longer exposures you may need to use an intervalometer. It goes without saying, but I’ll say it anyways as an excuse to link my preferred band – you’ll need a tripod. Finally, your favorite wide angle capable lens to capture as much of the sky as possible.
Do your research! Find locations that have minimal light pollution. Here’s a handy map I came across. Checking moon phases is a must as well. The time period around a new moon is your best bet – you’ll never know how truly bright a full moon can be until you’re trying to shoot the stars! As mentioned above, a cloudy sky can also pose challenges. Ideally speaking you’ll find a place away from population centers on a clear night with the moon nowhere to be found, or at least in it’s most obscure phase.
As far as individual camera settings go, it’s impossible to give specific numbers because it will largely depend on the above conditions and the specific gear you’re working with. Most of my night shots fall into the ƒ/2.8 – ƒ/4 range and a focal length between 24-40 mm, with an exposure time of about 25 seconds. If you want me to take a stab at a starting point, 24mm and 25 seconds at ƒ/2.8 is probably a safe bet to give you at least enough information to make the proper adjustments.
That’s just the tip of the iceberg as far as photo tips go for shooting at night – but my garden needs me! For more information, check out CreativeLive – they have a few helpful courses on the subject!
It’s Technique Tuesday, and since the last little tip I shared was a very technical tutorial on creating panoramas in Photoshop and Lightroom, I figured we would go back to the basics with a more universal message that I think will help new photographers and those who may be struggling themselves with tunnel vision alike. With a recently added Abstract Astoria workshop happening soon, and my Photography As Art seminar happening in Seattle this fall, these are some basics I will find myself repeating!
What are you seeing as you photograph? How do you perceive the world and what’s important to you? This is something that goes much deeper than thinking about getting the latest camera with the most megapixels. Good shots come from cultivating the eye. Scrutinize every subject without prejudice. A good photo can be found in rusting debris lying in an alley of a big city or out in a pristine environment. Finding images everywhere is how you practice, how you improve your work. It’s about the subject only in how you frame it, and in the message you send with the photo.
Do you shoot any possible subject, whether a rusting can in a gutter, a grand ceremony in a foreign land, or birds on a beach? Or do you define yourself as a “bird photographer” or a “landscape photographer”? Try not to limit your subjects or how you define yourself as a photographer. Photographing without prejudice opens up the world! You can’t even walk into a grocery store without finding a viable subject. And along the way, you gain practice that cultivates your eye.
Practice Matters
You might think that composition comes naturally for professionals like us. Naturally, perhaps, after many years of doing it! There is no question that if you are to succeed as a photographer, you have to take a lot of pictures. This is sometimes frustrating for people who have invested a lot of money in the latest gear and want instant results since you have to take a lot of both good and bad photographs to get better.
There is an old joke about a visitor to New York City trying to get to a concert at Carnegie Hall. After getting a little lost, he saw a man walking down the street with a large cello case. He stopped the musician and asked, “How do you get to Carnegie Hall?”
The musician looked sternly at the visitor and said, “Practice, practice, practice.”
A concert pianist rarely gets up on stage and gives a bad performance, but only because he or she has had years of practice. That isn’t to say that you can’t get good pictures at whatever stage you are in, but it does point out how important it is to get out and take lots of pictures. Practice does matter.
The Subject, or the Photograph?
One thing that can hold photographers back from finding great images is that they focus too hard on finding the “perfect” subject. Whenever possible, try to avoid “trophy hunting” for subjects. That means going out and trying to find the same subjects that photographers like Art Wolfe shot, or going to major locations and photographing only the big, iconic subjects. Think about that. You can buy postcards of those big, iconic subjects that were shot under ideal conditions. When you start looking for subjects simply as trophies to be captured, you stop looking for the photograph.
If you simply look for subject matter, you’ll often be disappointed because the camera is not looking for subject matter. The camera doesn’t care what your subject is! The camera is simply looking at light and shadow and how to translate that into pixels. It is your job as a photographer to work with your camera to find interesting photographs, not simply capture a subject.
Looking at the art world outside of photography can be instructive. Painters have to figure out what the whole image is going to be, not simply the subject. They have to interpret a scene in a certain way on their canvas, rather than simply pointing a camera at a subject and pressing a button. Seeing through that “lens” can help you navigate the challenge of finding original compositions in the world you walk through every day.
In this book there are very few photographs of the big, iconic subjects that so many others shoot. Art looks for and finds subject matter that is going to translate into interesting photographs that appeal to him. He responds to the world around him as a place filled with photographic possibilities because he is not simply looking for an interesting subject. He is always looking for interesting photographs.
A topic that came up recently was just how easy it is nowadays to quickly create seamless panoramic images from stitched photos using Adobe Photoshop and Lightroom. It’s a simple process in either program, so if it’s something you haven’t tried or are just looking for a refresher on how to merge photos – this post is for you!
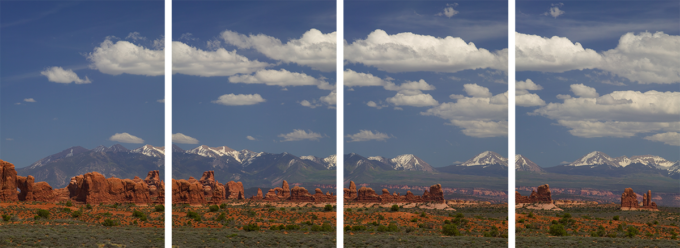
The first thing you want to do of course is choose the images you’d like to create a panoramic from. The photos should overlap just a bit, as the colors of the pixels are how the software will determine where to stitch the images together. Make sure you photograph your panoramas in portrait format to get the most amount of pixel real-estate for the highest resolution final image!
Once you’ve made your selection of images, you’ll then need to choose between using Photoshop or Lightroom to merge them together. The base Adobe Creative Cloud subscription includes both, so it’s really a matter of your familiarity with one or the other.
Both processes are simple enough. I’d say if you’re looking for quick and easy results the Lightroom method is a good starting point, but if you want a little more control the Photoshop method offers a little more. Better yet, give both a shot to see what you prefer!
In Lightroom:
1.) Import the images you wish to merge together
2.) From the top menu, choose the “Photo” drop-down and find the “Photo Merge > Panorama” Option
3.) In the Panorama Merge Dialogue box, ensure “Spherical” is selected for the
projection. You can also choose “Auto Crop” to automatically crop away the
transparent edges. Finally, ensure “Auto Settings” is checked.
4.) Click “Merge” and your panorama will be created!
In Photoshop:
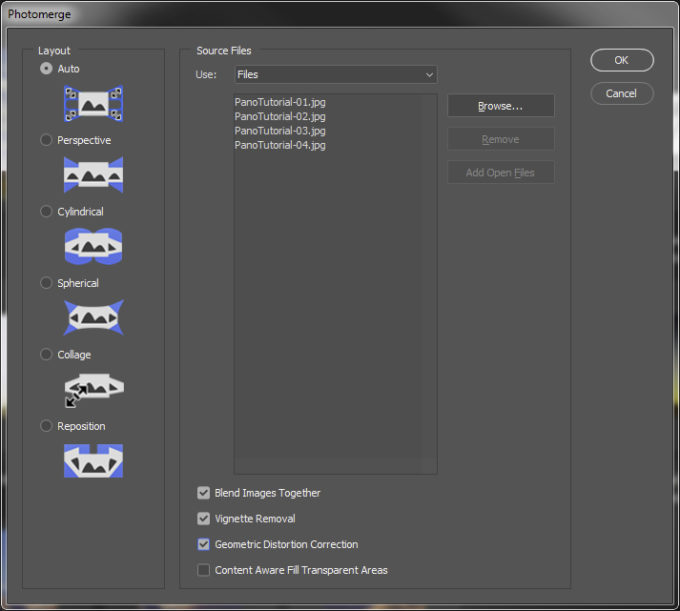
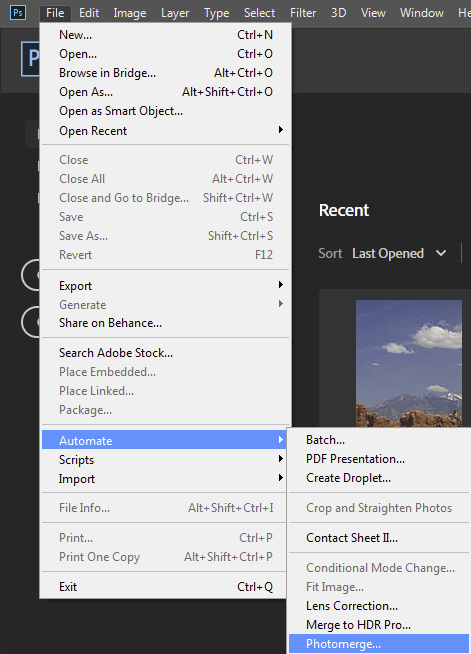
1.) From the “File” menu, choose “Automate” and then “Photomerge“. 2.) In the Photomerge dialogue box, ensure “Auto” is checked under “Layout“.
In the “Source Files” box, be sure “Use:” is set to “Files” and hit the
“Browse. . .” button.
Choose the files you wish to stitch together. In this case we will use four
PanoTutorial.jpg images in the Pano Tutorial Images folder.
Be sure that “Blend Images Together”, “Vignette Removal”, and “Geometric
Distortion Correction” are all checked.
You can also choose to check “Content Aware Fill Transparent Areas”, but this
will add to processing time and attempt to fill in edges with content sampled from
the image, which may require more advanced Photoshop experience to ensure
there aren’t repeated elements in your image.
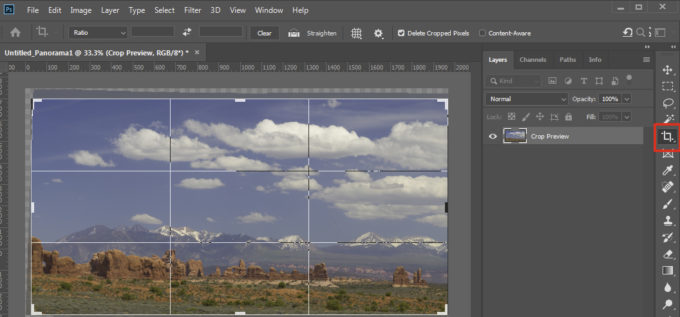
3.) Click “Ok” and the Process will begin. Depending on the size of the images being
merged, it could take several minutes to process the images.
4.) Once the image has processed, from the top menu, choose the “Layer” drop down and
choose “Flatten Image“.
5.) Using the crop tool (highlighted in red below) crop the image to get rid of transparent
areas, and also use the rotate ability of the tool to ensure your horizon is straight.
Those are the basics – There are obviously a lot of other options in those dialogue boxes. . . I suggest experimenting to see what different settings do to come up with a process that works for you!
I recently took a trip up to Northern Canada to photograph a variety of owls, and came away happy – if not chilled to the bone. It’s cold up above the 51st parallel, no matter the time of day. That didn’t seem to impact the hunting owls of the region, who’s keen senses can detect rodents beneath the snowfall dozens of meters away. They essentially do a graceful face plant into the snow, rummage around, and come away with a snack.
The light sky and the bright white snowy landscape make shooting a challenge. To control the light and capture a quality image, one first has to understand light in terms of it’s relationship to photography. This excerpt from “Chapter 6: Reading the Light” from The New Art of Photographing Nature explains it more succinctly than I might in a blog ramble:
Without light we would have no color. And without light, there would be no photography. In fact, the word photography derives from Greek roots meaning “writing with light.”
Primitive man did not have the benefit of science to explain natural phenomena such as the rainbow. Nor did we, until Sir Isaac Newton’s use of the prism separated white light into its component colors. Light is a form of electromagnetic energy, which, in the whole spectrum of frequencies, is only visible as colors in a very narrow band. Other frequencies, such as infrared, ultraviolet, gamma, and X-ray radiation, are invisible to our eyes.
Yet, despite our basic understanding of light, it is something we are apt to take for granted, like the rising and setting of the sun. But in photography, we can never take light for granted, and must learn to perceive it many nuances. The quality of the light creates a variety of colors and moods. Light also models form, and the direction of light is crucial to how we perceive shape and depth in the landscape.
When talking about light, it is important to distinguish between quality and quantity. Quality of light can, for the outdoor photographer, mean the time of day, the angle of the light striking your subject or whether it creates high-contrast or low-contrast conditions. It can also be measured as color temperature (in degrees Kelvin) with daylight on a sunny day being around 5500 degrees Kelvin. While color film required filtration to correct for changes in color temperature, digital cameras have a built-in white balance function that can adjust the camera to virtually any lighting condition, indoors or out.
Quantity of light refers simply to the amount of light reaching the camera’s sensor and recording an image. It is by controlling this light, through changes in aperture and shutter speed, that we arrive at a proper exposure.
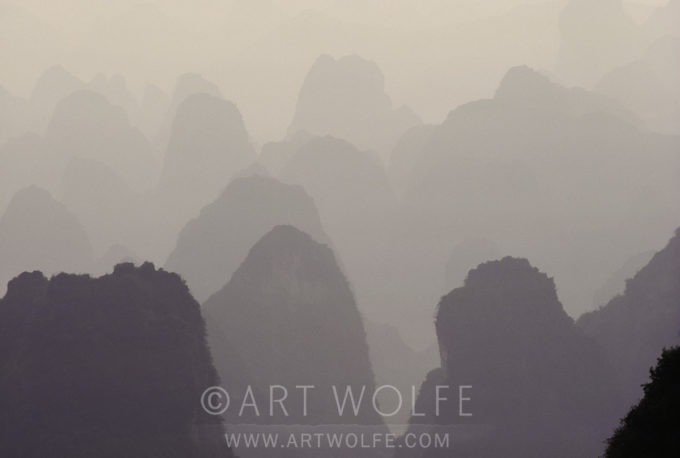
In the shot of the karst mountains in Guilin, China, I wanted to emphasize their repeating pattern and unusual shapes: individual humps instead of long ridges. I used my 80-200mm lens to zero in on an area that I felt made the strongest statement.
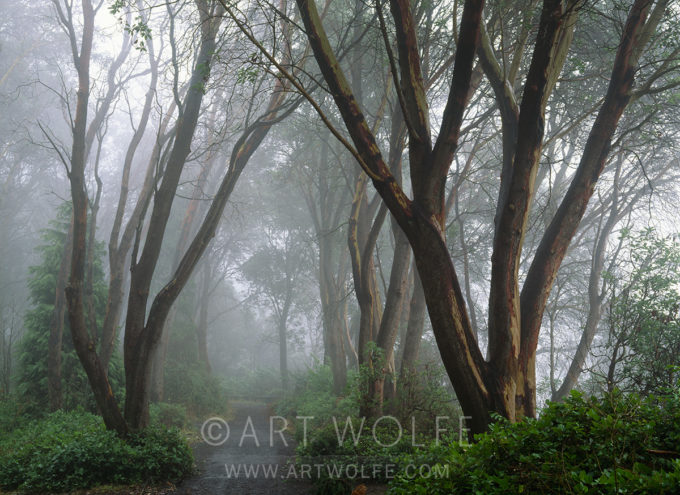
The second shot was taken a few minutes from my home in Seattle. I grew up in this neighborhood, and as a boy, I loved this path especially, with its graceful madrona trees. I went back to photograph it forty years later.
Madrona trees in mist, Washington. 45mm lens, f/22 @ 4 sec, Fujichrome Velvia 50
Spatially, light objects stand forward of dark in our normal experience of perception. When we have atmosphere such as fog, however, it is the reverse; dark objects are closer to us than light ones, as in the mountain scene. We understand this perceptually because atmospheric haze intervenes and makes the far mountains paler and less distinct. This is sometimes referred to as “atmospheric perspective.”
We also understand crisp outlines as close and fuzzy ones as distant, as with the trees in the fog, which is contrary to normal perception, where we can see distant objects in focus as well. The sense of space in both these images is definitely enhanced by the fog. Forms are more noticeable without competition from intricate detail. The tree trunks stand out more without the busy clutter of foliage. Because it shrouds things from view, fog, more than any other atmospheric condition, creates mood and a sense of mystery.
For more how-to lessons, purchase The New Art of Photographing Naturein my online store!
With SNOWMAGEDDON hitting the Pacific Northwest, a timely themed #TechniqueTuesday is in order! This is an entry from Photographs From the Edge, where I’ve combined the stories behind some of my most recognizable career photographs, as well as providing tips, techniques, and camera data for them. Enjoy, and I hope everyone back home is staying safe in the Winter weather!
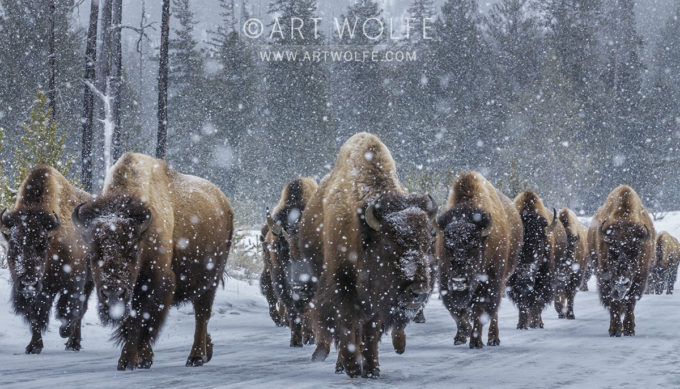
Canon EOS-1DX, Canon EF 70-200mm f/2.8 lens, f/18 for 1/250 sec., ISO 2000
This image of bison in Yellowstone National Park really began when I co-led a rafting trip down Alaska’s Taku River a number of years ago. On that trip I met Robert Bateman and his wife Birgit. This outstanding Canadian artist spent time photographing details of rocks along the river’s edge or details of the forest. I had to ask what he was doing. He simply responded that he was taking details that he could later render accurately as details in his paintings.
At that time I had been fixating on getting closer and closer to animals and ultimately getting that classic portrait of that animal almost as if it was a trophy. The analogy was that I was a hunter with the camera. Bateman made me take a serious look at how he would he was less concerned about portraits of animals and more concerned about capturing an animal within the context of its environment. I looked at my own work and started realizing he was right.
Bateman showed that by creating atmospheric conditions and a sense of place, the composition become more nuanced, more intricate, and more involving for the viewer. In the years after meeting Bateman, I think my work became infinitely more interesting by being more inclusive of the environment. From that point forward then I would always look at storms and thick atmosphere as opportunities rather than distractions.
This image of bison in Yellowstone works to carefully include the animal’s environment. With the advent of higher ISO cameras, I can shoot with both a smaller aperture and a faster shutter speed. Here, I was able to capture a herd of animals with great depth of field, and to use a fast enough shutter speed to stop the movement of snow. So in this image of the buffalo in Yellowstone, you can see tiny points of white snow suspended in motion as well as individual animals clearly in focus. To me, this photo recalls some of the great paintings of Robert Bateman.
Photo tip: For falling snow to show up in a photo, you need contrast to set the snow apart from the rest of the scene. In this image, both the dark trees in the background and the dark fur of the bison help bring this contrast to the image. The falling snow behind the bison also lend a strong sense of atmosphere to the shot.
The nature of the photo: Snow is extremely variable in size and shape, which has a strong impact on how it appears in a photo. Very cold conditions can create tiny snow crystals that will appear more as fog than snow in a photo. Large snowflakes can be a bold part of a winter photo.
For more photos and the stories behind them, along with tips and techniques, purchase Photographs From the Edge in my online store. As always, make a request note in your order and I’ll give it a signature!
And if you missed it – check out the gallery of images from my recent return trip to Yellowstone.
Since they are a niche piece of equipment, not everyone is familiar with what exactly a tilt-shift lens is and what they are used for. Admittedly, I’ve only used them sparingly in my career. Speaking in simple terms, a tilt-shift lens is a lens that allows the optics to tilt and rotate in relation to the image sensor on your camera.
When you take a photo with a standard lens, your lens and the sensor create planes of the same angle. At a wide aperture, everything in front of and behind your focus point will gradually become more out of focus. Using a tilt-shift lens, you can achieve more control over what is or is not in focus by having greater control of your focusing planes, therefore keeping more of the image both in and out of focus, depending on what you’re looking for. It should be noted that there is no auto-focus available on T/S lenses.
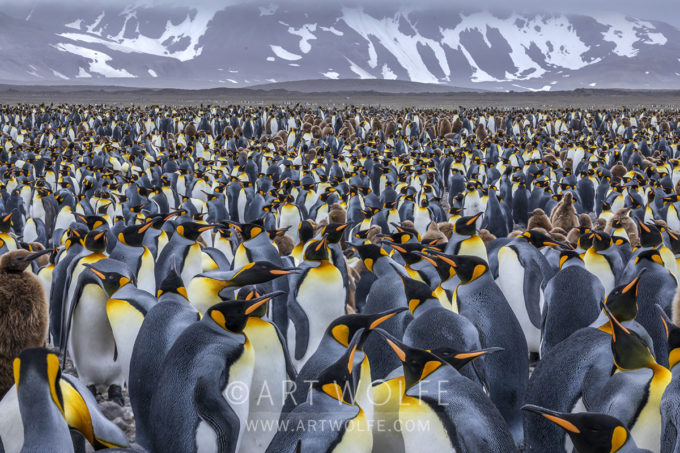
You can use this flexibility to achieve a number of desired outcomes. Although on short notice prior to my trip my Canon rep was unable to get me the lens, I was able to rent the Canon TS-E 135mm f/4L MACRO from borrowlenses.com and use to great effect while photographing a king penguin colony on South Georgia Island. By tilting the lens down, you’re essentially moving the plane of lens to be closer to the angle of the the ground and in effect, widening what falls into the range of focus. This allows you to utilize some of the benefits of a relatively lower aperture while still achieving a great deal of detail.
This is just one use and effect achievable with a tilt-shift lens. Even if you’re not familiar with their use, it’s likely you’ve seen photos or even video utilizing the concept. In portrait photography, where a longer lens is ideal to bring attention to the subject and blur the background, a tilt-shift lens can be used to use such a lens in a tight space. In architecture, having greater control over your image plane can be used to combat the distortion that often happens to parallel lines. If you’ve ever seen a photo of a cityscape that looks more like a scale model than an actual city – that’s a tilt-shift lens in action!
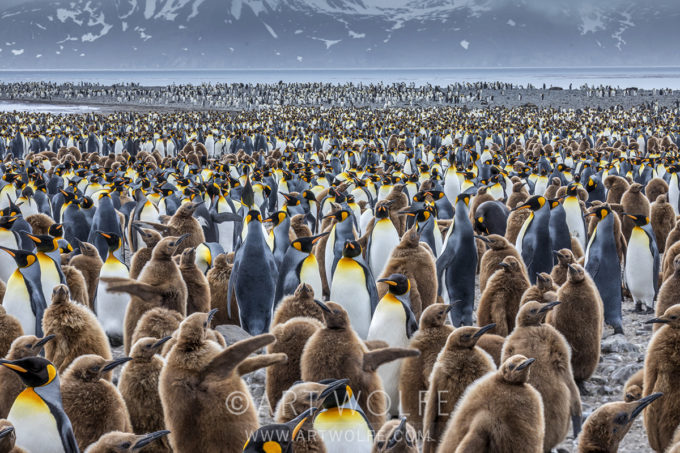
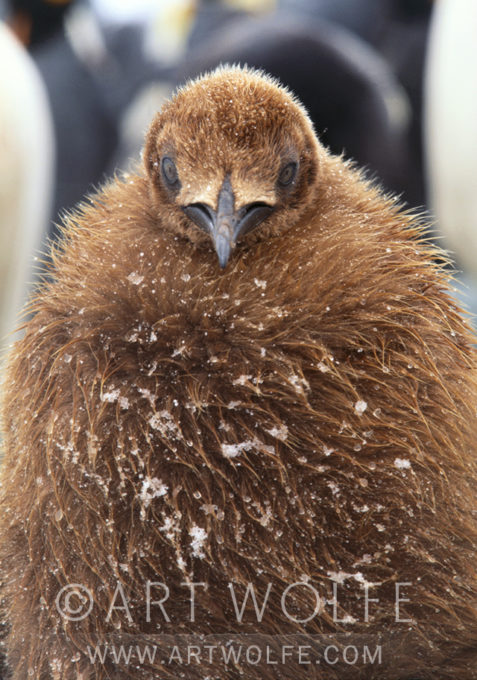
The nature of the photo:King penguins are second only to emperor penguins in size. Mostly they live on islands north of Antarctica such as South Georgia Island, rather than on the continent itself. They feed on fish and squid from the ocean nearby which is known for its diversity of life. Canon EOS-1N/RS, TS-E 90mm f/2.8 lens, f/16 for 1/125 sec., Fujichrome Astia
South Georgia Island is a great place for penguin photography, but it is an extremely remote island in the South Atlantic that is difficult to get to. While working on my book, The Living Wild, I worked out a way of getting onto South Georgia Island and camping for six days. My assistant, Gavriel Jecan, and I were dropped off by an American tour boat then picked up six days later by a German passenger ship coming from Cape Town, South Africa.
During our stay, we faced all sorts of weather, but primarily wind and snow. This can be miserable for the photographer but such weather is often stunningly beautiful for the pictures. I love atmospheric conditions and blowing snow is one of those conditions that convey a sense of the primordial and timelessness to the image. Still, it made for difficult shooting.
You can see all of the penguins are hunkered down to withstand this turbulent weather. We were trying to shoot videos as well as stills. The wind meant we had to stabilize the image with a heavy tripod. A small f-stop of f/16 kept all the penguins in focus. One thing a still photo doesn’t convey are the sounds and smells of the moment. Certainly the smells of hundreds of thousands of penguins is something I’ll never forget. The sounds of the birds, the trumpeting of the adults is a sound that is forever etched in my brain. Simply put, it’s one of my favorite places to visit on earth.
Photo tip:
A simple tip this technique Tuesday, but an important one to consider – If you suspect challenging weather, be sure you are prepared for it with the right clothing, boots, gloves and hats. If you are too uncomfortable, you are not going to stay outside for the unique possibilities that weather might bring. When conditions get tough, dramatic and unusual photographs are often possible then.
For more stories, technical details and tips relating to some of my most well-known photos, check out the book this excerpt was taken from in my online store – Photographs from the Edge.
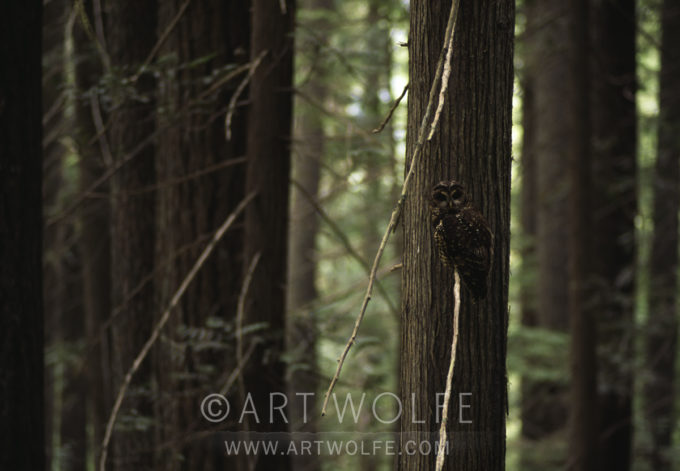
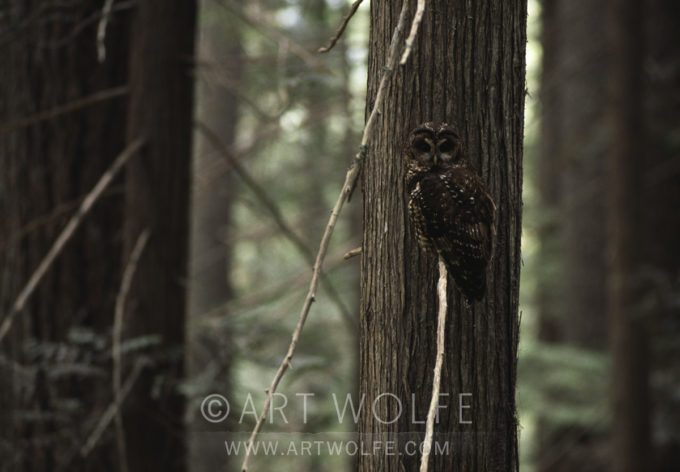
AW: In these three shots of a spotted owl, we see how the owl changes in importance according to its relative size in the frame. In my opinion, no image is stronger than the other; they simply say different things. The first composition is a shot of old-growth forest that happens to have an owl as an element (80mm lens). In the second, the owl is clearly more evident, and still enough forest shows to create a strong sense of place (200mm lens). But in the third, I’ve eliminated most of the forest and the owl is clearly the dominant element. It is a more rewarding view of the owl, and of the textures of the trees, which you can now fully appreciate. The sense of forest is definitely gone (400mm lens).
MH: In each of these images, the owl relates to his surroundings in a different way. In the first, he is hardly visible, blending in beautifully with his surroundings. It is interesting that here, the light-colored branch, rather than being a detracting element, actually leads our eye right to the owl. The forest, with its strong vertical lines, is clearly the dominant element in the frame. If I had a story to illustrate that emphasized the need to save lots of habitat to provide for one owl, I would use this version.
In the middle frame, there is much more of a balance between the bird and the forest. The owl stands on its own, without being overpowered by the trees. This would be a classic opening shot for a story on spotted owls and old-growth forests.
In the last image, you have a portrait of the bird. Now, too, the lighter limbs of the trees actually take over as the strong linear elements in the composition. The owl’s soft shape stands out against the harder lines of the tree trunks, without losing the feeling of camouflage we had in the first version. Unless I had text I wanted to drop out of the space on the left, I’d crop this to a vertical to emphasize the owl even more.

 Once you’ve made your selection of images, you’ll then need to choose between using Photoshop or Lightroom to merge them together. The base Adobe Creative Cloud subscription includes both, so it’s really a matter of your familiarity with one or the other.
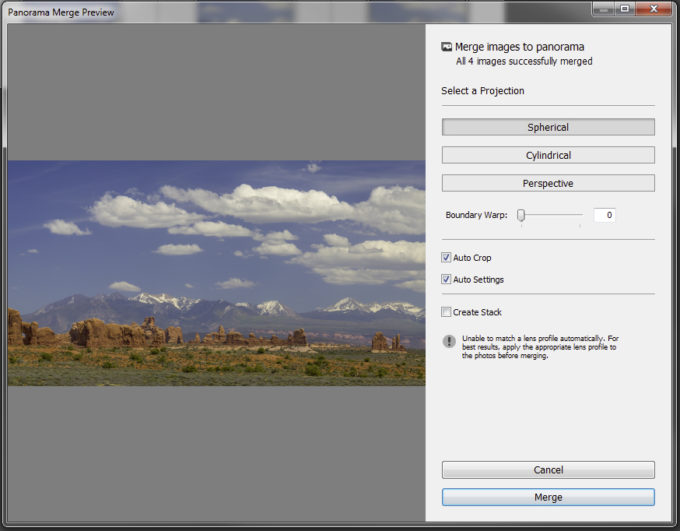
 2.) In the Photomerge dialogue box, ensure “Auto” is checked under “Layout“.