This excerpt is from “Photographs from the Edge”, which not only details the stories behind some of my most well-known captures from across the globe and throughout my career, but is also filled with tips and tricks and equipment information.
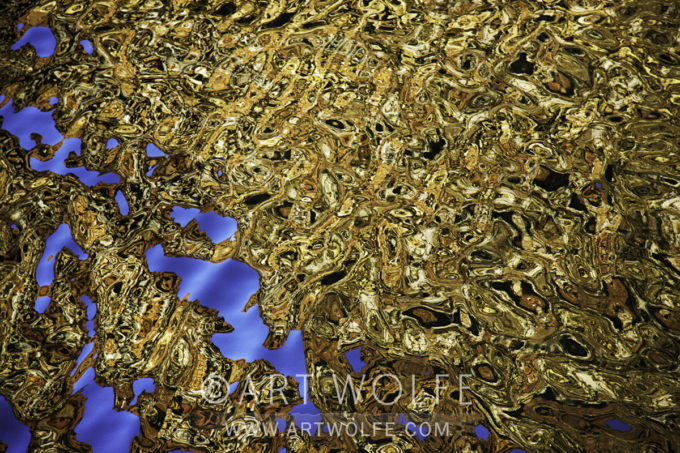
June 2013: Canyon Wall Reflection, Kimberley, Australia Canon EOS 5D Mark III, EF 24-105mm f/4 lens, f/4 for 1/1250 sec., ISO 2000
The nature of the photo: The Kimberley region of Australia sits in the far northwestern part of the continent. The area is known for its sandstone and limestone gorges and steep cliffs. The land has a maximum height of a little over 3,000 feet, but the terrain is so steep that the country is difficult to move through except by boat along the coast.
The fine art world has long been important to me, since that was what I studied in college. Many painters have influenced my own work. The image here reminds me of the work of Gustav Klimt and his homage to the pointillist painters of his time. These included a series of paintings of women with very ornate dresses.
As I traveled by boat through the inlets and canyons along the coast in the Kimberley area of northernwestern Australia, I found that the reflections of the canyon walls in the water reminded me of the color palette and design within Klimt’s dresses. In this image, you can see the ocher-colored cliffs reflected in the disrupted surface of this saltwater inlet, along with the blue sky above.
I love these moments where the abstraction takes on all sorts of forms that remind you of other things, things that become metaphors for me. You can get lost looking at the details of this image, seeing “faces” and other shapes. I find that these abstracted pieces with embedded images draw the viewer into them.
In the center of this photo, I see the eye and ears of a goat. Other people will see something entirely different. That’s how an image like this one can engage people on a very different level than simply one of recognition.
Photo tip: Water is a wonderful reflective surface in nature and offers so many opportunities for the observant photographer. Look for reflections, both on still water and on water that is disturbed and creating unique patterns and rhythms. Be careful of using a polarizing filter with reflections because it can remove key elements of those reflections on water.
This excerpt is from “Photographs from the Edge”, which not only details the stories behind some of my most well-known captures from across the globe and throughout my career, but is also filled with tips and tricks and equipment information.
July 2014: Rufous Hummingbird and Chick, Seattle, Washington, USA Canon EOS-1D X, EF 200-400mm f/4L IS USM EXT lens +1.4x, ƒ/20 for 1/125 sec., ISO 4000
The nature of the photo: All hummingbirds are remarkable birds for their amazing flight abilities. However, the rufous hummingbird, a bird about three-inches long and weighing about a tenth of an ounce, has the longest migration of any U.S. bird its size. It may go the distance from Alaska to well into Mexico, and some scientists think it may go as far as Panama.
I have spent 30 years developing and cultivating a Japanese-inspired garden around my house in Seattle. It has filled in nicely, creating a wild space by my home. I planted some black pines in my garden early on to provide year-round structure and color, besides refuge for birds and other wildlife. I have steadily shaped and pruned them bonsai style to help them fit into the space of my garden.
In 2014 as I was working on my trees, I found a bird staring me in the face. As I looked down past the bird, there was the nest. A rufous female hummingbird had chosen to nest in my beloved black pines! That sort of discovery still excites me after so many years connecting with nature.
A hummingbird nest is so tiny, no more than 2 inches across. The bird covers her nest with lichen, so it is easy to miss in the lichen-covered black pine. But luck had been with me, so I quickly descended from my stepladder and forgot about pruning the trees that day.
I wanted to photograph the mother as it raised its young, so I set up my camera about 10 feet away from the nest. Even that close, hummingbirds are really small, so I needed to use a 200-400mm lens at 400mm plus a 1.4x converter. I could then take pictures from the lawn chair without being so close to the nest as to disturb the mother. I had a field day for the next two weeks as this hummingbird raised its young.
Photo tip: Wildlife photography is rarely about just capturing the animal in a photograph. Timing can be critical to getting the remarkable, striking shot. You have to keep shooting, always paying attention, to be sure you do get that shot. Shooting your camera continuously will not necessarily get the shot, though, because the key moment may be between frames.
Maybe it’s time to think small, macro small. September and October in the Pacific Northwest present wet dew laden mornings which are perfect for photographing tiny intimate landscapes, insects in your garden, abstracting details of a flower into a wash of color, or a spider’s web suspending drops of dew.
When I talk about “macro photography” I’m not limiting myself to 1:1 or greater magnification. Macro to me is really anything that might fit in my 2 hands. A clump of clover or a close-up of a Macaw’s back showing detail in the feathers, fall into my definition of “macro photography” as does a butterfly’s wing or dandelion seed head filling the entire frame.
People often ask me what I would recommend for a macro lens and honestly I don’t generally carry one; they add too much weight for how often I find myself using one. Instead, I carry a set of extension tubes, practically weightless when compared to adding another lens to my bag, and at my age, less is definitely more (as in more walking, more shooting and more time out of the chiropractors office!)
I’ve asked Jay Goodrich to provide a few technical details on macro lenses and how extension tubes work:
To understand macro lenses you must first understand how a lens focuses on a subject. As you twist the focus ring, the glass optics inside move forward and back. Want to focus closer? Move the glass further from the sensor. Want to focus at 1:1 magnification? (1:1 happens when the object you are shooting is the same size on the sensor as it is in real life such as a quarter or butterfly’s wing filling the frame) Then your lens must be able to move the optics away from the sensor a distance equal to the focal length of your lens (This will vary based on the crop factor of your sensor). In other words if your 100mm lens can move 100mm from the sensor, you have a ‘macro lens’ able to focus close enough for objects to appear life size on the sensor. A 100mm macro lens will be able to achieve 1:1 (lifesize) at twice the distance from your subject than a 50mm macro lens would.
But what if your 100mm lens is not a “macro lens”? That simply means it is not able to move the optics a full 100mm from the sensor. Perhaps it can only move them 75mm and thus it can’t quite focus close enough to fill the frame with the butterfly’s wing. An extension tube is spacer that fits between your camera and lens and they come in various thicknesses. Having no glass at all they do not impact your image quality as a magnifying filter (also used for macro photography) would. So if you were to put a 25mm extension tube on the back of your “non macro” 100mm lens – you would then be able to achieve the full 100mm (75+25) of extension necessary to photograph your subject at 1:1 or 1x magnification.
So what does Art use in the field? He will add extension tubes between his 70-200 f4 lens. Without them, the lens has a minimum focusing distance of 1.2m and a magnification of .21x (about 1/5th life size). Adding a 25mm extension tube allows him to move in closer and achieve .42x life size. Stack additional extension tubes behind the lens and he’s able to focus even closer yet – all without adding an additional lens to his bag.
If you enjoy shooting macro subjects, an investment in a true macro lens is worthwhile. While extension tubes allow you to “make one” on the fly, they must be removed to allow the lens to again focus on distant objects and to infinity. You can even purchase a macro lens with enough extension built in to achieve up to 5x magnification – filling the frame with the eye of a praying mantis.
Most of the time stopping down to f22 and keeping your sensor plane parallel to your subject will give you enough depth of field to cover your subject. If not, you may need to “rack focus”, shooting several images with the focus point first on the leading edge of the subject with each subsequent image focusing a little further into the composition until you reach the furthest point you want in focus. Later you combine the images with Photoshop or Helicon Focus; the combined image will then look sharp across the entire scene from front to back.
I use macro photography to abstract the patterns, lines and texture found in nature; to give the viewer a different taken on an old subject. We’ve all seen photographs of flowers, force your audience to think a little, to tilt their head as they wrap their imaginations around your composition.
You can abstract just about anything you find in nature and even man-made objects. By framing tight on your subject you are able to show a pattern that is lost when looking at the whole. Your image allows a new appreciation for the subject which is unavailable without the photograph to isolate and show only what you, the artist behind the camera, is allowing the viewer to see.
Patterns come from the repetition of shape and textures, thus it is possible to get too close and not show enough of your subject, losing the magic of the pattern you had intended to show. If you love ferns for their delicate pattern of leaves, get in close, focus your attention on just one frond and enjoy the gentle curve of the main stem while playing with the beauty of the individual leaves branching out while ever decreasing in size to either side. A fully symmetric composition with the frond in the center makes a different, but equally effective statement as drawing the frond out of a corner diagonally, try it both ways to see what you like.
Sometimes if I am lacking for inspiration I’ll create a little vignette, a story, with the elements around me. On a beach I may grab some bits of seaweed, a shell, perhaps a dead crab or some muscles, and a bit of drift wood. I’ll loosely arrange these so as not to appear too deliberate or forced and play with the composition. This exercise can help to open me up to other options around me as I begin to see line and form that I may not have seen otherwise.
A good exercise for anyone, whether you are feeling stuck or full of inspiration, is to walk to a random spot, in your back yard, in the country, in the forest… and just stand there and take in the scene. Look all around you. It may take 15 min or it may take an hour, but you will begin to see opportunities on a macro, close up scale, which you may have overlooked in the past. The stained glass effect of a dragon fly’s wing, the rainbow of colors in a puddle, a sewer grate, the wabi sabi qualities of a dead leaf as it curls and browns. Photographic opportunities are all around if you open yourself to the possibility of seeing them.
Always keep a sharp eye for any distracting elements in the composition. Check each of the four corners for bright areas on the edges, twigs, dead leaves, hard edges. A grouping of pine needles close-up can make for an abstract of Japanese writing; a single pine needle in the corner can blow the whole composition.
As you head out to photograph the macro landscape, ask yourself about the difference between a tight shot of a flower that could be used in a botanical textbook as “figure 7.2”, and an artist’s abstract of that same flower. When you get in really close, can you start to see a Georgia O’Keefe or Claude Monet’s influence on the composition? Does the texture make you think of a pointillism painting where the entire scene is composed of dots of color? Go back and photograph those same flowers, mosses, and leaves you have shot so many times before, even those in your own yard, but do so through a new set of eyes, not looking to record nature but to abstract and challenge the senses of your viewer.
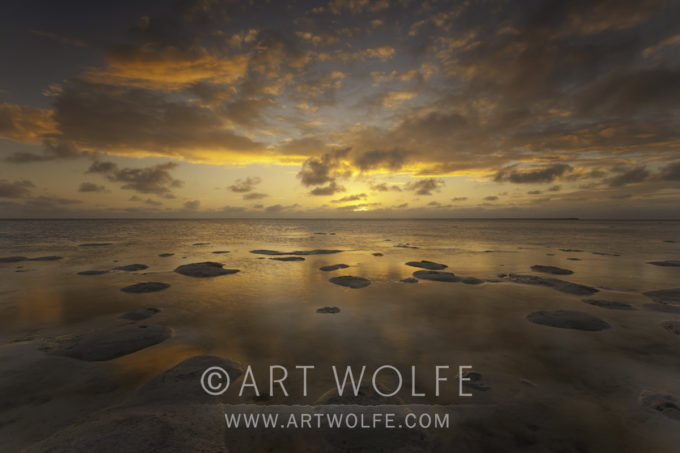
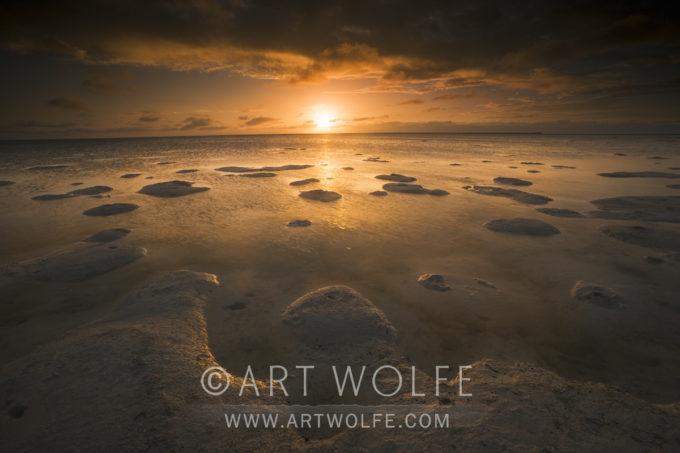
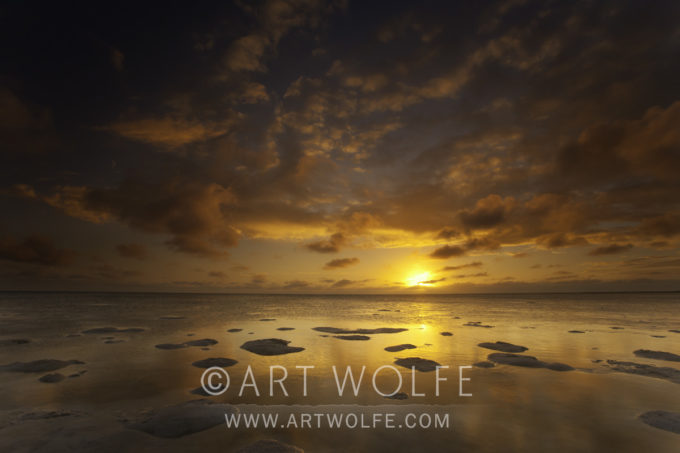
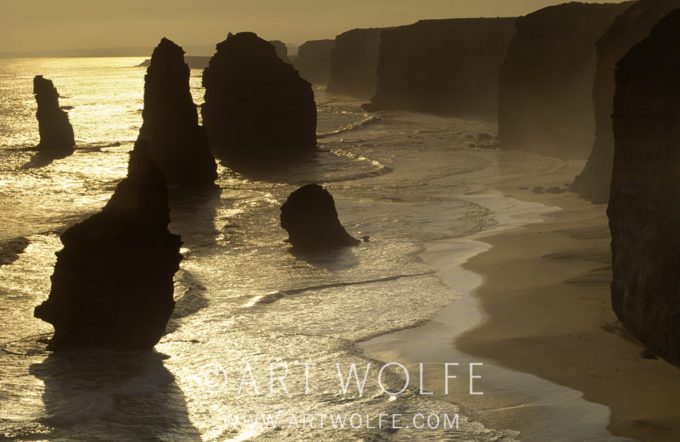
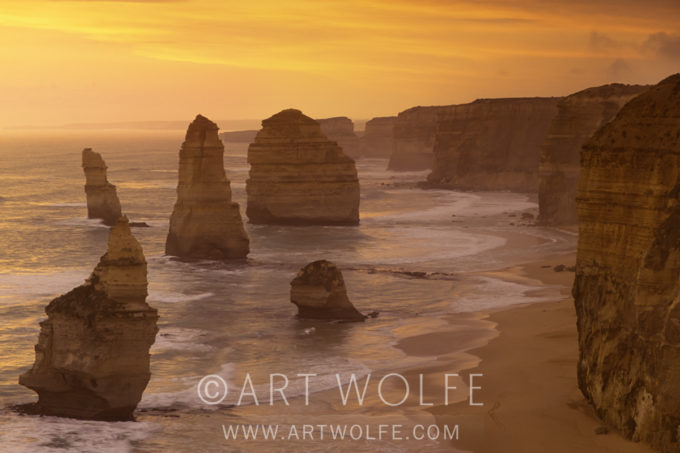
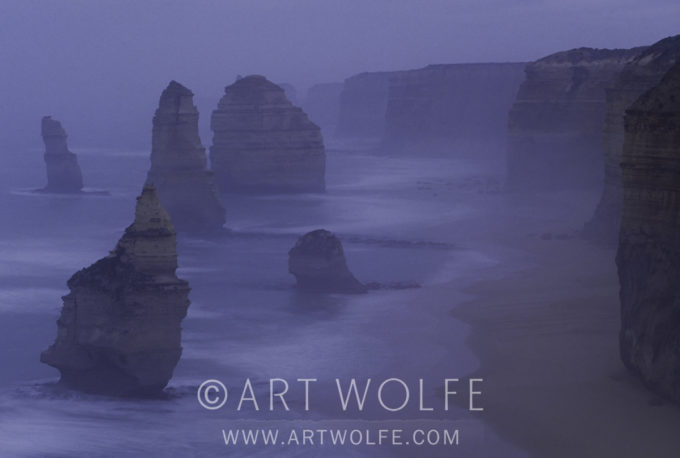
AW: One of the most common errors I see in portfolio reviews is the placement of the horizon in the middle of the photograph. In my opinion, this flattens out the image, creating less of a sense of depth. Placing the horizon high in the frame or low, on the other hand, can create a dynamic that allows the eyes to wander through the image far more easily.
In the first image, with the horizon in the middle, the eye just stops. In the second, the high placement of the horizon allows me to add more foreground, showing the expanse of beach and tide. There is a nice play between the forms of sand and the drama of the setting sun. In the third shot, with the horizon low in the frame, the focus is on the sun and how it reflects on the water, giving greater emphasis to the clouds overhead. High and low horizons create less predictable images and to my mind, offer a greater sense of depth and drama.
MH: Because the horizon line is so straight, it cuts the picture space into definite sections and has to be factored into what you want to emphasize. In each of these images, we get a slightly different sense. Placing the horizon in the middle might be desirable if stability and tranquility are what you want to convey. However, it relies on a very dramatic sunset to make a powerful statement.
With a horizon placed high in the frame, the foreground becomes more important, and requires either a texture or an interesting detail. However, if the drama of the sky is more powerful, then lowering the horizon is a better option.
This lesson and more from The New Art of Photographing Nature – Order yours today in my online store! As always, include a signature request and I’ll be sure to sign any books ordered through the store- however, my time between travels is limited so please note this can delay orders. If you want to get your prints and books signed in time for the holidays, now is the time!
Looking for a sense of scale can be another way of defining a composition and influencing how you place your subject. Scale is simply a way to give the viewer perspective on how big the scene is within the photograph.
Once you understand how to use scale, you can decide in each case whether or not to include it. Sometimes abstract photographs look their best when there is no sense of scale whatsoever, while big landscapes need it to reveal themselves to the fullest.
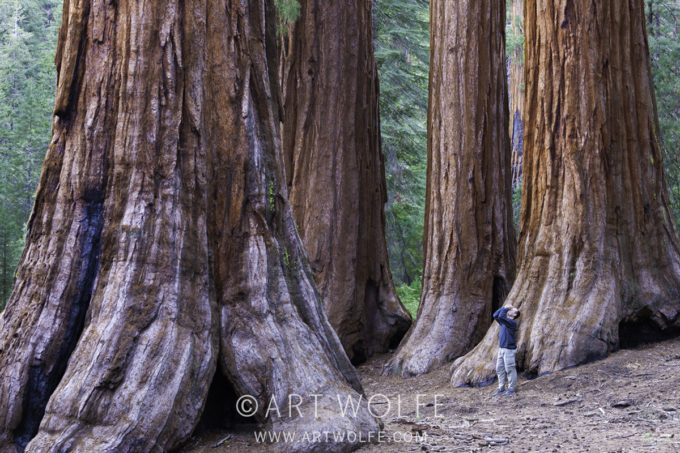
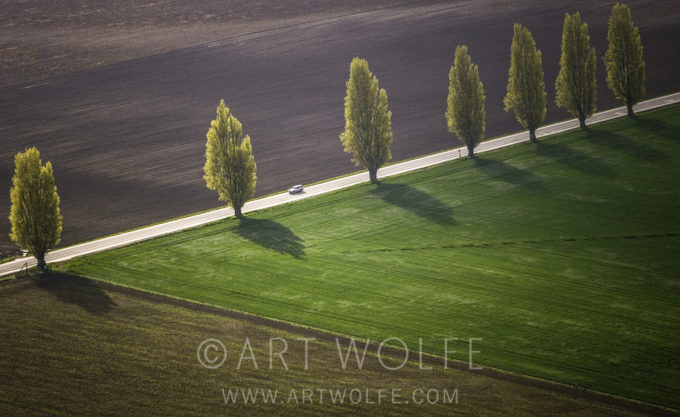
There are lots of things that can be used to convey scale within a photograph. Anything that is recognizable to viewers and will immediately convey an idea of its size will work. This is one reason why human figures are often used for a sense of scale in landscapes and street scenes. We know how big people are, and when we see a person in a scene, it gives us an idea of how big the scene is. People can also personalize a place and help a viewer better connect with it, such as in the example shown here of a visitor standing in Yosemite’s Mariposa Grove.
Park visitor, Yosemite National Park, California 70–200mm F4L IS USM, f/9 for 0.5 sec., ISO 400
Other useful elements are items that people use, from vehicles to houses; these have a human scale that people understand. Animals also provide a sense of scale, as shown in the image below, as do certain types of plants, such as a big pine tree, another evergreen, or a large cottonwood tree—iconic types of trees that people recognize and have an idea of the size of.
The trick to using any of these things for scale is that they must look like a natural part of the composition. A big mistake that people make when trying to convey scale is to simply add something to the picture without thinking about how it integrates into the overall scene. That always looks odd and gives the feeling that the object was simply added as an afterthought—which it probably was!
Never compose your picture around the object that is there for scale purposes. Compose your picture based on the various ideas discussed in this and other chapters, then look for a way to incorporate your object so that it contrasts with the rest of the picture but does not start to look like the subject. When you’re using an object for scale, it needs to be a supporting character for the scene, never the star.
In general, things used for scale work best near the edges of a composition or along the bottom. Don’t slam them against the edge of the picture; that looks awkward; put a little bit of space between them and the edge. By placing these objects well away from the center of the picture, you are telling the viewer that there is an important relationship between this object and the rest of the scene.
Often you’ll hear artists talking about diagonal lines within a composition. Diagonal lines can be very important to an image because of how they affect the mood and visual impression of a scene. However, diagonals are not just about line. You can have diagonal shapes and patterns as well.
Diagonals are always dynamic elements within a picture. They create a strong feeling of movement because the eye wants to move along a diagonal. There is something about the human mind that wants to follow a diagonal line. We will also follow a vertical line up and down, though we won’t really follow a horizontal line. Putting a diagonal line in with a vertical or horizontal line will create a very dramatic contrast. That can be a dynamic way of using a composition, but it can also be very distracting and disturbing for the viewer. You have to be careful about how you are using diagonal lines, shapes and patterns.
Diagonals also give a very strong dynamic feeling to an image because most diagonals in the real world are objects that have some sort of tension to them. A diagonal will typically be something that is moving or has the potential of movement. Diagonal objects in real life can look like they are ready to fall down so there is always a certain tension there. In addition, we know that if something that can move is placed on a diagonal surface, it is going to move down that surface because of gravity. That doesn’t mean that diagonals used in your photograph are looking like things are going to fall or roll down – it just means that there is a tension and movement there that people react to.
There is something very interesting that happens with diagonals when they are combined with horizontal and vertical lines. They can look like they are a support beam. Think about when you play the game, hangman. Most people draw the hanging post with a diagonal line between the vertical and horizontal lines to make it look like it has more support.
Okay, all of this can seem very esoteric and not very applicable to that landscape with a stream running through it. Yet as you start to look at that scene, you will start to see diagonals there that can help structure your composition and create a stronger design. Once again, becoming aware of these elements of design will help you use them within your composition.
Full midday sunlight is usually the worst for photography. Its direct overhead lighting produces flatness of form and washed-out colors. Most professional photographers choose mornings or afternoons, when light moves toward the warmer end of the spectrum. But it is not just for warmth of color; early and late in the day, the tonal range is less extreme. Digital cameras can record more subtle gradations of tone than was possible with film, but are still limited in how much dynamic range they can capture in a single photo. Under conditions of extreme contrast it is not always possible to record the full range of values.
You could think of the image sensor as being like the human eye, but not nearly as sensitive to the full range of light. In bright light, the eye can see all the tonal values from the brightest highlights to the darkest shadows because the iris automatically adjusts to the different light levels. Our brain also tells us what to expect. For example, a scarlet tanager registers the same color red in our mind, even though we might see it in sunlight or in shade. Cameras, however, have a smaller parameter of sensitivity. Their response to tonal extremes varies depending on the specific sensor used in a given camera model.
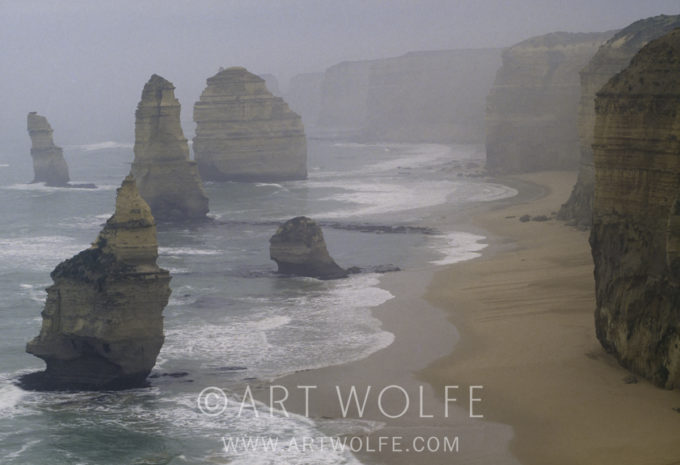
(early morning) Twelve Apostles, Port Campbell National Park, Victoria, Australia 80-200mm lens (in 200mm range), f/16 at 1 second, Fujichrome 50
AW: I first photographed the Twelve Apostles, sea stacks off the southern coast of Australia, early in the morning, which resulted in a very pastel image.
Late Afternoon – f/16 at 1/15 second, Fujichrome 50
MH: This series reminds me of the famous painting series, by French Impressionist Claude Monet, of the Rouen Cathedral. He always painted the façade from the same vantage point, but under different light conditions at different times of the day and year. The resulting comparisons were a symphony of color tapestries with varying vibrations and moods. The cathedral was not the point. It was the effect light had on its appearance.
Sunset – f/16 at 1/8 second, Fujichrome 50
Unlike the tourist who stood on the edge of the Grand Canyon, snapped his photo, and then said, “Okay, let’s go, I’ve got it,” we could stand in the same spot, every day, 365 days of the year, and have 365 different images. The subject will be the same. But it will not look the same because the lighting conditions will differ.
After Sunset – f/16 at 2 seconds, Fujichrome 50
Color, as we saw in chapter 4, elicits an emotional response. Mood by itself can be the subject of a photo, as it is in these four images. But more important, mood is one emotional link the photographer shares with the viewer. Each of us can probably pick a favorite. It might be interesting to ask yourself why you like one more than another.
For the last post on lenses we focused on the super wide angle, and how it affects perspective. Now I am introducing my favorite zoom lens for photographing wildlife, the 200-400mm. It has an internal 1.4 extender which is absolutely fantastic. It pushes the 400mm to 560mm and opens the aperture to get more light to the sensor.
I have been known to add an additional external 1.4 or 2 extender on top of this. This is recommended only in desperate situations, like when the snow leopards are spotted two miles across a Himalayan valley and you are on foot. Not only does the extender restrict light to the sensor, it magnifies the faults of the lens.
I use this lens for more than wildlife, though. Strong telephoto focal lengths are needed for photographing extreme compression effects, such as pulling in background elements like the setting sun to make them tower over the foreground subjects.
In addition, the telephoto allows you to:
cut down the angle of view and isolate aspects of the scene in front of you
get close to wildlife without disturbing it
frame simple compositions–look for little slices of design and interest within a landscape
Last and very important – to use this heavy lens effectively, you’ll need a sturdy tripod and a strong back as it weighs nearly 8 pounds.
As we are in the middle of a couple of West Coast workshops where coastlines, waterfalls, and woodland streams take center stage, now is a great time to discuss the use of neutral density filters. In the summer months where overcast days become rare even in a region fabled for it’s grey skies, ND filters are a necessary tool for outdoor photography.
Simply put, an ND filter will reduce the amount of light your sensor receives without affecting the color of your capture, therefore allowing you to use a wider aperture, capture a longer exposure – or both. This is especially useful when you’re shooting outdoors on a bright, sunny day, or trying to expose for soft waves and motion in water. If you’ve done this without an ND filter, then you know how hard it can be to get the exposure correct without having a blown-out sky and over-bright highlights.
ND filters come in several stops, with the cheaper 1, 2 or 3 stop filters being common – however I highly recommend spending the extra money on a 6-stop or even 10-stop ND filter. These will block out more light, and give you the greatest amount of leeway in using your camera settings to achieve your desired results.
A 6-stop filter will be good enough to expose for blurred waves and streams, and capturing the scene without an over-bright sky, while a 10-stop will create the foggy dream-like haze of water in motion. In either case, you will cut down on blown-out areas of your photo, balancing out the tones while keeping true-to-life colors and exposing for the proper amount of detail.
Though most of my use for ND filters involves apertures in the 11-13 range to capture all the details of a landscape, or as low as 5 for a scene that may not need all the details sprawling to the horizon, an ND filter will also allow you to open up your very wide. This way you can photograph a specific subejct outdoors on a brighter day while still keeping your aperture wide enough to achieve an out of focus background.
Some people are amazed to learn that I still enjoy getting out to photograph wildflowers. The greater truth is that I just enjoy getting out to photograph – anything. It fuels my soul, and as long as I can walk and hold a camera that’s where you’ll find me, out in the field working the subject, whatever it may be.
As spring gives way to summer, the snows on the mountains around Seattle melt away to reveal wonderful meadows of wildflowers. Mt Rainier is perhaps one of my favorite destinations for wildflowers, and so many can be found just a short walk from the parking lot. For those familiar with the area I like to head to Paradise, drive past the main parking lots and down the hill maybe half a mile, parking where the road crosses Edith Creek. From there you hike up towards the mountain and the wildflowers will soon surround you with a rushing creek and smooth boulders to work with. Hiking maybe a mile will afford beautiful views of Mt. Rainier filling the foreground with flowers.
When you head out to photograph wildflowers, one’s first instinct is to often isolate a perfect blossom at a 45 degree angle and go home happy. I call this the trophy shot – It looks just like the image on the packet at the home and garden store. We all have them, myself included, so get that shot – and then open your mind to more creative possibilities.
When I have lead workshops to Mt. Rainier in the past, I’ll let the students know that we have “arrived” at our destination for the next hour and they will politely line up on the trail and begin to photograph the first flower they see, usually right from the very direction they had approached it. After all, that’s why we’re here, no? No! We’re here to stretch our creative imaginations, to see in new ways, and uncover new possibilities. Consider how you approach the flower as you would any subject. Over the years I have critiqued so many photos and the answer is all too often the same, get lower and get closer.
My approach is generally to first walk through the area and get familiar with the myriad of options, perspectives, background possibilities, subtle differences in lighting. I’ll look at the subject from all sides possible before choosing a location to begin. Remember, recolonizing, fragile, easily accessible meadows like those of Mt. Rainier don’t allow for venturing off established trails. So please be aware of your surroundings, trail markers and warning signs.
Initially, I will photograph the larger scene with a wide angle lens (16-35, always with a polarizer adding a 2 stop hard ND filter as needed) helping to establish a sense of location. This can be useful later when trying to remember where I was when the image was taken, perhaps a hold-over from shooting slides when it could be three months before I would see any results from the days’ efforts. The wide angle lens allows me to include the surrounding plants, trees, terrain and mountains leaving the to flowers become a pattern of color in the lower foreground. I’ll look for leading lines in the pattern, gentle curves, a way for the viewer to interact with the image as they move through the foreground, middle ground and background – an old, well established formula from view cameras that still works today.
As I move in closer, I continue shooting with the wide angle lens, allowing first, a group of flowers and then individual blossoms to dominate the frame. This gives me the ability to still tell the story of location and environment through the greater composition. When people first purchase a wide angle lens they see it as an opportunity to get a greater view of the distant vista, to include the mountain and the surrounding hills – and are all too disappointed with the results. It’s not until they begin to see the wide angle as a tool for getting in close to the subject, I’m talking within inches – not feet, do they begin to see the possibilities.
Once satisfied, I’ll switch to my 70-200 lens and look to limit the composition to just the flowers themselves. Here I begin looking for those ubiquitous motifs in nature, patterns of petals filling the frame, alternating colors, lines and form, positive and negative space. Ultimately zooming from the wide end up to 200 mm abstracting the subject as I bring the viewer to see the flower in a unique way. I’ll then put on extension tubes which allow me to focus even closer. As you abstract the elements of the flower, digital photography now allows you to “rack focus” with a middle ground f-stop, say f11, shooting several images as you move the shallow depth of field marching towards the back of the composition, knowing later you will combine them into one image with a sharp focus throughout.
What about wind and movement? Use it! Sure you can purchase a “Plant Clamp” to hold the flower steady in a light breeze but why not use the movement to your advantage just as you would with flowing water in a stream. Try longer shutter speeds to abstract the flowers to a wash of color. Even introduce your own movement by intentionally panning with the camera up, down or sideways during the exposure. You may be surprised by the results, perhaps pleased even.
Working the subject I will be changing my location, moving in closer, shooting from the side as well as directly overhead – ultimately I may even spread the legs of my tripod to where it is less than 12 inches off the ground and be lying on my side in the dirt – why? Because it’s about unique perspectives. Flowers aren’t usually photographed from directly overhead nor do most people bother to look at them from the ‘flowers’ perspective. Great images are generally not made at a comfortable standing height having just walked up to your subject!
Don’t wait for the sunny day to go out and look for wildflowers – your best bet is an overcast day with even lighting. A sunny day is great for a picnic, and the flowers are beautiful to look at – yet the shadows caused by the direct sun put too much contrast in the image. The strong highlights and shadows will take away from the varied hues of the flowers, as well as giving you much less information to work with when editing your videos in a tool such as Adobe Lightroom. Overcast and even rainy days are some of my favorite for flower photography. Good thing I live in Seattle!


 July 2014: Rufous Hummingbird and Chick, Seattle, Washington, USA
 By Art Wolfe with Jay Goodrich