A very famous French diver once called Indonesia’s Wakatobi an underwater Nirvana. I am not going to quibble with Jacques Cousteau. Last week I traveled with very good friends and serious underwater photography gearheads (which I am not) to this island archipelago. My friends endured lost luggage and had to rent equipment, and I, a fish out of water doing underwater camera work, battled against stronger-than-expected currents, a leaking mask, and balky SD cards. Fortunately on the last couple days of shooting things worked themselves out and I managed to get a few really nice photos that will fit very nicely in the huge new wildlife book coming out next year!
One of the more challenging aspects of photographing underwater in this and similar locations are venomous fish – in this case, scorpion fish. On top of managing the underwater camera system while trying to stay steady in a difficult current and not scaring away my subjects, I also had to keep myself from disturbing the sea floor. At one point my underwater guide and myself were balancing ourselves on a tiny wooden dowel stuck into the sea floor to try to stabilize ourselves. It wasn’t easy, but it was worth it – enjoy the photos!
I used a Canon EOS 5D Mark IV camera with an EF8-15mm f/4L FISHEYE USM lens in a Nauticam underwater housing.
Recently my staff received the following question in regards to the above image:
“Was this photo a single shot, an HDR composite, or some other technique?”
Short Answer:
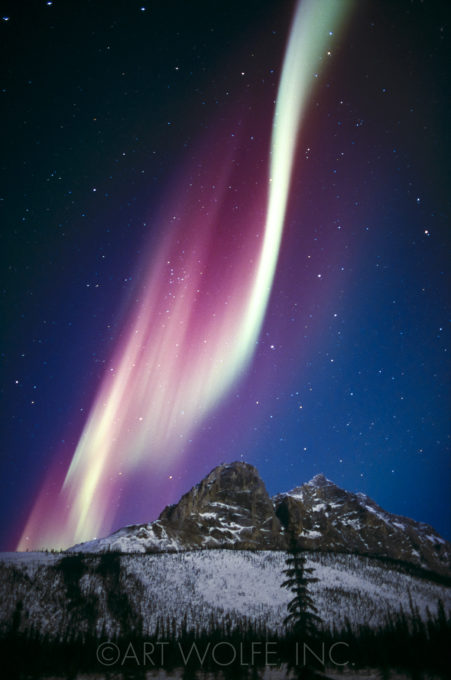
this is from the good ol’ days when you shot a slide (single exposure in this case) and waited a few months to see if anything turned out…
Medium answer:
All the details – Canon EOS-1N, Canon EF 17-35mm lens, f/2.8 at 30 seconds, Fujichrome Provia 400 film, Gitzo G1325 tripod.
Loooong Answer:
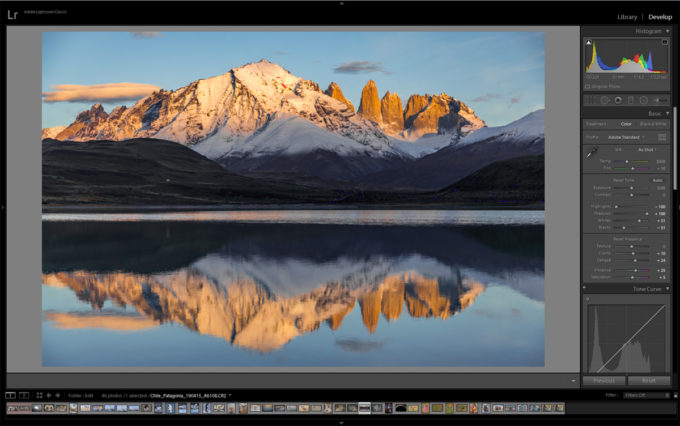
The aurora borealis, or the “northern lights” as they are often called is an atmospheric phenomenon that occurs as electrically charged particles from the sun make gases glow in the upper atmosphere. Despite the dryness of this scientific explanation, it is difficult to view the aurora borealis without experiencing a sense of wonderment and mysticism. It remains one of the most dazzling sights in the natural world.
To get this image, I flew to Fairbanks, Alaska, then drove eight hours north to the Brooks Range on the famous pipeline road to Prudhoe Bay. The Brooks Range lies within the Arctic Circle and thus provides a more predictable chance to see the aurora borealis. I timed my journey to coincide with a half moon because the snow-clad range would be properly illuminated by the half moon’s light. A full moon might actually have been too bright during the required 30-second exposure. I discovered that despite the fact that the aurora is in continuous motion, a 30-second exposure is usually fast enough to yield proper exposure and reasonably sharp lines within the displays. When I photographed this display, I was unhappy with its color, which appeared to be a dull, pale green. When I returned home and developed the film, I was delightfully surprised to discover that the film picked up the reds.
This photo is featured in the book “Edge of the Earth, Corner of the Sky” as well as being available as a fine are print.
Are there any photos in my collection you’d like to hear the story behind? Drop a comment below – your suggestion could spark an idea for a future blog post!
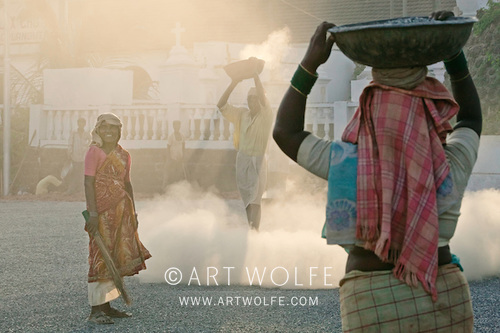
You never know what you will find when wandering around a city with a camera in hand. When light and subject and circumstance come together, magic can occur.
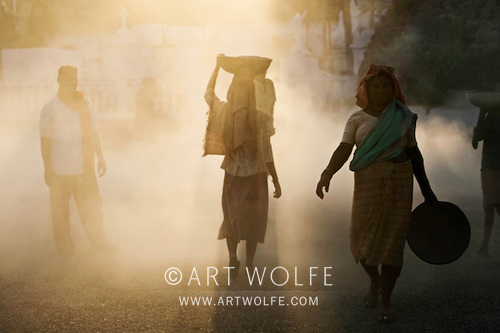
In this particular case, the facts behind the shot are nothing special. Workers had been putting gravel onto the parking lot of a restaurant in Panjim, Goa, which kicked a lot of dust into the air. Pedestrians were simply going about their business. However, when backlit by a late sun, the scene became street art–performance art. The activity of putting gravel down created an amazing atmosphere for a nicely layered image.
Standing back from the scene, I used a 70–200mm zoom, which enabled me to shoot a series of shots without interfering with the people so that they would not pay attention to my presence. I positioned myself looking directly into the late afternoon light so that the dust kicked into the air would be filled with light. I was not so much concerned about capturing details and faces of the people, as much as I was with the positions of the bodies within the frame. I kept shooting and reframing the shot as the scene changed every couple of seconds when the workers threw on the next load of gravel and different people came through the scene. I love the layering effect of the light and dust that comes from the backlight.
Photo tip: Dust, rain, humidity, fog, haze all add dimension to a scene when shot with backlight, light behind the conditions. It creates atmosphere and interesting changes in tonality and light, as well as creating layers in depth. Be careful that bright atmospheric conditions do not cause your camera to underexpose the scene.
Camera & settings used: Canon EOS-1Ds, EF 70–200mm F2.8 lens, f/7.1 for 1/160 sec., ISO 100
My life will always be about travel and explorations. When restrictions are relaxed – and both myself and my staff have done our due diligence to assess risk factors to ensure we travel safely – you can bet I will be back out there in the field leading workshops in the safest manner possible.
That brings us to the question:“What becomes of Tequila Time with Art when Art is travelling again and not always home?”
The answer? I don’t intend to stop doing Tequila Time, and in fact, time zones and connections permitting, I’m truly fascinated about the possibilities of sharing what I can while I’m on the road.
I need your help though if you’re tuning into Tequila Time via Facebook rather than Instagram!
The fact of the matter is that going live on Instagram is a much more convenient tool for the format we use on Tequila Time. When I’m traveling again, I simply can’t add more equipment to my pack or steps to my setup to support multiple platforms. I am aware there is both hardware and software that exists to make this easier, but I don’t need one more process to deal with on my travels. To that end, we’ve created a quick and simple guide to getting started on Instagram for everyone willing to make the transition!
Enjoy the guide and drop your Instagram handle in the comments so we can trade follows! We will follow this post up with one focused on publishing your own content next week. For now, lets just get you started!
STEP 1: Creating Your Instagram Account
The good news is that if you are already on Facebook, joining Instagram is easy as they are owned by the same company – you can use your Facebook login information to sign up for Instagram. First you’ll need to choose which platform or platforms you’ll need Instagram on. The most popular method is through a smartphone app, and here you will also do the majority of your uploading of images.
You can also create an account through any web browser by going to www.instagram.com.
TIP:
When you create an account, be sure to create a username that is unique, memorable, and easy to type for others so you’re easy to find!
STEP 2: I’m in, Now What?!
If your only goal is to view Tequila Time then the only thing to do is find me, follow me, and wait for Thursday’s at 5:30 PST!
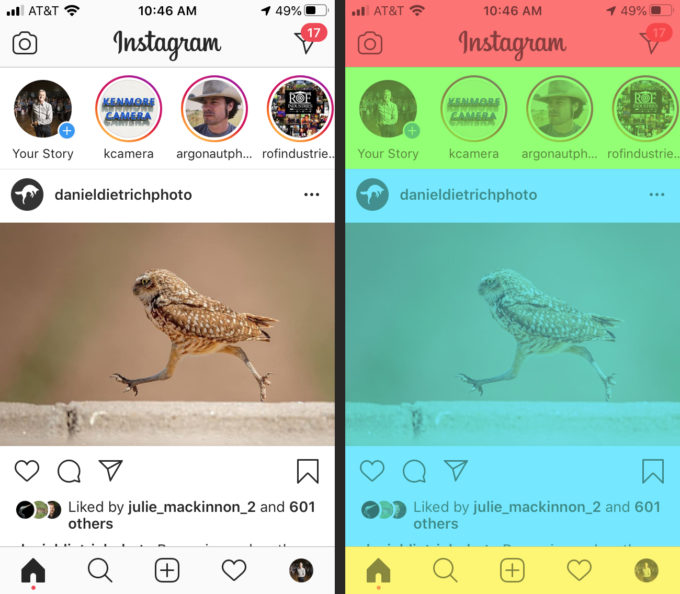
What you should be seeing on your smart phone should look somewhat like the left side of the image blow – it might differ slightly from the Android app or the web browser version, and since you may not be following anyone just yet your feed is likely not populated. The color coding on the right will help us break the interface into four sections explained below.
Let’s start from the bottom and work our way up:
Main Menu Navigation:
The yellow section is your navigational bar that will take you to the various parts of instagram. The house icon is your home screen, and it encompasses what you see in both the cyan and green areas above. The magnifying glass is where you would go to search for members, posts or other content. The square with the + in the center of the menu is where you do your own personal uploading and posting of photos with comment. The heart is where you can see your interactions with other members whether that be someone’s like on your photos, a comment, or more. Finally, the circular icon on the right represents your personal Instagram feed, and you can go here to see what your personal page looks like to others whom visit you.
Your News Feed:
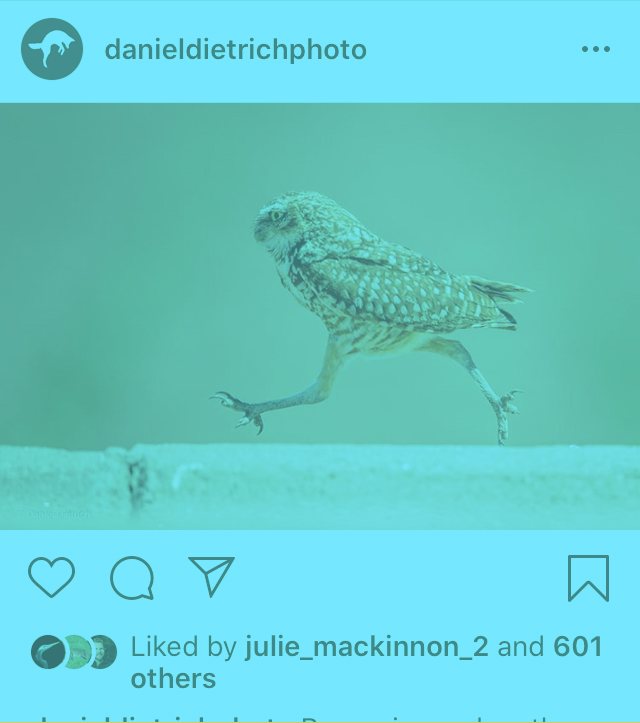
The blue area is your feed, much like your news feed in Facebook. Again, it’s accessed via the house Icon on the lower bar. When those you follow post new photos, they will appear in your feed. Here you can see my good friend Daniel Dietrich has posted an owl that is apparently also an exercise enthusiast. Under the photo you can use the heart icon to quickly “like” Daniel’s photo, or hit the text blurb to leave a comment. The paper airplane would allow you to share Daniel’s post either to your story or to other people directly. Finally on the right you can bookmark the image to visit later. this feed can slide up to reveal more posts.
Activity Feed:
The green section is where you can see recent activity from people you follow who are most active. This is an important section – when I go live, you’ll see my icon in this list with the “live” tag on it. This is where you’ll want to go on Thursday’s at 5:30 to join me! This section slides horizontally to reveal more folks you follow.
Title Bar:
Finally at the top of the page is the red section. On the left is a camera icon, and you can go here to take photos and videos with various filters, but most importantly this is where you would also start your own live broadcast if you wanted to! Again you have the paper plane icon on the right where you can share the page to others.
With this info you should at least be able to create an account and find me, as soon as this evening at 5:30 for today’s Tequila Time! This post is already long – next week we will follow up with instructions and tips for uploading your own photos and getting some followers.
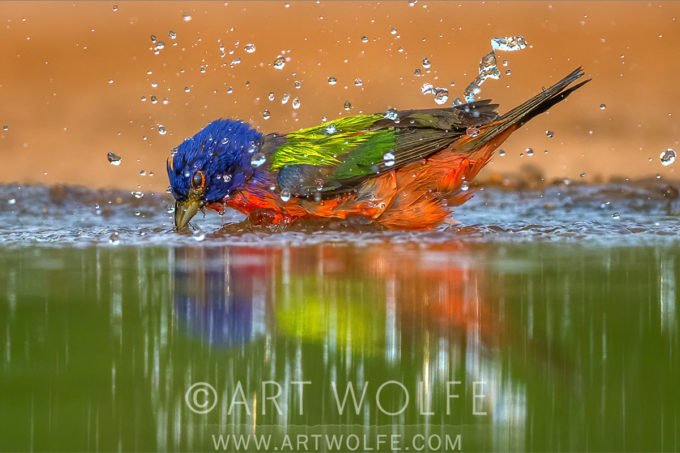
Canon EOS-1D X, EF200-400mm f/4L IS USM EXT, 1/6400 ƒ/5.6 ISO 5000
If you’ve been paying attention to the blog or caught last week’s livestream, you already know I’m keeping myself occupied lately working on a new series of educational videos releasing very soon. If you follow me you know that I’m an artist first and a technician second – I learn to use technology as I need it, but unlike many photographers my background lies in fine art.
That being said, my upcoming lecture series will touch on many of the technical aspects of photography as well, for example using a high shutter speed to capture water droplets around the high-speed movements of this small painted bunting.
Freezing the action here requires a fast shutter speed – in this case I’ve chosen 1/6400th of a second. I’ve achieved my goal – the droplets and the bunting are sharp! However one problem you may run into depending on the available lighting is the high ISO required to get enough light from such a brief exposure. In this case my ISO was bumped all the way up to 5000 – well beyond what most photographers are comfortable with.
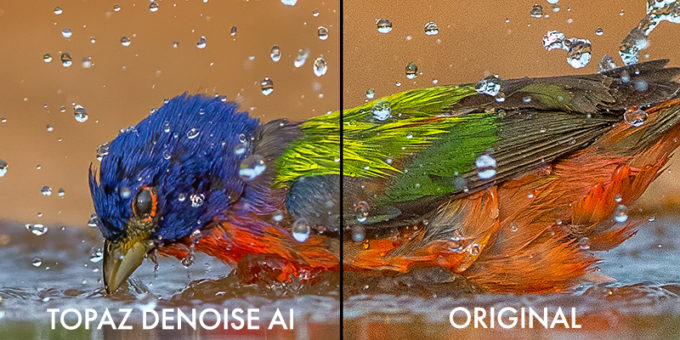
Personally I have always pushed my use of ISO; if the photo truly requires a high number to get the effect and freeze the action like I want it to, I am okay introducing a bit of noise. Much of that can be removed later in post. As an example, here is a close-up of this image with one side using Topaz Denoise AI, and the other the original image:
As you can see, Topaz does a great job of removing much of the noise in the image while retaining details. I highly recommend that regardless of the software you use to remove noise, that this is your first step in your edit. As you tweak levels, colors, and other attributes of your image, they may overly enhance the noise making it harder to retroactively remove. After you remove the noise, you can then go back and re-introduce some sharpening where needed, selectively avoiding areas with large swaths of color that will just end up looking noisy.
That will have to be a lesson for another day – enjoy your week, stay safe and healthy!
Since we are all likely spending a little MORE time on our computers and less time out and about shooting, I thought it might be good to compare notes on what everyone is using these days to edit, organize, and promote their photos.
Serious photographers seem to come in some combination of three varieties – those who love the medium and the experience it can bring through travel and interaction with the world around us, those who love using the camera as a tool to create artistic statements, and those who really -really- love tech. I am definitely more a combination of the first two types – but to really maximize your potential, you need to embrace all three to some extent.
I’m fortunate to have a staff to help me with the minutiae of all of these tools, and together we’ve come up with a list of some of the software applications and web services we use. If you have any suggestions for myself and fellow photographers, leave a comment!
Ten Tech Tools of the Trade (In No Particular Order):
AW: Lets get the most obvious tool out of the way first as I’m sure most people are familiar with Adobe’s tools. I spend most of my time in Lightroom, where I use it as both an organizational tool, and to add some post processing to my photos. Most of the tools you’ll find here keep photography at the forefront, simulating many traditional practices in a much more simplified and speedy manner.
AW Staff Note: Art rarely uses Photoshop, however when I’m preparing his photos in final edit for a book project or print, it pays to have more control over the fine details. There are lots of tips out there for things like enhancing sharpness, reducing noise, and much more.
AW: This is a tool I’ve just recently started using. In the past, most de-noise tools operated roughly the same, or at least to my eye seemed to have similar results. This app from Topaz uses a new process to remove nose, and so far it works great.
AW Staff Note: It does take some time to process however, so make sure you have the time to spend getting everything just right, and pack your patience! Not that Art is ever impatient. . .
AW Staff Note: These are tools we use to edit audio and video. It’s not a huge part of what we do, but as they can come packaged with the other adobe tools we use it doesn’t hurt to have them. Premier is used primarily for cutting and editing video clips; AfterEffects is kinda like photoshop for video, and Audition is for editing sound clips to remove things like echo, mic popping, etc. . . they are complicated programs but just simple enough that most things you might need to do, you can find a tutorial online to get you through it.
AW Staff Note: Yep. Art doesn’t use this one himself either, but when we are working with video files, they are often for the web and therefore require slightly less fidelity than if we were say, creating an HD TV show with all the Audio/Video bells and whistles. But you also want to start with the best possible quality. That means huge video files. Handbreak is a great (and free) tool for taking huge video files and turning them into smaller video files that still look and sound great, with a lot of tuning available to get the result you want.
AW: Ah! Now we are speaking my language again. Currently I’m living in Keynote working on Pathways to Creativity, a new series of seminars that will be divided into chapters and made available for download, aiming for this fall! These programs are simple enough. I create all of my presentations in Keynote, whether it’s for an epic stage or a slide show at home. Lightroom does have a built-in slide-show feature as well, but Keynote gives me more control.
AW Staff Note: Powerpoint and Keynote are similar so if you’re on a windows-based computer, PP might be your option. They mostly play nice together, but aren’t without some small issues if you’re going back and forth.
AW: I don’t personally use Photoshelter often, but I have their plug-in installed in Lightroom. When I export my photos it can be pre-set to upload automatically to Photoshelter assuming I have an internet connection, so staff back home can see my latest photos.
AW Staff: Photoshelter is a great way to store, organize, and share your photos online. We use it to drive our stock site and host innumerable images. We’ve had very few if any service interruptions or down time in my experience with it. There are a lot of options for sharing your work, and also protecting it with watermarking and small file downloads.
AW: This one goes without saying – if you’re taking photos, share them! And follow me – maybe you’ll get a follow back – in fact, if you leave your handle in the comments below, I’ll be sure to do so.
AW Staff: One thing you’ll notice about Art’s Instagram page is that we try to avoid the square crop when possible and aim to preserve Art’s preferred aspect ratio for his images. We accomplish this in a simple manner – a square background slightly off white (RGB all set to 251), and then size the image to fit within the square.
AW Staff: YouTube gets more traction, but I find Vimeo to be more user friendly. The best solution is to use both if you’re using these tools for promotion. Don’t forget about the Handbrake tip – you don’t want to spend hours uploading a huge video that is going to soak up your storage space!
AW: Having a place to dump or receive files on the road or while travelling is incredibly useful. Both DropBox and Google Drive are good options and easy to use. Photoshelter is limited to just photographs, so having another way to store and transfer other file types online is necessary.
AW Staff: Another shout out to wetransfer.com as well, a free service (with some paid options) where you can send files to people to download via emailed link.
AW Staff: Last but not least with everyone working from home these days, we use GoToMyPC.com to connect to the office. We’ve never had any issues using it, and after the initial setup it’s very easy to use. There’s also a file-sharing option to make transferring files between computers easy and painless.
AW: Well, that rounds out today’s list, though there are plenty of other tech tools out there. Comment below if you have any additions or suggestions for things we should be taking a look at while we have the time to do so.
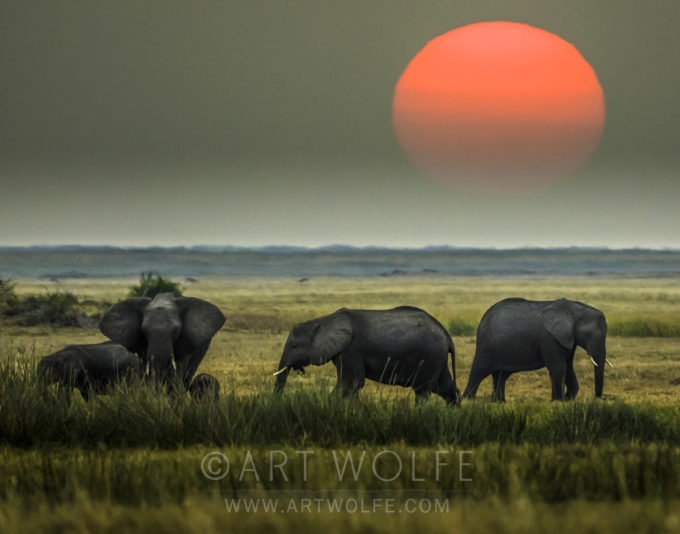
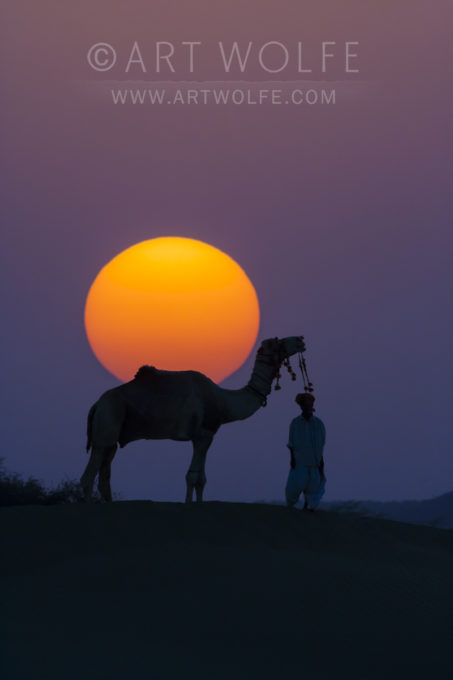
Happy World Wildlife Day! It’s also technique Tuesday, and today’s tip was inspired by a question from Lowell E., Who inquired via my contact page – how exactly DO photographers make things, like the sun for example, seem so much larger in a photograph than it does in real life?
Great Question Lowell!
The simple answer – use a telephoto lens! Now, it should be noted the sun itself is not getting larger, rather it’s an optical trick where your subject is appearing larger as your lens dials in on it. Photographing a subject a quarter of a mile away, for example, is relatively a short distance compared to the sun at 93 million miles away.
For more information, here’s an excerpt from The New Art of Photographing Nature:
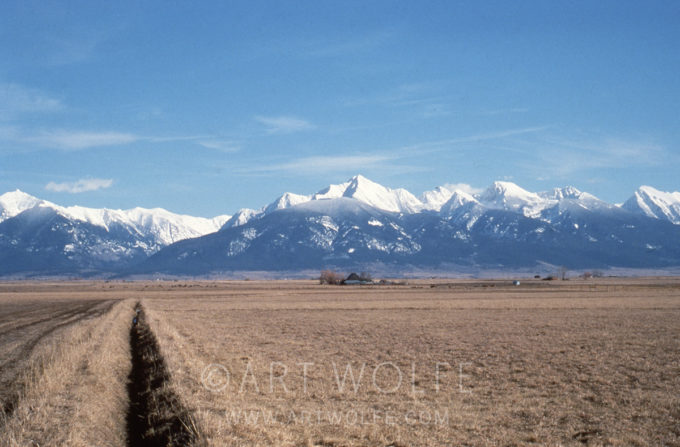
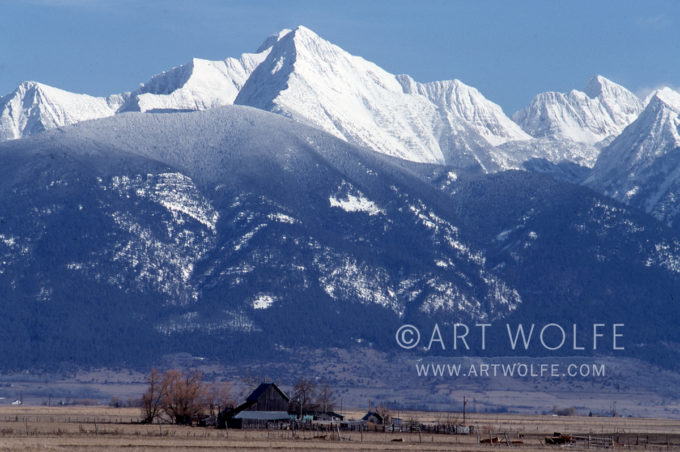
AW: As I was driving down the Flathead Valley in the Montana Rockies, I noticed this homestead set against the distant mountains. The first shot was taken with a 50mm and most closely resembles what I saw from the car as I drove by. I recognized the possibilities, but this clearly was not it. It incorporated too much sky, too much foreground, and the dark furrow of earth leads your eye away from what was most important to me in the composition.
In the second shot, I zoomed in with a 300mm lens, creating a telescopic effect, and brought the mountains closer in relation to the farm. I knew this was what I wanted–the farm with the looming backdrop of mountains. I placed the farm in the bottom and cropped so only mountains were above it, creating a sense of dramatic vertical rise. For the last shot I used a 400mm with a 1.4 teleconverter resulting in 560mm focal length, bringing me even closer. By making the image a vertical I was able to emphasize the rise of the mountains, and using a polarizer allowed me to create a little more drama. For my money, this is the strongest image in the series.
MH: Here again is a good example of what the camera can do that the eye cannot. The only way we could approximate this image would be to hike a long way to get very close to the farm. But even then you would not have the same perspective, with the farm and the mountains so strongly juxtaposed. This sense of drama is created by the compression of distance only achieved by using a powerful telephoto lens.
Think you have a great question that might prompt it’s own Technique Tuesday post? Submit a question via the contact page!
Here are some other great resources relating to the subject:
Good news if you’re in the Pacific Northwest and could use a little photographic inspiration to recharge those chilly fall batteries – the next two weekends will see me back home for a few events, and I hope to catch you there!
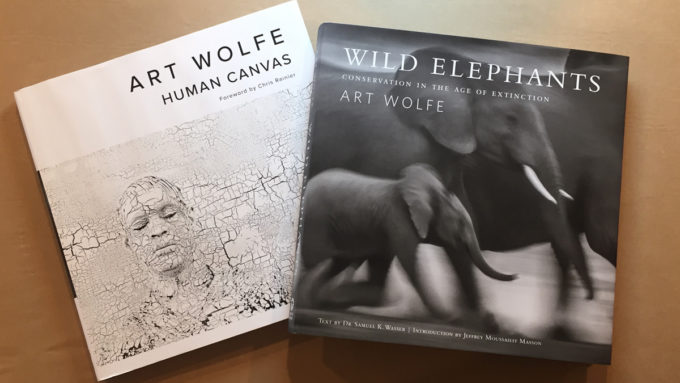
As you may know if you follow me, Wild Elephants was published this week. Thank you to everyone who pre-ordered. I’ll be signing those books this weekend so we can send them out! The new trade edition of Human Canvas will also be officially published next week, but we have received those as well. I’ll be attending the Kenmore Camera Digital Photo Expo this Saturday from 10:30 AM til 12:30 PM – come and pick up your signed copy of either or both books! This is always an invaluable event with plenty of resources on-hand to talk about the latest photo tech – don’t miss it!
For those of you in the Seattle and Portland areas, there are still limited spaces remaining for both Photography As Art seminars happening in those cities – sign up to reserve your spot today!
If you’d rather gamble than secure a guaranteed spot, today is the last day to enter your name in our give-away, so check it out and enter your name before midnight for your chance to win a ticket!
I’ve only just begun a couple months of heavy travel, but in between I’ll be back in Seattle just long enough to catch my breath. This happens to coincide with the annual Kenmore Camera Digital Photo Expo, which is always a fantastic event full of passionate presenters and the latest and greatest equipment from the digital photography world available for hands-on evaluation!
Please note – I’ll only be available at the expo myself on Saturday, November 2nd from 10:30 AM – 12:30 PM and I’ll have my new books Wild Elephants and Human Canvas on hand to sell and sign, along with a selection of my other popular books.
You should definitely check out both days of the expo if you can. There will be a number of speakers on hand from a variety of backgrounds and companies. There is sure to be something for everyone, and so much information to be absorbed.
If you’re in the market for new equipment, or simply a photography enthusiast looking to gather all the knowledge you possibly can from experts in the field and those with the technical know-how to answer your equipment related questions – take advantage of this opportunity!
AW – Often students in my classes will bring work that shows an interesting subject, but without enough information to tell a complete story. I find that one effective tool for storytelling is using a wide-angle lens close to my subject, so that some of the background is included, creating a valuable sense of place.
I find elephant seal weaners, fattened up and then abandoned by their mothers, to be wonderfully cooperative photographic subjects. With this weaner, I laid flat on the ground in front of it to photograph it on its level.
The hot-spring-addicted macaques in the Japanese Alps are another fun subject. When their own hot springs were invaded by the furry monkeys, the human residents built a monkeys-only spring. This youngster hung around the side of the pool, making a perfect subject for a wide-angle shot, which allows me to add important background and context.
MH – Looking at us with its liquid black eyes, the seal pup seems to be hoping we are his mother coming to feed him. Weaned at three weeks, he seems a bit lost, even indignant, that the tap has suddenly been turned off. With the spectacular landscape of South Georgia in the background, this image creates a sense of loneliness, seeing this solitary pup by himself in this grand wilderness.
In the second image, the Japanese macaques are so human-like that it’s a little freaky. The monkey in the image seems curious, even mischievous, while his peers ignore his proximity to the camera and wallow in the thermal heat. I love seeing an animal in its environment, especially one as unique as this. It enlarges our understanding of how they live and sometimes gives us clues as to what motivates their behavior. Here, the slight distortion of the wide-angle lens enhances the drama of the scene.
Strong Leading Lines
Another important approach to using a wide-angle lens is to work with leading lines. Leading lines have long been important parts of painting and other two-dimensional forms of art. A leading line is simply something that creates a line from foreground to background and leads or directs the eye through the image. It can be anything that is visually distinct, that a viewer is going to notice, and helps define the composition.
You can find all sorts of leading lines in the environment: tracks in the sand, edges of roads, cracks in rocks, architectural structures, and so on. These can be used to direct the viewer’s eye through a composition and toward the main subject. They are an excellent way to help the viewer understand your picture as well as add a graphic element to the design of your image.
Wide-angle lenses help emphasize leading lines. This comes back to the concept of perspective. By getting in close to nearby parts of leading lines, you spread them apart, yet they still go to the same vanishing point in the distance. That creates a very strong change from foreground to background along those lines, something that will dramatically show off the elements of your photograph.
To understand this, think about a railroad track. If you stand on a hill and photograph railroad tracks in the distance so they start at the bottom of your picture and go to the horizon near the top, you will see them heading off to a vanishing point at the horizon. The railroad tracks will be a certain width at the bottom of your composition. If you then put on a wide-angle lens and get right down on the tracks, the width of the tracks will fill the width of your image. The tracks are still going to go off into the distance to a vanishing point, but now they go from the full width of your frame, creating an extreme change from foreground to background.
Don’t be afraid to get close to leading lines in order to emphasize how strong they are. So often photographers back off from subjects like this and lose some of the impact because they don’t have the same foreground-to-background perspective.

 You never know what you will find when wandering around a city with a camera in hand. When light and subject and circumstance come together, magic can occur.
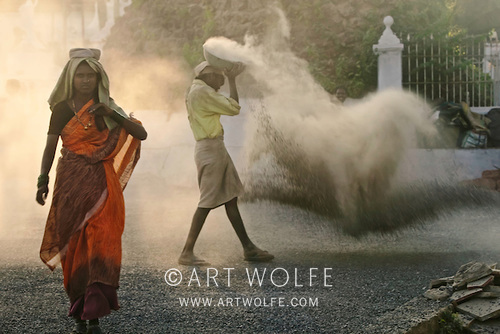


 I’ve only just begun a couple months of heavy travel, but in between I’ll be back in Seattle just long enough to catch my breath. This happens to coincide with the annual


