Currently, I’m in Chile viewing the total solar eclipse visible from South America, and it makes me hark back to when I traveled to South Australia back in December 2002 to photograph a total eclipse there. At the time, I was photographing landscapes for my book Edge of the Earth, Corner of the Sky and I thought this would be an amazing opportunity. I’d seen many technically excellent photographs of total eclipses over the years, but quite honestly they all looked pretty much alike. My objective became capturing the eclipse in relation to the Earth.
The solar eclipse that occurred on December 4, 2002, was noteworthy when viewed in South Australia for a couple of reasons. First, the eclipse was unusually brief at 25 seconds. Also, it occurred less than 40 minutes before sunset, so the likelihood of an obscured view was greatly increased because clouds generally stack up along the horizon at that time of day. To maximize my chance of success, I decided to find the precise position from which to film the eclipse by experimenting exactly 24 hours before the eclipse. I also decided to try two cameras for two very different perspectives, so I used both a wide-angle and a 70–200mm lens, enabling me to take full advantage of the eclipse’s late hour by incorporating the landscape.
Most eclipses occur earlier in the day when the sun is much higher in the sky. For this book, I wanted to establish the connection of the eclipse with the Earth. I wanted the viewer to witness the eclipse as if they were standing there next to me under the gum trees. Since I could not determine exposure until totality began, I decided to use matrix metering on an automatic aperture priority setting. When totality began, I would simply engage the shutter using locking cable releases, hoping that the entire roll of film would run continuously through the camera. This would have happened had I not made one final decision: to auto-bracket my exposures. I discovered, too late, that the camera would not continuously advance while on the auto-bracket setting. After just three exposures, both cameras stopped advancing. By the time I figured out what was happening, totality ended. Fortunately, I did get proper exposures for both compositions. After the critical moment of the full eclipse, I continued to photograph as the eclipse continued, switching to other lenses and film.
To create these images I used two Canon cameras, an EOS-1N and an EOS-1N/RS, EF70-200mm and EF 16-35mm lenses, Fujichrome Provia 400 film, and a Gitzo tripods. For the images of the setting eclipse on the horizon, I used an EF500mm IS lens and Fujichrome Velvia film.
With a few extra days to spare, I met up with some friends in Yosemite. I was excited because there was no moon, but unfortunately, the clouds rolled in. I was able to get a few decent shots of stars and star-trails, but the most interesting nighttime image in this group is one that shows the climbers on El Capitan lit up like fireflies (final shot).
A few tips for shooting for the stars! (Sorry, I couldn’t help myself):
As far as equipment goes, in most cases you wont need anything special. Most of my shots end up being between 20-30 seconds in length. If you wish to shoot longer exposures you may need to use an intervalometer. It goes without saying, but I’ll say it anyways as an excuse to link my preferred band – you’ll need a tripod. Finally, your favorite wide angle capable lens to capture as much of the sky as possible.
Do your research! Find locations that have minimal light pollution. Here’s a handy map I came across. Checking moon phases is a must as well. The time period around a new moon is your best bet – you’ll never know how truly bright a full moon can be until you’re trying to shoot the stars! As mentioned above, a cloudy sky can also pose challenges. Ideally speaking you’ll find a place away from population centers on a clear night with the moon nowhere to be found, or at least in it’s most obscure phase.
As far as individual camera settings go, it’s impossible to give specific numbers because it will largely depend on the above conditions and the specific gear you’re working with. Most of my night shots fall into the ƒ/2.8 – ƒ/4 range and a focal length between 24-40 mm, with an exposure time of about 25 seconds. If you want me to take a stab at a starting point, 24mm and 25 seconds at ƒ/2.8 is probably a safe bet to give you at least enough information to make the proper adjustments.
That’s just the tip of the iceberg as far as photo tips go for shooting at night – but my garden needs me! For more information, check out CreativeLive – they have a few helpful courses on the subject!
Recently I collaborated with B&H Photo Video to share a few quick tips on shooting wildlife photos for World Wildlife Day.
Click here to check out the video, and don’t forget to visit my gear page which lists a lot of the equipment I use both in the field and to manage and edit my photos!
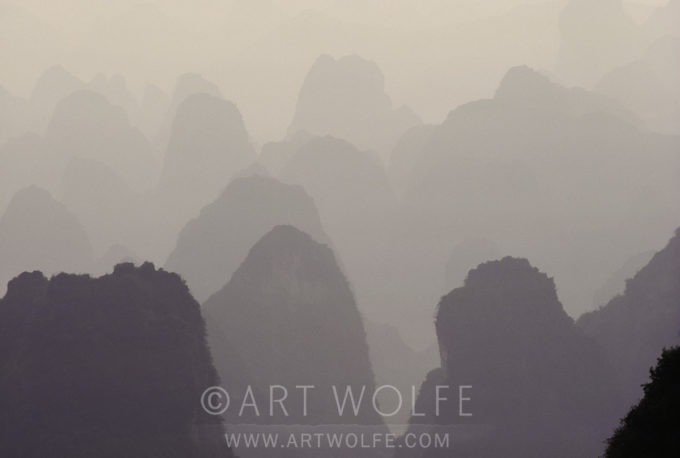
In the shot of the karst mountains in Guilin, China, I wanted to emphasize their repeating pattern and unusual shapes: individual humps instead of long ridges. I used my 80-200mm lens to zero in on an area that I felt made the strongest statement.
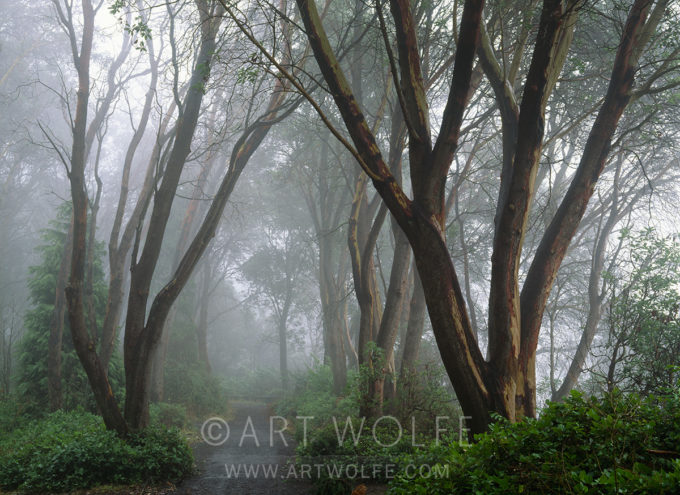
The second shot was taken a few minutes from my home in Seattle. I grew up in this neighborhood, and as a boy, I loved this path especially, with its graceful madrona trees. I went back to photograph it forty years later.
Madrona trees in mist, Washington. 45mm lens, f/22 @ 4 sec, Fujichrome Velvia 50
Spatially, light objects stand forward of dark in our normal experience of perception. When we have atmosphere such as fog, however, it is the reverse; dark objects are closer to us than light ones, as in the mountain scene. We understand this perceptually because atmospheric haze intervenes and makes the far mountains paler and less distinct. This is sometimes referred to as “atmospheric perspective.”
We also understand crisp outlines as close and fuzzy ones as distant, as with the trees in the fog, which is contrary to normal perception, where we can see distant objects in focus as well. The sense of space in both these images is definitely enhanced by the fog. Forms are more noticeable without competition from intricate detail. The tree trunks stand out more without the busy clutter of foliage. Because it shrouds things from view, fog, more than any other atmospheric condition, creates mood and a sense of mystery.
For more how-to lessons, purchase The New Art of Photographing Naturein my online store!
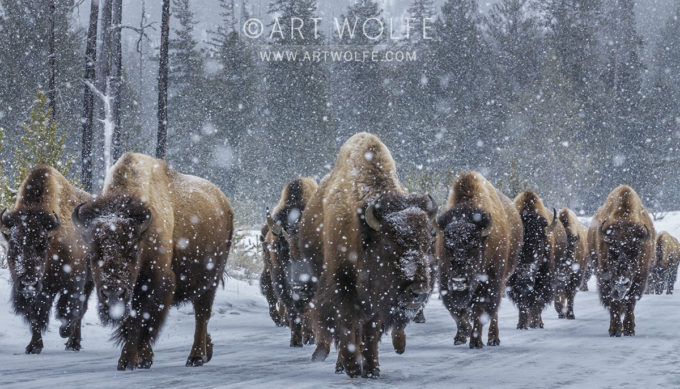
With SNOWMAGEDDON hitting the Pacific Northwest, a timely themed #TechniqueTuesday is in order! This is an entry from Photographs From the Edge, where I’ve combined the stories behind some of my most recognizable career photographs, as well as providing tips, techniques, and camera data for them. Enjoy, and I hope everyone back home is staying safe in the Winter weather!
Canon EOS-1DX, Canon EF 70-200mm f/2.8 lens, f/18 for 1/250 sec., ISO 2000
This image of bison in Yellowstone National Park really began when I co-led a rafting trip down Alaska’s Taku River a number of years ago. On that trip I met Robert Bateman and his wife Birgit. This outstanding Canadian artist spent time photographing details of rocks along the river’s edge or details of the forest. I had to ask what he was doing. He simply responded that he was taking details that he could later render accurately as details in his paintings.
At that time I had been fixating on getting closer and closer to animals and ultimately getting that classic portrait of that animal almost as if it was a trophy. The analogy was that I was a hunter with the camera. Bateman made me take a serious look at how he would he was less concerned about portraits of animals and more concerned about capturing an animal within the context of its environment. I looked at my own work and started realizing he was right.
Bateman showed that by creating atmospheric conditions and a sense of place, the composition become more nuanced, more intricate, and more involving for the viewer. In the years after meeting Bateman, I think my work became infinitely more interesting by being more inclusive of the environment. From that point forward then I would always look at storms and thick atmosphere as opportunities rather than distractions.
This image of bison in Yellowstone works to carefully include the animal’s environment. With the advent of higher ISO cameras, I can shoot with both a smaller aperture and a faster shutter speed. Here, I was able to capture a herd of animals with great depth of field, and to use a fast enough shutter speed to stop the movement of snow. So in this image of the buffalo in Yellowstone, you can see tiny points of white snow suspended in motion as well as individual animals clearly in focus. To me, this photo recalls some of the great paintings of Robert Bateman.
Photo tip: For falling snow to show up in a photo, you need contrast to set the snow apart from the rest of the scene. In this image, both the dark trees in the background and the dark fur of the bison help bring this contrast to the image. The falling snow behind the bison also lend a strong sense of atmosphere to the shot.
The nature of the photo: Snow is extremely variable in size and shape, which has a strong impact on how it appears in a photo. Very cold conditions can create tiny snow crystals that will appear more as fog than snow in a photo. Large snowflakes can be a bold part of a winter photo.
For more photos and the stories behind them, along with tips and techniques, purchase Photographs From the Edge in my online store. As always, make a request note in your order and I’ll give it a signature!
And if you missed it – check out the gallery of images from my recent return trip to Yellowstone.
One of my favorite things to do when I have a couple extra days at home is to take a quick day trip to the Fraser River Delta in British Columbia. It is a haven for birds and birders and I concentrated on the short-eared owls and harriers that were hunting for rodents in the tall grasses. As I did earlier in the month at Pt. Reyres, I practiced with my new Canon EF600mm f/4L IS III USM lens, shooting mostly with a Canon EOS 5D Mark IV.
In addition to the birds of prey, I captured some of the best bufflehead images I’ve ever taken. Usually they look like little black and white sea ducks floating in dark water, but in the low winter light their feathers become a colorful iridescent rainbow.
Since they are a niche piece of equipment, not everyone is familiar with what exactly a tilt-shift lens is and what they are used for. Admittedly, I’ve only used them sparingly in my career. Speaking in simple terms, a tilt-shift lens is a lens that allows the optics to tilt and rotate in relation to the image sensor on your camera.
When you take a photo with a standard lens, your lens and the sensor create planes of the same angle. At a wide aperture, everything in front of and behind your focus point will gradually become more out of focus. Using a tilt-shift lens, you can achieve more control over what is or is not in focus by having greater control of your focusing planes, therefore keeping more of the image both in and out of focus, depending on what you’re looking for. It should be noted that there is no auto-focus available on T/S lenses.
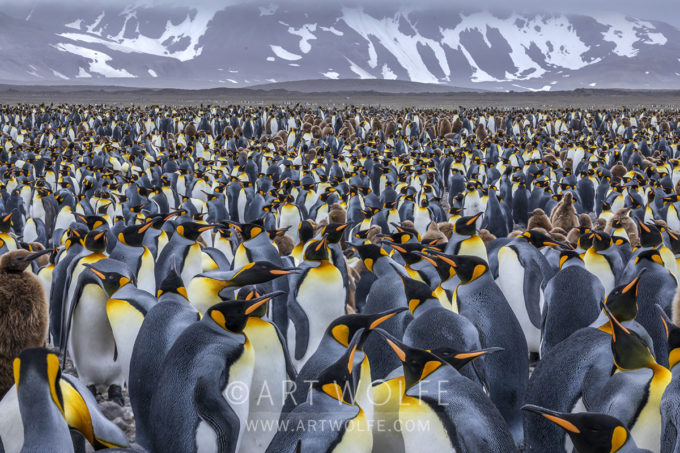
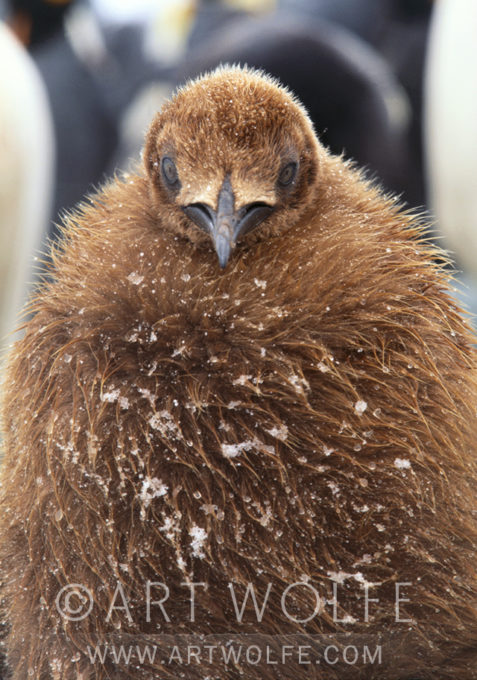
You can use this flexibility to achieve a number of desired outcomes. Although on short notice prior to my trip my Canon rep was unable to get me the lens, I was able to rent the Canon TS-E 135mm f/4L MACRO from borrowlenses.com and use to great effect while photographing a king penguin colony on South Georgia Island. By tilting the lens down, you’re essentially moving the plane of lens to be closer to the angle of the the ground and in effect, widening what falls into the range of focus. This allows you to utilize some of the benefits of a relatively lower aperture while still achieving a great deal of detail.
This is just one use and effect achievable with a tilt-shift lens. Even if you’re not familiar with their use, it’s likely you’ve seen photos or even video utilizing the concept. In portrait photography, where a longer lens is ideal to bring attention to the subject and blur the background, a tilt-shift lens can be used to use such a lens in a tight space. In architecture, having greater control over your image plane can be used to combat the distortion that often happens to parallel lines. If you’ve ever seen a photo of a cityscape that looks more like a scale model than an actual city – that’s a tilt-shift lens in action!
The nature of the photo:King penguins are second only to emperor penguins in size. Mostly they live on islands north of Antarctica such as South Georgia Island, rather than on the continent itself. They feed on fish and squid from the ocean nearby which is known for its diversity of life. Canon EOS-1N/RS, TS-E 90mm f/2.8 lens, f/16 for 1/125 sec., Fujichrome Astia
South Georgia Island is a great place for penguin photography, but it is an extremely remote island in the South Atlantic that is difficult to get to. While working on my book, The Living Wild, I worked out a way of getting onto South Georgia Island and camping for six days. My assistant, Gavriel Jecan, and I were dropped off by an American tour boat then picked up six days later by a German passenger ship coming from Cape Town, South Africa.
During our stay, we faced all sorts of weather, but primarily wind and snow. This can be miserable for the photographer but such weather is often stunningly beautiful for the pictures. I love atmospheric conditions and blowing snow is one of those conditions that convey a sense of the primordial and timelessness to the image. Still, it made for difficult shooting.
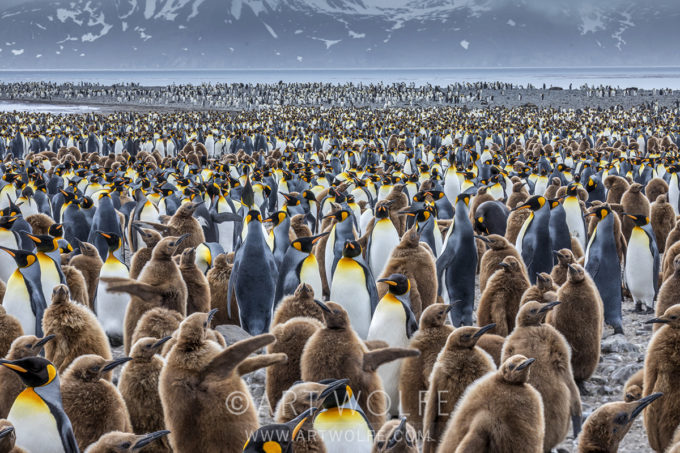
You can see all of the penguins are hunkered down to withstand this turbulent weather. We were trying to shoot videos as well as stills. The wind meant we had to stabilize the image with a heavy tripod. A small f-stop of f/16 kept all the penguins in focus. One thing a still photo doesn’t convey are the sounds and smells of the moment. Certainly the smells of hundreds of thousands of penguins is something I’ll never forget. The sounds of the birds, the trumpeting of the adults is a sound that is forever etched in my brain. Simply put, it’s one of my favorite places to visit on earth.
Photo tip:
A simple tip this technique Tuesday, but an important one to consider – If you suspect challenging weather, be sure you are prepared for it with the right clothing, boots, gloves and hats. If you are too uncomfortable, you are not going to stay outside for the unique possibilities that weather might bring. When conditions get tough, dramatic and unusual photographs are often possible then.
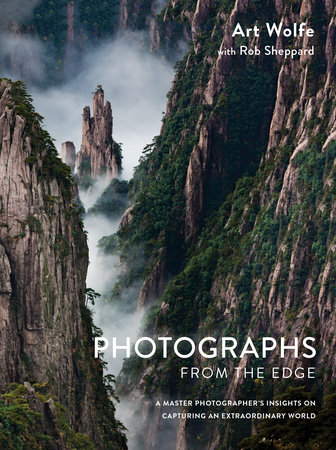
For more stories, technical details and tips relating to some of my most well-known photos, check out the book this excerpt was taken from in my online store – Photographs from the Edge.
This excerpt is from “Photographs from the Edge”, which not only details the stories behind some of my most well-known captures from across the globe and throughout my career, but is also filled with tips and tricks and equipment information.
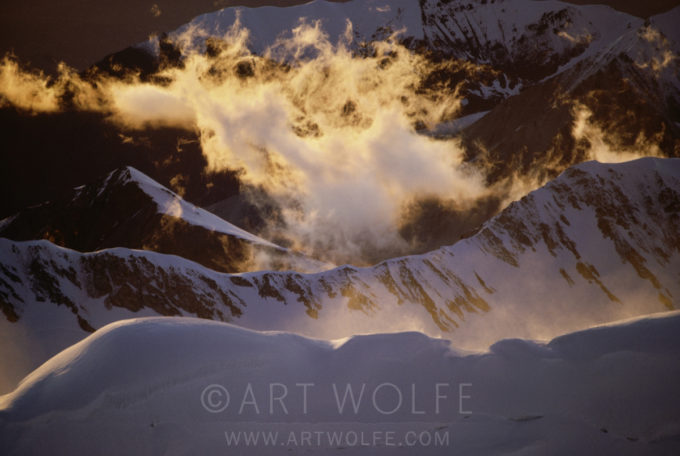
August 1988: “Rising Mist”, Alaska Range, Denali National Park, Alaska USA Nikon F3, Nikkor 200-400mm f/5.6 lens, f/8 for 1/250 sec., Kodachrome 64
The nature of the photo: Mountains are well known for their fast rising and falling air along their slopes. Glider pilots in mountainous areas will fly right at a mountain side when the thermals are right, then catch a fast moving ride going up with the air. They often describe this as running and jumping onto an elevator that is already moving upward.
Years ago I was working on a book entitled Alakshak, The Great Country, a Sierra Club book about Alaska. I spent a lot of time crisscrossing Alaska gathering photos for it. As part of this journey, I wanted to get some aerial shots of mountains in the Alaska Range. So I found myself in a small plane above the mountains working in the hours between 11 pm through 1 am.
In the summer, this is a key time because the light is most dramatic then. During summer solstice in Alaska, most of the day is bright sunshine and you only have a few hours of twilight with bold light and color. I was using the shortest hours of the day to capture the most radical light.
In this image, the light of the sun on the Arctic horizon illuminating a few misty cloud sweeping up a slope at around 18,000 feet. While I like this image and I have long loved photographing mountains, it is not the photo itself that brings back memories of this moment. This was shot over 25 years ago, and I remember it all these years later because of the absolute turbulence that our plane would encounter as the plane would fly long the lip of the ridge.
I fly a lot, and I have been on planes around the world in some very remote locations. However, I’m not a happy camper when the plane drops 20 feet in an instant as it was doing here. I can often circle in ever tighter circles around the subject with my mind so focused on the shooting that being scared is not part of the equation. However, when a plane is dropping and rising with the thermals like this, it is uncomfortable at best and frightening usually.
I remember spot metering the brightest part of the frame which was simply the wispy cloud. I compensated for the brightness by exposing to make that cloud bright with detail. By contrast then the surrounding mountains and distant valley remain fairly dark by comparison. This shot shows off the ephemeral nature of clouds and light. Within seconds of shooting this, the sun dropped below the horizon, and the entire moment was gone in an instant.
Photo tip: Spot metering can be a helpful technique when the light is dramatic and you have to be sure you get the brightness values right. In this shot, spot metering determined the exposure for the bright cloud, but that would have meant the clouds were dark and the rest of the scene even darker. That exposure has to be adjusted to make the clouds bright, not dark, by adding exposure to what the meter shows.
For this and many, many more stories behind some of the most notable photographs from a lifetime of world travel, pick up “Photographs From the Edge“ today and make a note at checkout that you’d like me to sign it!
This excerpt is from “Photographs from the Edge”, which not only details the stories behind some of my most well-known captures from across the globe and throughout my career, but is also filled with tips and tricks and equipment information.
July 2014: Rufous Hummingbird and Chick, Seattle, Washington, USA Canon EOS-1D X, EF 200-400mm f/4L IS USM EXT lens +1.4x, ƒ/20 for 1/125 sec., ISO 4000
The nature of the photo: All hummingbirds are remarkable birds for their amazing flight abilities. However, the rufous hummingbird, a bird about three-inches long and weighing about a tenth of an ounce, has the longest migration of any U.S. bird its size. It may go the distance from Alaska to well into Mexico, and some scientists think it may go as far as Panama.
I have spent 30 years developing and cultivating a Japanese-inspired garden around my house in Seattle. It has filled in nicely, creating a wild space by my home. I planted some black pines in my garden early on to provide year-round structure and color, besides refuge for birds and other wildlife. I have steadily shaped and pruned them bonsai style to help them fit into the space of my garden.
In 2014 as I was working on my trees, I found a bird staring me in the face. As I looked down past the bird, there was the nest. A rufous female hummingbird had chosen to nest in my beloved black pines! That sort of discovery still excites me after so many years connecting with nature.
A hummingbird nest is so tiny, no more than 2 inches across. The bird covers her nest with lichen, so it is easy to miss in the lichen-covered black pine. But luck had been with me, so I quickly descended from my stepladder and forgot about pruning the trees that day.
I wanted to photograph the mother as it raised its young, so I set up my camera about 10 feet away from the nest. Even that close, hummingbirds are really small, so I needed to use a 200-400mm lens at 400mm plus a 1.4x converter. I could then take pictures from the lawn chair without being so close to the nest as to disturb the mother. I had a field day for the next two weeks as this hummingbird raised its young.
Photo tip: Wildlife photography is rarely about just capturing the animal in a photograph. Timing can be critical to getting the remarkable, striking shot. You have to keep shooting, always paying attention, to be sure you do get that shot. Shooting your camera continuously will not necessarily get the shot, though, because the key moment may be between frames.


 July 2014: Rufous Hummingbird and Chick, Seattle, Washington, USA