Color plays an important role in any visual art form. Along with composition, it’s one of the key elements of any great painting. Watch any film and the costumes, sets, and lighting are all designed with color in mind, meticulously planned by experts in various design specialties. Color photography is no different in situations where you can control your subject and environment, but there are complimentary colors to be found in nature as well.
Today we are looking at the color wheel with a focus on blue and orange. it’s one of the more prevalent colors found in nature, given the interaction of the sky and water in contrast to sunsets and the earthy oranges and browns of the natural world.
If you’re on a photo hunt and struggling to find a subject, consider the colors around you and how they might tell the story of a given location. Sunsets, rust, dirt, wood, leaves in the fall or the orange glow of firelight can all provide a starting point to shoot against a blue sky either directly or reflected in a local body of water. Finding splashes of color and ways to match them up against their compliment can be a fun challenge. If you’re shooting a subject such as a model in a particular location, it can definitely pay off to scout ahead for backdrops and background elements of a certain consistent color and have them dress accordingly!
In the field there are times when a standard lens is inadequate to capture a subject as you would like to portray it. Often I will use a 15mm fisheye to create more interesting angles and more dynamic compositions. This lens can improve the statement of a subject by changing the relationship of elements in the picture. Getting up close with this lens lends a strong sense of depth to a composition. Some say it distorts reality, but really you are changing the way you are perceiving perspective. The lens defines this way of looking for us and creates a fascinating relationship of foreground and background. Standard focal lengths can be boring! Take that step out of the ordinary.
Here are a few tips when shooting with a fisheye lens:
• Know your subject, and keep the composition simple – the distortion is already going to make your image more complicated. Make sure your subject stands out!
• Try different heights and angles – where you shoot from can intensify or lessen the fisheye effect.
• Fisheye lenses allow a lot of light to enter making them useful for night photography – therefore they can be great for shooting stars.
• Look for normally straight lines that will bend with the lens and lead the eye through your photograph
• Often I tell people not to put the subject in the center of the frame, but intentionally centering up a subject and using symmetry with a fisheye lens can often create a compelling image.
• When shooting in close quarters, a fisheye lens can be used to capture the elements that a normal lens would crop away. You can then either keep the distorted view, or use software like Adobe Lightroom to correct the effect and remove most if not all the distortion.
• Get close to your subject – a fisheye lens will bring so much of the surrounding detail into the frame, you can get much closer to your subject than you normally would.
Years back, student Angels Gazquez Espuny of Spain interviewed Art for a school project. The title was “The Artist’s Psychology”, and considering that Art has made his Photography As Art seminar a continued exploration into the subject matter in the years since, it seemed like a timely re-post! Enjoy!
From your experience, what is art and what is an artist?
A true artist is an individual who creates from their soul be they a musician, writer, dancer, sculptor, painter or photographer etc…They have a need to express themselves in a creative way, revealing a part of themselves in the process. To restrict their creative outlet, whatever it may be, whether they sell their work or not, is to imprison their soul.
Art is a journey, for both the artist and the viewer. An artist will grow and mature over time. Myself, I began with a more realist approach to my painting and photography and have trended towards a greater appreciation for the abstract as I have followed my own journey. The same is true for the viewer. At one point in your life you may not ‘get it’ when you look at another’s artwork; perhaps it is too abstract or unusual; but later in life you may return to these same pieces and see them from an entirely new perspective, appreciating them in a way you couldn’t have before. Everyone sees and interprets art from their own experiences. It is because of this that you can’t simply define “art” or an “artist”, each is an ever changing and growing interpretation for the individual.
For me personally, the highest form of art is something that enriches the viewer and speaks to them evoking an emotional response from within. I fill my home with art, both my own and pieces I have collected during my travels all over the world. Some are highly prized pieces such as centuries old Native American baskets but they run all they way down to simple indigenous crafts I have picked up for a few dollars. I have even transformed my yard over the years into a work of art inspired by the Chinese paintings of the Haung Shan landscapes.
I am an artist, I have been since a child. It was when I was a young boy in middle school the teachers, upon seeing my paintings, were so moved, that they actually paid me for my work. It was right then that I knew I would make a living selling my art, my creations, and I have followed that path ever since. My roots are set deeply in painting. I went to the University of Washington receiving my degree in Fine Arts and I saw this as my path. It was only in my 20s that I would transition to a photography and make my name as a wildlife photographer and in my journey, now at 60 years old, I find myself returning to my roots as a painter more and more.
Why and what motivates you to create, what do you normally create?
As I said before, I am an artist and I have that same drive inside me that all true artists feel which continues to motivate me even after nearly 40 years. When I return from a trip my mind is instantly seeking out the next opportunity – whether it is with my camera in the field, a studio session, or time with paint and a brush, as an artist I will never rest.
I have always been a strong conservationist, even as a child. I grew up spending more time outside than inside exploring the woods near my home in West Seattle, Washington getting to know every bird, reptile, mammal, and plant I could find. At a young age I could see the need to protect and preserve our fragile natural resources. I strive to capture the natural beauty in works of art with the hope that it will inspire the viewer, evoke that emotional response, to see the need to preserve and protect our diminishing resources.
In my career as a photographer, I first began photographing animals and landscapes and that is perhaps what I am most well known for. Over the years, traveling the world, I was fortunate enough to encounter the elusive animals that inhabit the remote corners of our planet, and at the same time I got to know and appreciate the indigenous people that inhabit these lands as well. Their culture in many cases remains intact as it has been for countless generations. Getting to know these cultures, fostered an appreciation for the beauty of their approach to life and balance with the planet. With a career spanning over 30 years, I have images in my archive that can not be replicated today as cultures give way to outside influences.
Traveling the world I have also been exposed to a wide variety of religions and practices giving me an appreciation for the beauty you can find in each. Over time I have found myself bringing home more and more creations around culture and religion from these travels.
Lastly, as I get older I find myself drawn more and more to the abstract. The photographs you find me taking today are less often about the grand scenic landscape and more often about intimate details, abstracting the elements in the natural world to tell a different kind of story, but one rooted in the same motivation for protecting and preserving the natural wonders of our planet.
Do you think an artist is born or grows with age?
I believe both statements are true. One is born with certain passions in their soul. No matter your level of physical fitness, if you don’t have a passion to climb mountains, you won’t be a mountain climber, that is a drive I believe you have deep inside of you and an artist’s drive is no different. You are born with this drive to create though not necessarily the talent to pull it off, for talent comes with time. This is how an artist grows with age. Some may be self-taught, others classically trained, and it’s the rare exception that may be inherently talented, but even with those, I would argue that you can see their work grow and transform over time as they follow their journey.
Whether your art form is photography, painting, music, whatever…talk with any artist and they will tell you of a journey where they grew as an artist, honing their craft, focusing their talents, changing with time and improving with each creation.
And I continue to evolve, I have taken photos in the last 3 years that I never would have seen just 5 years ago – at 60 years old I continue to get better, look objectively at my art, improve on it and move forward, never stagnating. I will be growing as an artist so long as I am still able to create.
Do you have any reference artists & what inspires you?
I am inspired by the works of many classical and contemporary artists. You will see direct evidence of influences from Jackson Pollack in my work in a composition showcasing the random line and chaos which can be found in nature. I have also long admired the work of dutch artist M.C. Escher. I have photographs that I explicitly composed with his repeating geographic patterns in mind such as the repeating black and white of a tightly composed image of penguins in the artic. As I am photographing in the field, a scene will unfold before me reminding me of a particular artist’s style and I will compose my image drawing upon this style.
As a lifetime student of art, the list of artists inspiring me is a long one. You’ll find all the usual suspects such as Salvador Dali, Renoir, Van Gogh as well as more contemporary artists such as Keith Haring, Jacob Lawrence, Mark Toby… To visit my library at home would provide you an understanding as it is filled with art books spanning the centuries, it would be far too difficult to try and list everyone I draw from here.
Additionally I am also influence and inspired by the original artists, those who left their art on rock and cave walls 10-30 thousand years ago in Australia, southwestern US and the caves of Spain and France. They were true artists abstracting their subjects, suggesting movement and exaggerating their features. They were not simply recoding exactly what they saw, they were creating art.
Lastly, I am inspired by the beauty of nature. The intricate designs you find everywhere you look, from a curled fiddle wad of a young fern to the beautiful colors in the wings of a McCaw. This is why I keep doing what I do, I love nature and all her beauty and I want to share this with everyone in the hopes that they too will fall in love and understand why we need to protect this precious gift.
Do you consider yourself an artist?
Absolutely. Art is my passion and I have been following that passion my entire life.
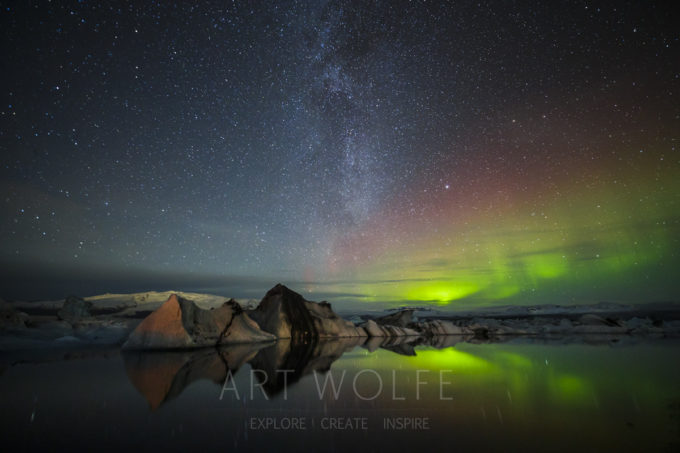
When photographing stars and star trails in the night sky, you’ll first need to decide which type of composition you are aiming to create – pin points of light, or long streaks of star trails. Ideally you’ll also want to find a location away from populated areas to ensure as little artificial light as possible is illuminating the atmosphere.
Now is a great time to experiment with photographing stars as the week of the new moon in April has been designated “National Dark-Sky Week“, when all are encouraged to turn their down or out at night to decrease light pollution. I wouldn’t count on all your neighbors to participate in this little-known event and advocate getting far away from population centers to achieve the best possible results – but it’s definitely something to mention when you are posting your fantastic new star photos to social media to raise awareness!
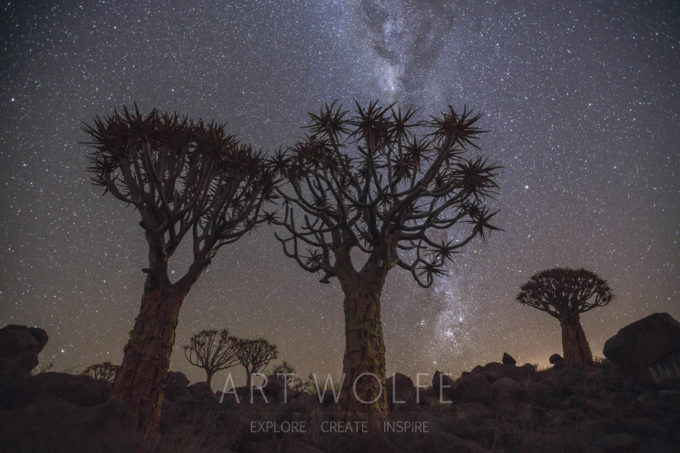
For pin-point stars, set your shutter speed to 30 seconds; any longer and the points of light start to become ovals and the image takes on a blurry look – especially if you are including our own Milky Way galaxy. Set your lens to it’s widest aperture and the ISO to 1600 or higher and expose. With a high ISO some noise will be apparent, especially in the darker areas of the image. Editing software like Lightroom or Photoshop can help reduce noise quite a bit.
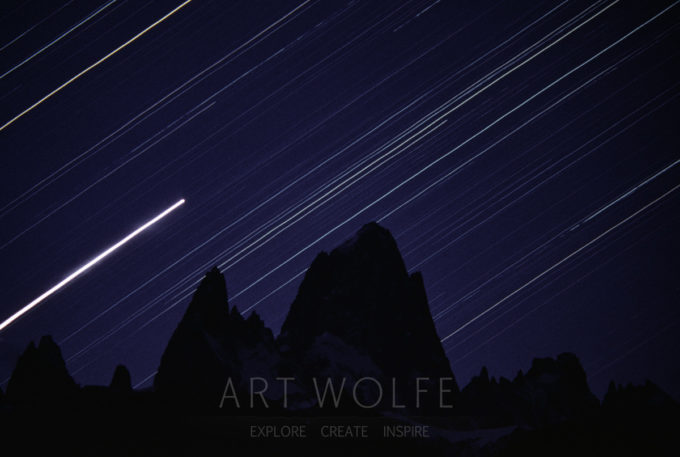
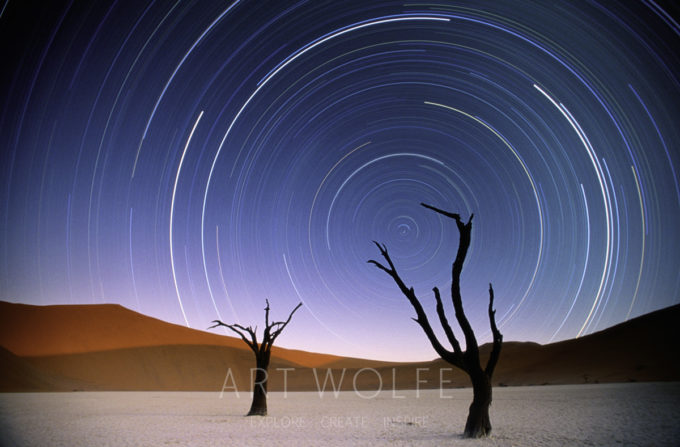
If your goal is to capture star trails – the elongated streaks of light that arc across the image, you will need a much longer exposure than 30 seconds – anywhere from 10 minutes to several hours. how long depends on the focal length of your lens and the effect you wish to achieve. Just as longer telephoto lenses will “magnify” movement such as camera shake while hand-holding it, a longer lens means less time before star trails become apparent in your image. Telephoto zooming will make the small details larger, so using a 400 mm lens will yield short but definite star trails. With a wide angle lens, a 16 mm for example, you will need at least 30 minutes of exposure before you begin to see decent star trails in your final image. For arcs of light to traverse the majority of the night sky you are generally looking at exposures of 2-5 hours.
In the days of film, you would simply leave your shutter one for the entire exposure using the bulb setting to manually open and close the shutter and your wristwatch to time the event. However, in the digital age you cannot leave your shutter open for that long without the risk of damaging the sensor and creating an exponential build-up of noise in the image. Rather than exposing for 2 hours straight, for the purpose of this example, you can shoot 240 thirty-second exposures (to equal 2 hours) and then later “stack” the images using a variety of software packages like Adobe Photoshop.
So then the question becomes “How do I take 240 exposures over the course of a couple hours?”. Certainly you could sit there with your cable release and click the button every 30 seconds, and if you only ever plan on attempting this technique once, perhaps that sounds like a fun way to spend a few hours. If you’d like to truly explore photographing the stars in this way, you’ll want to invest in a cable release with an interval timer, or an “intervalometer”. This device can be configured to work with your camera to control it in a number of ways. In this case you could set it to trigger your exposures for 30 seconds over a course of several hours while you catch some rest before setting up for the next shot.
One of the more overlooked and crucial aspects of capturing quality images of stars is to pay just as much attention to what is on the ground as to what is in the sky. You’ll want to incorporate interesting elements from the landscape around you; mountain peaks protruding into the sky, whole trees or branches, rock formations, saguaro cactus – etc. You will need to tell the complete story so the viewer can appreciate not only the stars but where you were when you created such a striking image.
When including the foreground elements you have several choices as to how to handle them. First you can allow them to be silhouettes by simply photographing the scene after the sun has set using their forms as artistic elements in the image – this is perhaps the easiest and most common approach. The second approach is to begin creating your photograph prior to the setting of the sun, at dusk. Capture your lower foreground elements in an image at sunset and then leave the camera undisturbed on the tripod. Once the sun has completely gone and you are ready to shoot the star trails as before. Later in post processing when you are stacking your images together you will have the dimly lit view of the landscape to include in your overall composition. Now is this cheating? No. This is simply the same technique I have used for years with slide film when I would create a dual exposure on the same slide, one at sunset followed by a several hour exposure later in the night without moving the camera. Stacking is simply how you achieve the same result in the digital age due to the delicate sensor.
The last technique I have used involves artificially lighting the foreground elements in your landscape. Using a light source such as a flashlight, powerful search light or even a flash unit you can manually paint light over the foreground images during your 30 second exposures. It takes practice to go over the foreground elements just right, if you pass over an area too many times you will create a hot spot, miss an area and it will be dark, but when all you have is a flashlight to “paint with” there is nothing to tell you where you’ve been and where you have yet to go. So practice with this and over time you will be pleased with what you are able to paint in the dark. Here in the northwest snow camping is a popular winter time activity and lights inside of your tent or igloo make for wonderful glowing foreground elements in these compositions.
When shooting star trails you have two basic choices for where to point the camera. You can either create concentric circles of light around a single point in the sky by aiming at the the North Star (Polaris) for those photographing in the Northern Hemisphere, or arcs of light by pointing your camera in any other direction. Be aware of which you are choosing to compose and include your foreground elements for framing and balance accordingly. Unfortunately there is no convenient star in the southern hemisphere to point your camera directly towards so you’ll need to find that magic spot some other way.
Lastly there are some atmospheric conditions to be concerned with when photographing all night – namely condensation on the lens. I have shot start trails in many areas of the world such as the dry deserts of Utah and Namibia where condensation is not a concern but if you were to shoot them with say the sea stacks of the pacific coast you’ll be battling fogging on your lens throughout the night. One approach is to use a small battery operated fan to blow a steady wind across your lens to keep it dry. A second, perhaps easier approach, is to tape hand warmers around your lens, the kind hikers and skiers use. You’ll need several and they are only good for one night worth of shooting but they will help keep your lens warm and dry.
Finally, to reiterate one of my first points – you need really dark skies. Pick a time when there is no moon or just barely a sliver and choose a location as far away and sheltered from the lights of near by cities as possible. For the pacific northwest where I live this means heading into the mountains, which make for great foreground subjects to include in the composition.
Enjoy, and I hope to see your photos show up on my social media pages in the coming weeks, and don’t forget to mention National Dark-Sky Week!
Now that Spring is officially a week away and the weather is warming up a bit here in the Pacific Northwest, it’s a great time to get out and shoot. Winter rains can be cold and nasty, but throughout the spring and early fall rainy overcast days that aren’t also affected by extreme temperatures and winds are the best days to get out and photograph! I woke up this morning to some cloud cover, light showers, and a relatively balmy 60 degrees, and was inspired to get the word out about how great such conditions can be for capturing fantastic images.
People are often surprised that I don’t run outside with my camera on a beautiful blue sky day. The clouds on an overcast day act like a huge softbox to soften the light, reduce contrast, and open up the shadows to details that would be completely lost on a bright sunny day. Falling rain diffuses and evens out the light even more. Some of my favorite images have been captured on gray rainy days.
You’ll need to check your lens frequently for spots but with a little care you can use the rain to your advantage. Use a tripod, polarizer, small aperture and long shutter speed to keep from recording individual falling drops of rain and maximize atmospheric softening. Additionally, the polarizer removes the shine from foliage for the richest colors possible. It’s rare that I don’t have a polarizer on the front of my lens. With standing water in your frame the falling rain will ripple the surface. The long shutter speed will blur movement the same way a waterfall can be rendered as a soft ethereal white drape over rocks.
The polar bears of Churchill are world famous, of course; like many photographers I have made pilgrimages there since the early 1980s. This has given me the opportunity to photograph the bears in various ways. From a tundra buggy, you can see the bears engaging in harmless battles as they wait to hunt seals once the ice that’s formed on Hudson Bay. From the air I recorded the beautiful patterns on the frozen lake’s surface as well as the bear’s shadow cast across the ice. To emphasize the barren tundra terrain and diminish the bear’s presence, I selected a 17-35mm wide-angle lens.
For The Living Wild I went to Churchill to photograph cubs newly emerged from their winter dens. Not only did I find several sows with their cubs, but I found them in near-perfect late afternoon light.
Because light meters are calibrated to read any scene as neutral gray, I set my aperture to overexpose by two stops from the reading to make sure the snow stays white. Without this compensation, the bears would be underexposed. This gives the most accurate exposures for white animals in the snow.
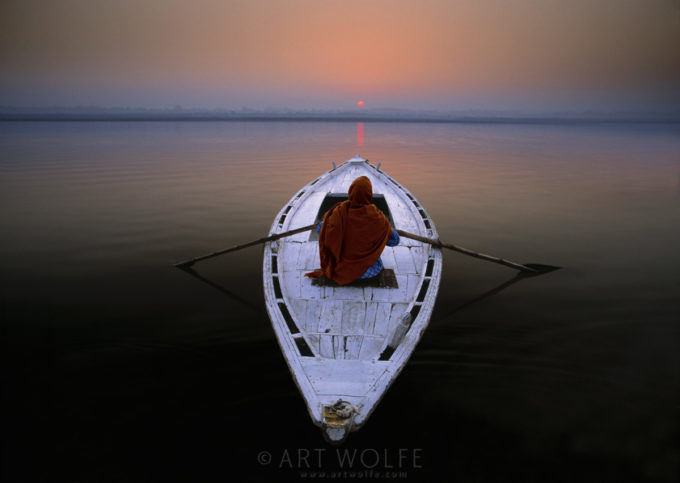
I was walking along the Ganges River in Varanasi, India, at dawn one morning when I saw the color. The sun rose through a layer of smoke and haze, and I thought, “Wow, that is a beautiful red orb.” I had to get that shot.
I was at this location during the Kumbh Mela, a massive gathering of Hindus along the Ganges that happens every 12 years. This is a time of great spiritual and cultural significance when holy men gather to bless the millions of people who have made the pilgrimage to the location. Many pilgrims had traveled to Varanasi and upriver to Allahabad. Many were crossing the river to the encampment on the far side. I contacted one of these people the night before, offering a dollar to act as my model the next morning, one hour before sunrise.
The next morning, I positioned the boat with my new model in the dark mud along the shore. I used a polarizer to take the shine off the water in the foreground, creating the illusion that the boat was floating.
To get the deep depth of field that I wanted, I shot with a wide-angle lens and a small f-stop of f/22, getting an exposure of one or two seconds, during which my model had to remain still. The foreground point of the boat is every bit as sharp as the distant horizon. I had to work quickly because the color of the sun was so important, and it lasted only a short time. once the sun rose above that layer of haze, it lost it’s color.
I loved creating the image, stylizing something these pilgrims did every day during Kumbh Mela, making the image more memorable. you don’t know whether the person is a woman or a man, which helps the viewer see him- or herself in that place.
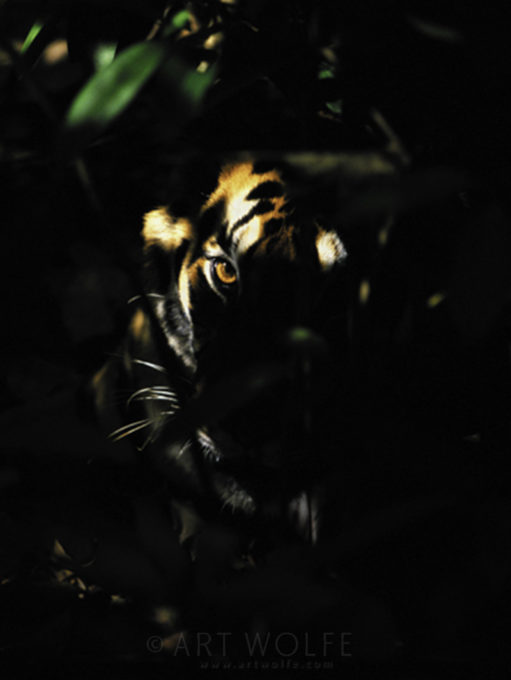
Art Wolfe: Spotlighting is an often unpredictable event that can create and unexpected picture. With this image of a tiger in the dense forest, it was essential that I spot-meter the tiger’s illuminated face to ensure it was exposed correctly, since all of the deep shadows could have easily fooled the camera’s meter.
Martha Hill: I find this image intriguing. Tigers are among the most elusive of the big cats, and this image, by showing it lurking in the shadows, perfectly captures the animal’s mystery. To me it is a more evocative rendering of the subject than the more commonplace, out-in-the-open view we often see.
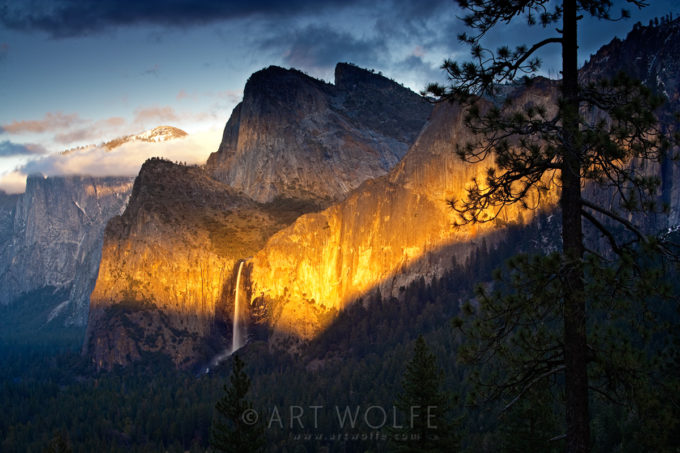
Art Wolfe: In the hours prior to this shot (of Bridalveil Fall), the valley had been covered in flat light under solid cloud cover. Late in the afternoon, however, the clouds began to break, sending shafts of light onto the faces of El Capitan and Half Dome, and, in this case, the waterfalls that rush over the cliffs in early spring.
Getting the proper exposure in a shot like this can be challenging. using my camera’s spot meter, I took a reading off the brightest area and opened up to keep the whole image from getting too dark.
Martha Hill: This image has drama and mood. Bridalveil Fall is one of Yosemite’s most photographed icons, but the unusual lighting conditions captured here set this image apart. The momentary beam of light illuminates the distant waterfall, directing the eye immediately to it. Under different conditions, such as an even lighting, we might overlook the waterfall altogether in this already dramatic landscape. The success of this image depends on timing – waiting for the exact moment when the light will highlight an interesting visual element.
For as much versatility as you get out of it, the Canon EF100-400 f/4.5-5.6 IS II USM lens is light weight, which means it’s great for traveling and backpacking. This is a particularly sharp lens with great glass and a smooth action collar. It also works well with extenders, which only adds to it’s versatility and value. The quick action zoom makes it a go-to lens for me for capturing wildlife.
What are some of your favorite lenses that never leave your pack? Leave me a comment below, I’d love to know what’s out there, and check out my gear page for more recommendations!
Capturing brown bears in Katmai, Alaska! Though specific to this location in the video, this is a lesson and focus I employ regardless of my subject – to capture that subject within the context of the environment rather than going for the same ol’ shots. Certainly as you travel and visit recognizable locations and subjects, you should capture the shots we are accustomed to seeing – but moving a step beyond and ensuring your photos are telling the story of that subject’s place in it’s environment makes for a much more informative and lasting image. Taking the time to explore a bit and focus on wide shots where the bears are present but not necessarily the focus, or finding details of the bear’s impact on the environment without showing them directly will not only immerse your audience in the location, it will inform and inspire other shots you choose to take.
Gavriel Jecan has traveled to this location with me many times, and he’ll be leading a trip here in July – sign up today! I’m leading a couple trips here as well, but they are sold out. If you’re interested, feel free to join the wait list in case we have any cancellations.


 Art Wolfe: In the hours prior to this shot (of Bridalveil Fall), the valley had been covered in flat light under solid cloud cover. Late in the afternoon, however, the clouds began to break, sending shafts of light onto the faces of El Capitan and Half Dome, and, in this case, the waterfalls that rush over the cliffs in early spring.