A big challenge for photographers is that the camera simply cannot capture the range of brightness in the world that we can see. When we look at a subject with our own eyes, we can see all sorts of detail, from the brightest areas to the darkest areas. Unfortunately, the camera cannot. And when there is strong contrast between bright and dark areas, the camera will emphasize, even overemphasize, that contrast.
This can be especially problematic with bright skies and dark landscapes. It can be impossible to get a single exposure directly from your camera that captures both a good sky and good ground at the same time. Another problem can occur when you are photographing a subject in the shade against a bright, sunny background; the exposure range can be so extreme that, once again, there is no correct exposure to get a good image.
The first thing to do is accept that sometimes you just have to say no to a particular picture, recognizing that it may be impossible to get a good image given the lighting conditions since no exposure will be correct. If you can recognize this, you will start looking around for images that you can say yes to. That’s an important decision to be able to make.
To get a better photograph, in certain situations, there are things you can do to control the way light comes into your camera. A traditional way for landscape photographers to deal with a bright sky is to use a graduated neutral density filter.
This filter is half clear and half gray with a blend, or gradient, through the middle. By placing the dark part of the filter over the bright part of the scene, such as the sky, and the clear part of the filter over the darker part of the scene, such as the ground, you can balance the light coming through your lens so the camera can get a good exposure.
The challenge with a graduated neutral density filter is that it creates a line through the image. If you have a mountain or tree going into the sky, it will be darkened as well as the sky, for example. Unfortunately, this is starting to be a very dated look for photography. A graduated neutral density filter can still be helpful in knocking down bright light or brightly lit areas in the picture to balance them with the rest of the image, but you just have to use it carefully so the effect is not obvious.
Another way to work with multiple image exposures is to shoot an exposure for the bright areas, then an exposure for the dark areas. These two images are then combined in the computer by using the best of each. Shooting two images like this is actually quite easy to do.
Exposure created for bright areas.Exposure Created for Dark Areas
Start by locking your camera onto a tripod. Shoot one exposure that makes your sky look good, then shoot a second exposure that makes your ground look good. Bring the two images into Lightroom, where you can adjust the sky picture to make the sky look its best, and the ground picture to make the ground look its best.
Then you send the two pictures over to Photoshop as layers. Put the two pictures on top of each other as layers and make sure they are lined up. Then simply remove the bad part of the top picture, revealing the good area of the bottom picture in that section of the image. You can do this in two ways. The down and dirty way is to simply use the Eraser tool by setting it to a large size and 0 hardness (a very soft brush). You then erase the bad part of the picture.
Combined Result
The second way to do this is to use a layer mask. Add a layer mask to the top picture/layer and use a large, soft-edged (0 hardness) brush to paint black onto that layer mask and block the bad part of the top picture.
If you’d like to see the masking process in action as a future lesson for the blog, leave a comment below. Although there are a lot of helpful tools these days to help you auto-mask and adjust exposures, nothing beats knowing how to manually edit your photos without relying on automated tools that might not always give you the best results. A fundamental understanding of masking is an incredible tool for any photographer to have available to them.
This year marks the 20th anniversary of Canon’s EOS 5 interchangeable-lens digital camera series—a milestone worth celebrating. Nearly all of my favorite photographs from the last twenty years were created with cameras from the EOS 5 series. The original 5D was with me during the filming of my award-winning television series Travels to the Edge, capturing stills that conveyed the beauty and our planet and it’s creatures. Each generation since has brought new opportunities to refine my craft, whether through enhanced resolution, improved low-light performance, or innovate autofocus technology.
Today, I’m working with the R5 Mark II, and it continues the tradition of excellence that first drew me to the series. These cameras have been invaluable tools in my work as both an artist and an advocate for the environment. Most remarkable has been their durability. Over the years I’ve had very few if any issues outside the usual wear-and-tear you might expect when traveling as much as I do, often to areas of extreme weather.
As Canon celebrates this milestone, I celebrate alongside them—grateful for the images captured, the stories told, and the enduring partnership between technology and vision.
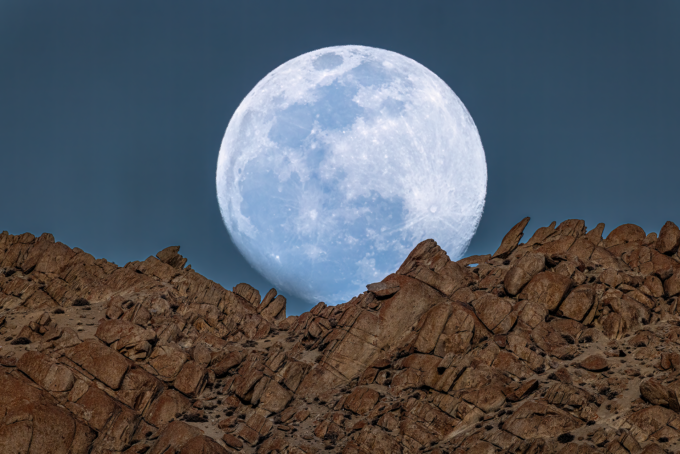
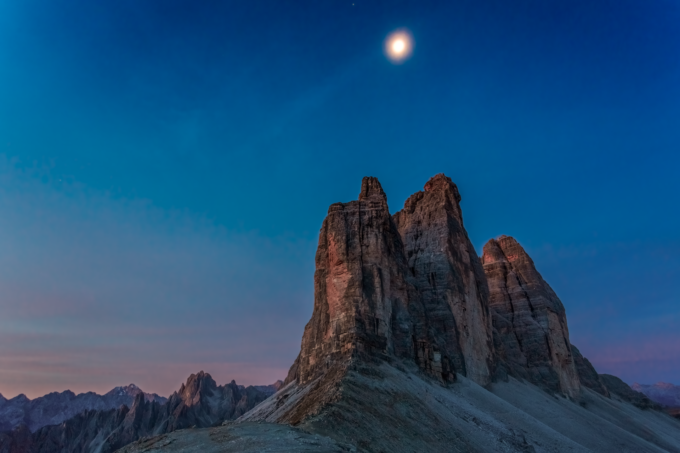
One of the most powerful tools a photographer has isn’t just the camera—it’s the choice of lens. Focal length not only determines how much of the scene you capture, but it also shapes how subjects relate to each other in scale and space. By deliberately choosing different lenses, you can either magnify a subject or minimize it, creating vastly different stories within the same world.
In Ladakh, India, while tracking the elusive snow leopard, I turned my attention to other subjects while waiting out the evasive cats. Using a 1200mm lens with a 1.4x extender, the moon filled my frame—crisp, detailed, and dominant.
Compare this to my image of the moon over Tre Cime di Lavaredo, Italy, shot with a 17-40mm wide-angle lens. Here, the moon shrinks to a tiny accent while the towering spires command attention. Same moon, two worlds apart—thanks to lens choice.
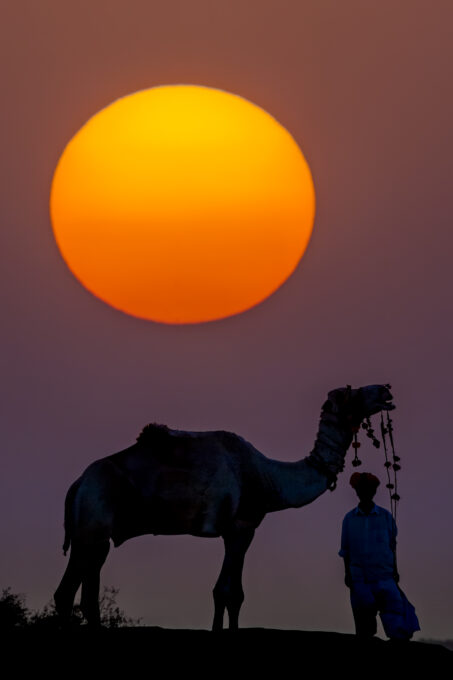
The same principle applies when photographing the sun. At the Pushkar Camel Fair in Rajasthan, I used a 500mm lens to place the sun in near-equal prominence to the silhouetted subject, creating a striking balance.
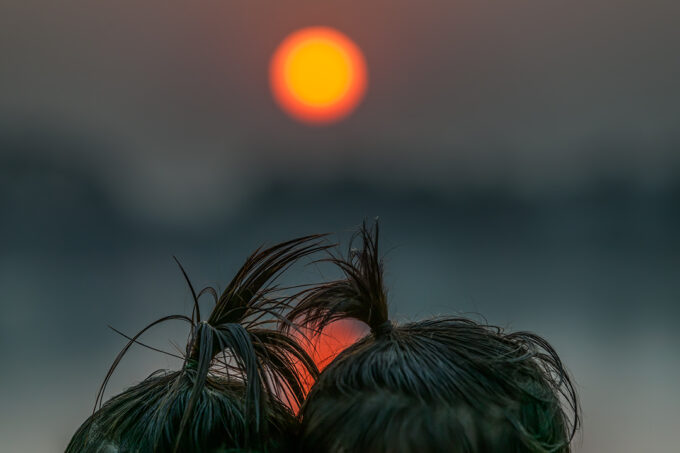
In Goa, India, I photographed two girls’ ponytails with the sun in the background, using a 70-200mm lens at 165mm. The sun becomes a smaller, softer presence—still important, but secondary.
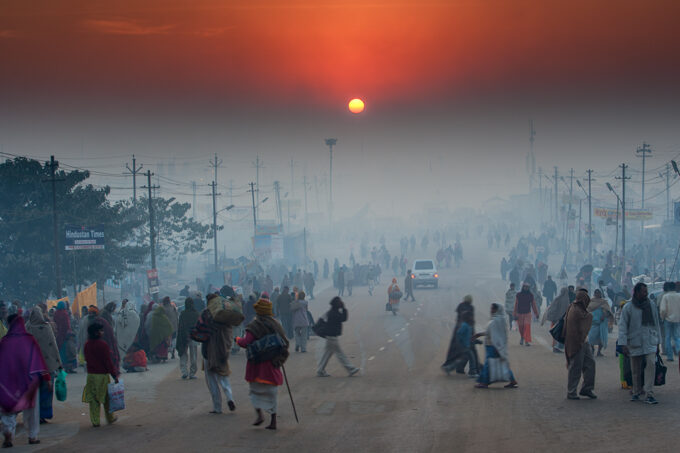
At the Kumbh Mela in Uttar Pradesh, a 70mm lens rendered the sun as a tiny orb in a vast, dusty expanse, emphasizing the human pilgrimage over the celestial backdrop.
Longer lenses not only magnify distant objects—they compress space, making background elements appear closer to the foreground. Wide angles, on the other hand, exaggerate depth, pushing background elements farther away. Mastering this interplay between focal length, subject size, and background compression will give you the ability to control the viewer’s perception and craft stronger, more intentional images.
“What I see vs. what I take” is a trend online among photographers to show how they find interesting subjects in otherwise uninteresting busy shots that lack a focus. It just so happens that this very idea is the concept behind the opening discussion of the Pathways to Creativity series I released a few years ago when I was at home during the pandemic.
There’s a lot going on in the world right now, so take a time out with a free episode of my streaming series Pathways to Creativity – Embracing the Abstract! Abstract photography is the perfect way to put your creativity and that fancy camera you’ve got to good use. The one on your phone is likely perfect for capturing abstract mages.
Experimentation can lead to happy accidents, unique techniques and more as you establish a visual language that speaks to you. Whether you’re hunting for visual metaphors, trying to capture a mood, or simply want to decorate with fascinating images that will raise questions and drive conversations, there is something very freeing about bucking convention and pushing the boundaries of what photography can be. Much like a sketchbook it’s less about the final image and heavily about the process.
If you’re feeling especially inspired, there are several opportunities on the upcoming calendar where I’ll be hosting photography retreats in Oregon and Washington, and although only a few such as Astoria, Port Townsend and Lake Quinault specifically mention abstracts in their titles, you can rest assured I’m always looking for such images myself wherever I am. You’re certainly not going to ruffle this artist’s feathers by seeking out MORE creative ways to express yourself through photography.
Recently I posted about my amazing new Canon R5 Mark 2 and some of the features I’m loving about this camera. However for all the technology invested in capturing tack-sharp images and freezing action, its also important to remind yourself to slow down every now and again.
One of the techniques I employ often is dropping the ISO down to 100 and stop down the aperture and let the motion move across the image. This “intentional camera movement”, or “ICM” technique is a great way to convey the sense of motion in an otherwise still frame, inviting the viewer to imagine the subject in action as described by the blurred image. Ernst Haas was one of my early influences, a person who’s work I continue to admire. He was a pioneer of using this technique to show the motion in his subjects.
It takes some experimentation and often you won’t really know if you have any successful images until you’ve edited and evaluated them. Some may still show the eyes of the animal in reasonably sharp contrast to the blurred legs in motion – I like this look – but I also like those images that make me think of ancient drawings on a cave wall, where nothing is particularly defined and the entire animal is abstracted in it’s motion and the background a blurred canvas.
I won’t always see the potential in these images immediately. Some I shot on film many years ago I nearly tossed out but decided to file away at the last second. I pulled them out years later and found a new appreciation for their abstract qualities and I’m glad I did!
If you’re interested in more photos captured with this technique, check out Rhythms From the Wild.
A few years back when most of us were stuck indoors, I took some time to comb through my catalog collecting hundreds of photos and put together Pathways to Creativity. From wildlife to abstracts, Pathways is a comprehensive look at my work and the thought process behind it. This is an exploration of ideas and inspiration, encompassing all aspects of photography from the way I use the technology to how I employ my fine art background into compositions and framing my subjects.
Years before that, I hosted a show exploring the world through my lens. Travels to the Edge is still circulating around the country. It was an incredible experience and I’m honored to have had the opportunity to bring my travels to your home.
Enjoy this content now streaming on my on-demand page for 30% off through Tuesday, September 3rd!
Use code LD24WOLFE at checkout to claim your 30% off – Available on all on-demand video. I recommend setting up a Vimeo account for easy access to your purchases!
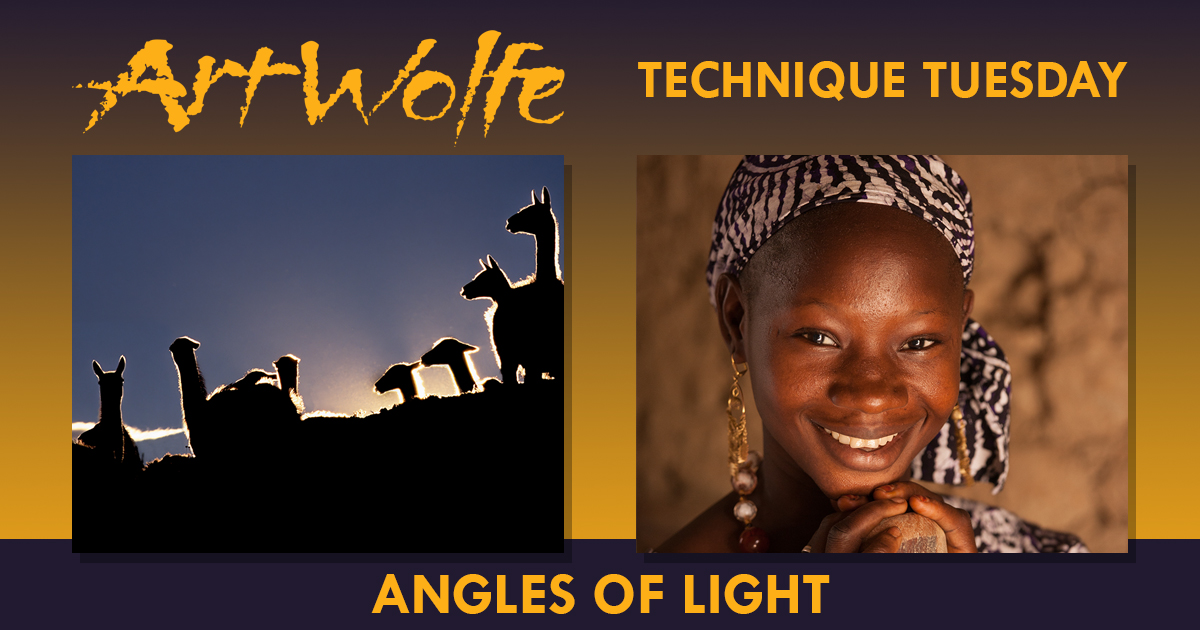
Working with light is the very definition of what a photographer does, and to that end it’s important to keep the various approaches and angles of light in mind to ensure you’re emphasizing what’s important to you or an essential aspect of the subject you’re capturing.
Here are a few examples of the types of lighting I consider while shooting a subject.
Front Lighting:
Front lighting is a common but difficult angle to work with. With the light coming from behind the photographer and illuminating everything from the front, shadows can be weak or non-existent as they fall behind the subject. It can also wash out colors as light is reflected directly back at the camera. This overall lack of contrast can create images that look flat, but when used correctly it can also create shots that emphasize colors, textures and patterns in more unified ways than other forms of lighting.
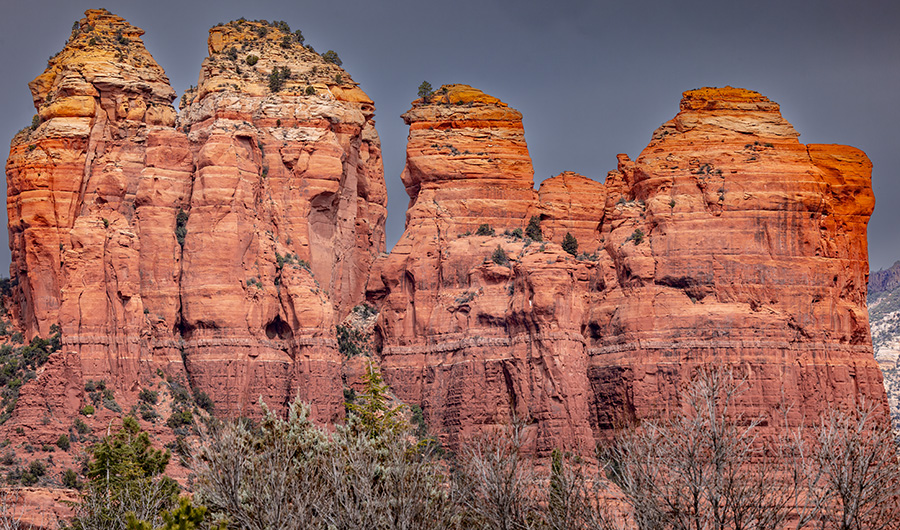
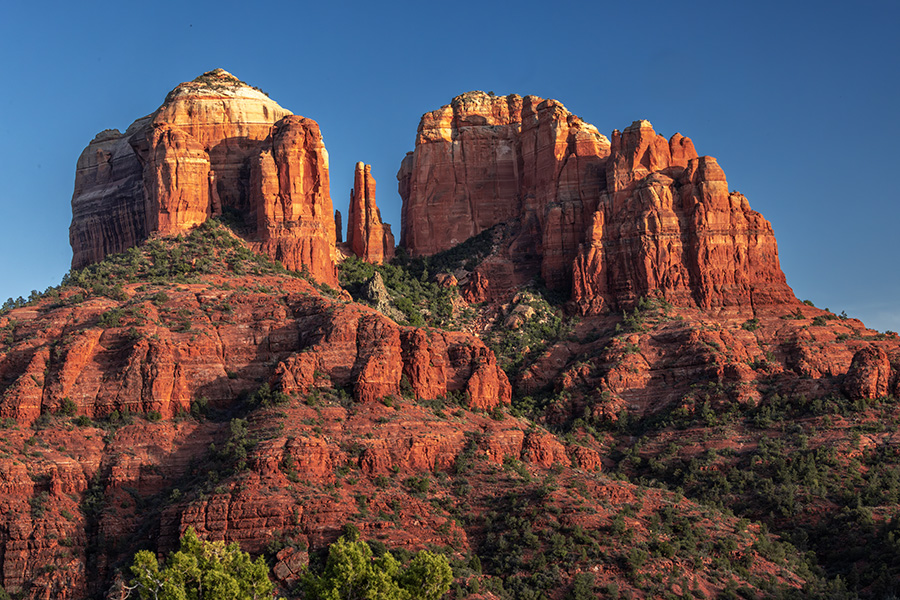
Side Lighting:
Conversely, side lighting provides an obvious falloff from highlight to shadow, resulting in dramatic contrast. This image, from the same location as the previous in Sedona, Arizona shows how two similar shots can look drastically different in two different lighting scenarios, in this case determined by the time of day. Side lighting can help emphasize the volume and overall shape of a subject. It will also emphasize texture quite a bit more than front lighting.
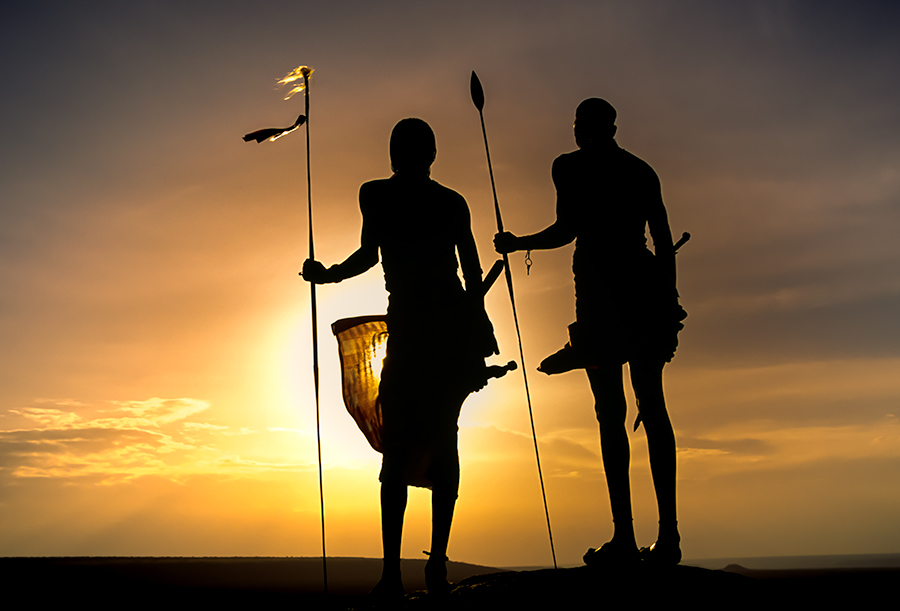
Silhouette (backlighting):
Backlighting can be used to great effect to show the shape of a subject without defining it’s volume when used to create a silhouette. It simplifies the scene, removing unimportant details. This shot of Samburu warriors in Kenya might still be an interesting subject in full light, but as a silhouette the forms of the men and their tools become one.
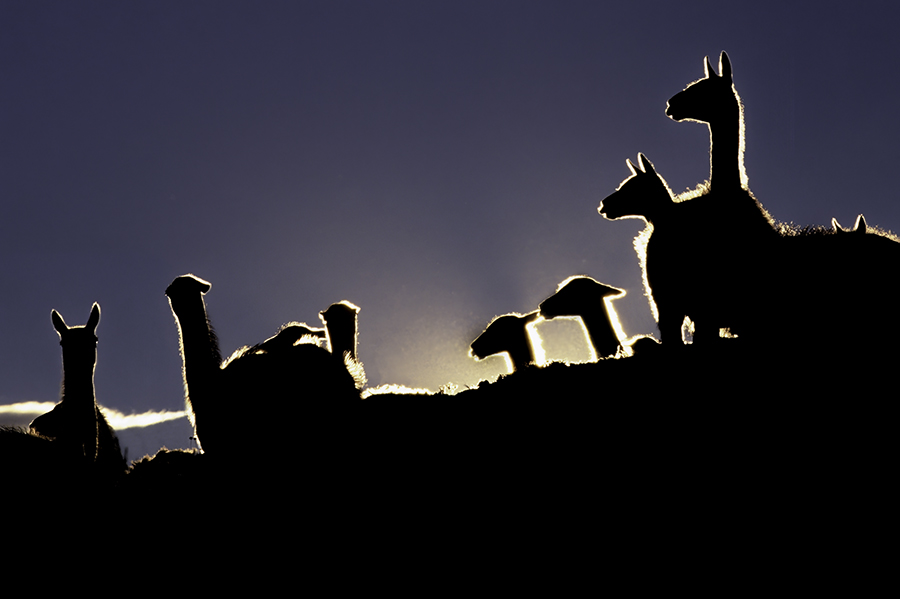
Rim Lighting (backlighting):
Another form of backlighting very similar to silhouette is rim lighting. This is when the light bleeds around the edges of your subject, creating a halo of light around a darker or silhouetted form. This is achieved by having a light either directly behind your subject, or behind and at a slight angle. This creates a dramatic effect that not only informs the shape of the subject, but begins to hint at volume and texture as the light bleeds over the edge of your subject. The rim lighting on these guanaco in South America hint slightly at their furry texture and brown color.
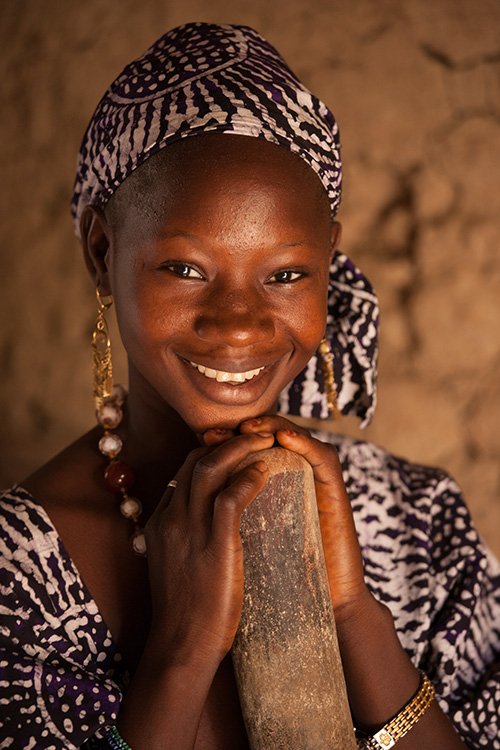
Reflected Light:
Reflected light is most often used in portraiture to provide soft, even illumination to the subject that helps to diffuse textures. In nature, it most often occurs when sunlight reflects off one surface and illuminates another, such as the walls of a canyon, or light bouncing from a lake to illuminate the forest at it’s edge.
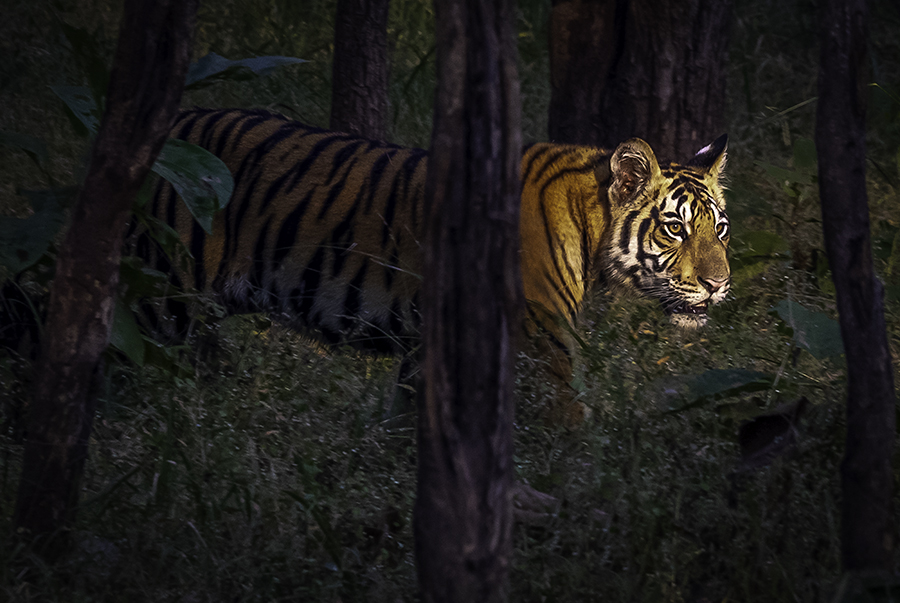
Spotlighting:
Spotlighting is often associated with artificial lighting setups, but when it’s found in nature it can be dramatic and provide a unique look at a subject. I have many shots of tigers in full, even light. This shot stands out as the subject steps into an illuminated pocket of an Indian forest.
Overcast:
Overcast lighting, also known as diffused lighting is one of the more frequently used and successful lighting types. It provides even illumination from light to dark, without creating harsh shadows or blown-out highlights. It does the most to show all aspects of your subject, allowing for detail in light and dark areas that shows texture while still including enough information to identify shape and volume.
Your assignment, should you choose to accept it: Go out and capture a subject or similar subject in two different angles of light, noting the elements that stand out and conversely fall back out of interest in each – feel free to share in the comments below!
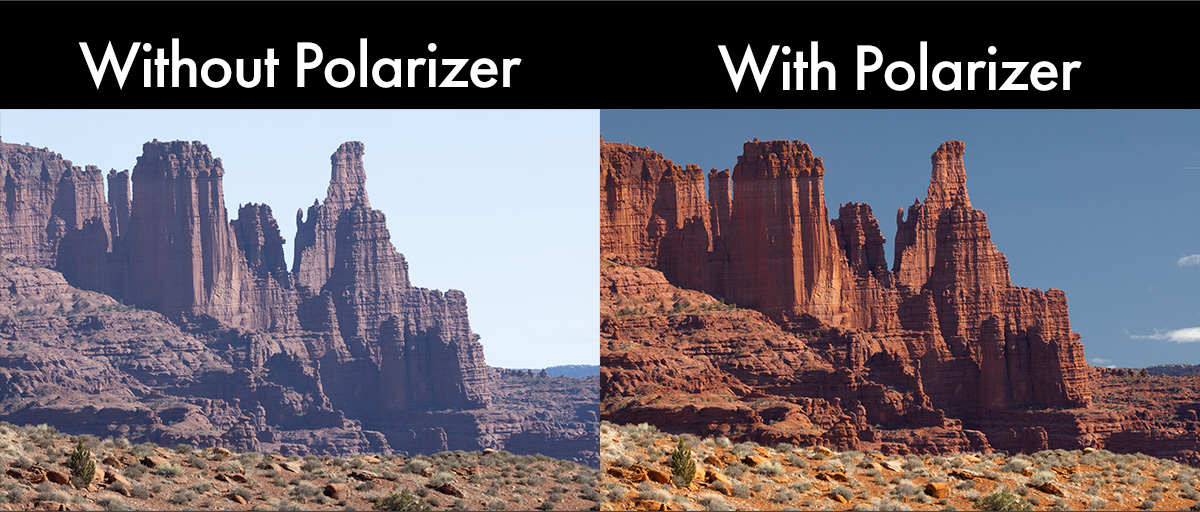
One of the most common and frequently-utilized pieces of equipment in my kit is also one of the most commonly overlooked components – A circular polarizer, or “CPL” as you’ll see them sometimes called. Without getting into the weeds on the science, essentially a polarizer controls the amount of reflected light reaching your sensor, resulting in more saturated higher-contrast images. Although filters have largely been replaced by post-processing RAW images, a polarizer is still an essential component of any kit.
There are two kinds of polarizers – make sure you pick the right one. You’ll want a circular (not linear) polarizer with quality glass. No sense in ensuring you have quality gear only to skimp on the glass at the end of your lens! I use the fantastic filters from breakthrough photography. Polarizers also come in warm and neutral tones. A warm polarizer does the obvious – warms up the colors of your shot! It also has the added bonus of helping to cut through haze and atmosphere. A neutral filter will give you something more, well, neutral – making it a great place to start post-processing.
Using a polarizer is fairly simple. There is more to just slapping one on and shooting, however. Polarizing filters have a ring to adjust the amount of the effect. I watch my LCD screen while rotating the filter to see the results happen in real-time. This is useful when shooting water as well. I will dial between capturing a perfect mirrored reflection on the water’s surface, or bypassing the reflections entirely to see into it’s depths. The later helps me immensely when photographing subjects like the salmon-hunting bears in Katmai.
If you’re photographing landscapes a polarizing filter is a must-have. Leave a comment below if you have a polarizer you’d recommend. I also love hearing about the creative ways you’re using them!
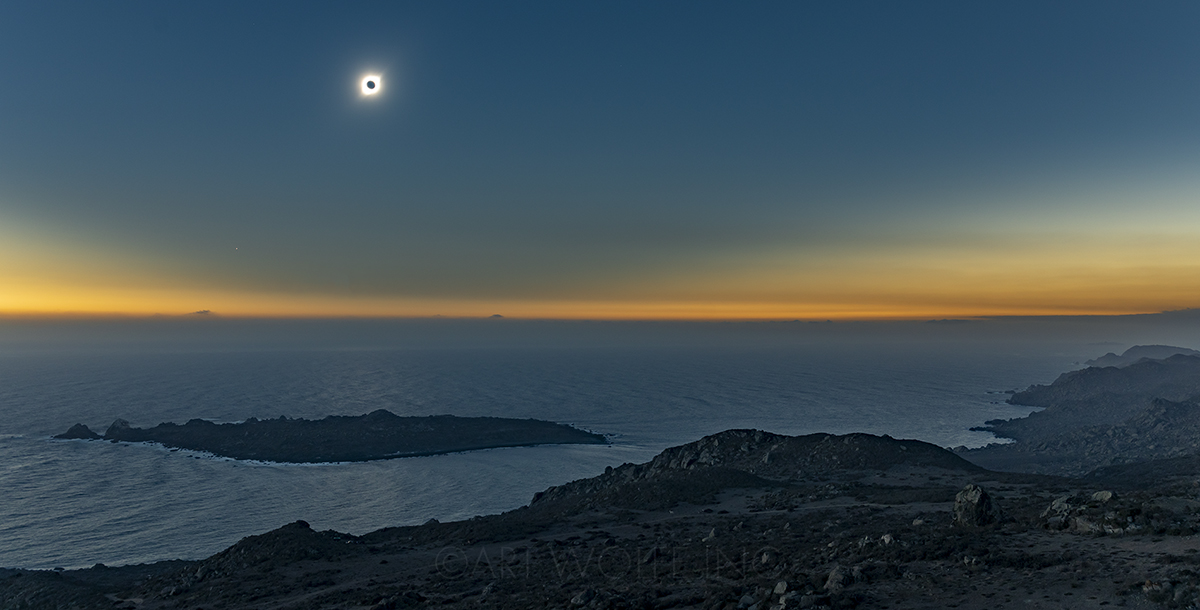
On April 8th we’ll be able catch a total solar eclipse here in the United States, as well as Canada and Mexico. I’ll be in Seattle when it happens, so my viewing will only be partial – but I’ve had the pleasure of having some incredible opportunities for capturing these serendipitous moments in recent years.
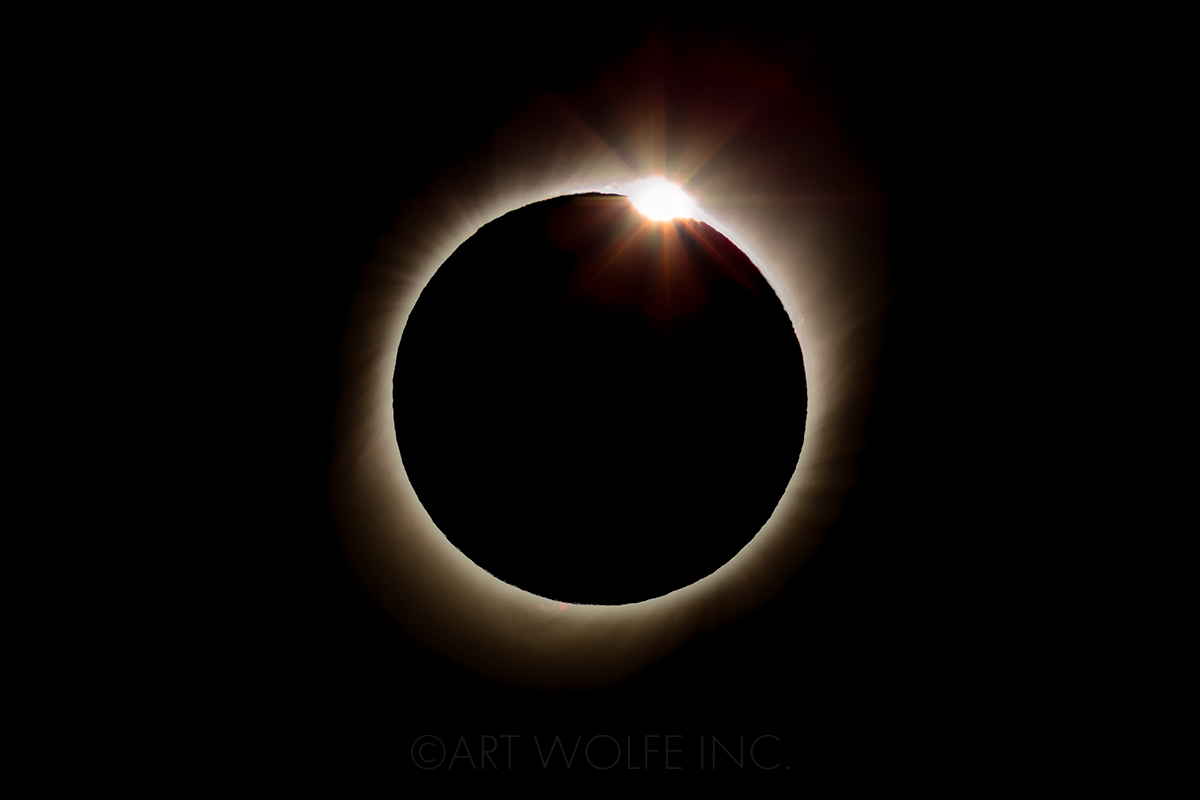
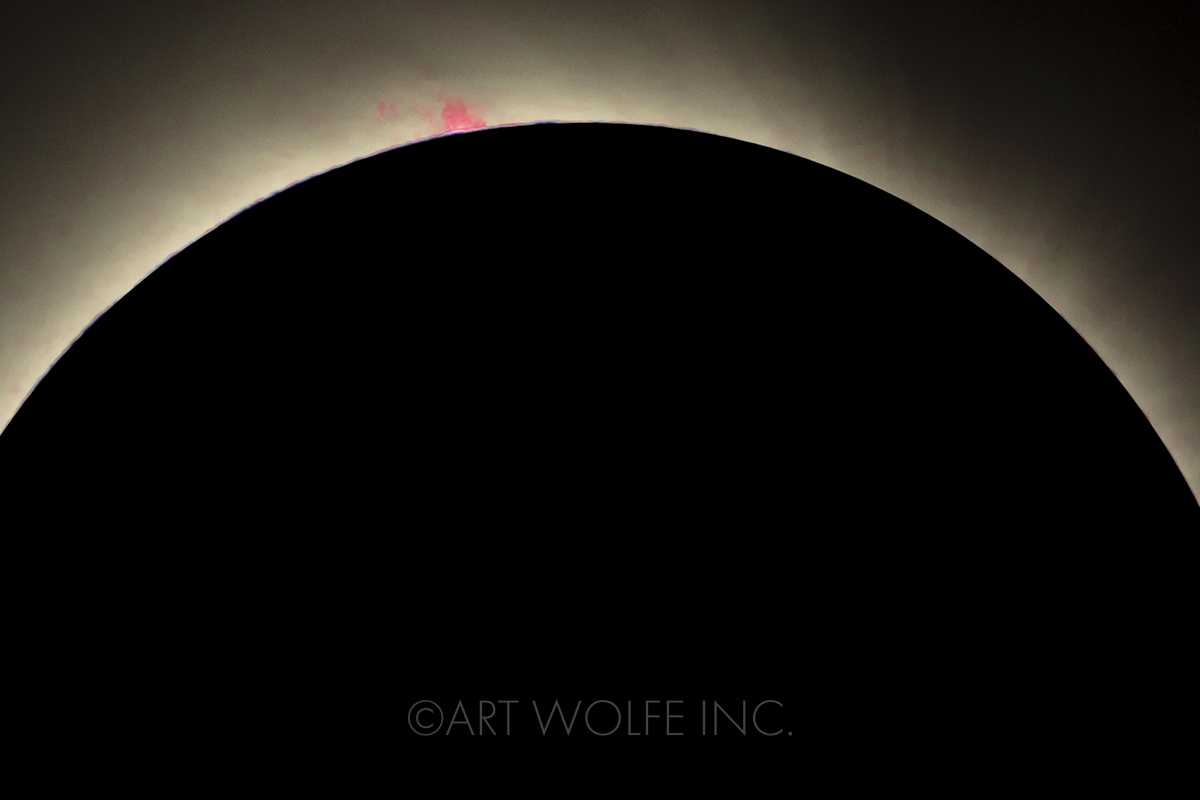
In 2019, I made it a point to get down to Chile to catch the total eclipse. I have shot eclipse moments in the past but this time armed with Canon’s lightweight 600, a 2x and 50mp 5D… I was not only able to get the shot I came for – but cropping in you can even see solar flares along the edge of the sun (below)!
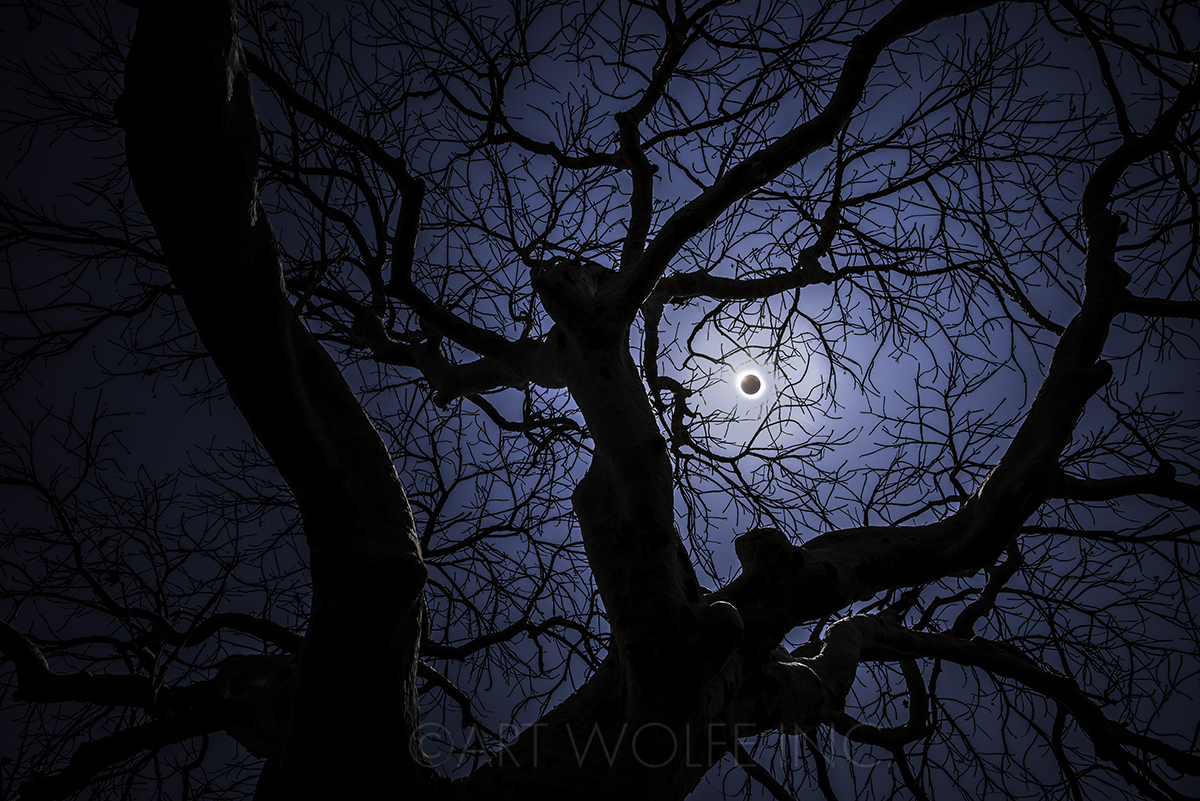
One of the most important tips for photographing the eclipse is to make sure you’re prepared to capture it in a variety of ways, both by zooming in for isolated details of the eclipse itself, but also connecting it to the environment. Framing it with trees or other terrestrial structures to establish a sense of place tells a greater story. My eclipse-shots are generally 1-second exposures at a low ISO around 400 using a long lens with extender, but there are a lot of factors you’ll need to consider. B&H has a great post on their Explora blog about photographing the eclipse.
A few years prior to Chile, I was also able to capture the annular event in one of Tanzania’s most remote National Parks, Katavi. This was a stop on a wildlife trip, and while I was able to capture some incredible photos of hippos and crocodiles, the eclipse stole the show!
I also captured an eclipse in Australia back in 2002. For that trip, I was shooting for Edge of the Earth, Corner of the Sky. I wrote an extensive blog post on that experience a few years back if you’re interested in more photos and stories!
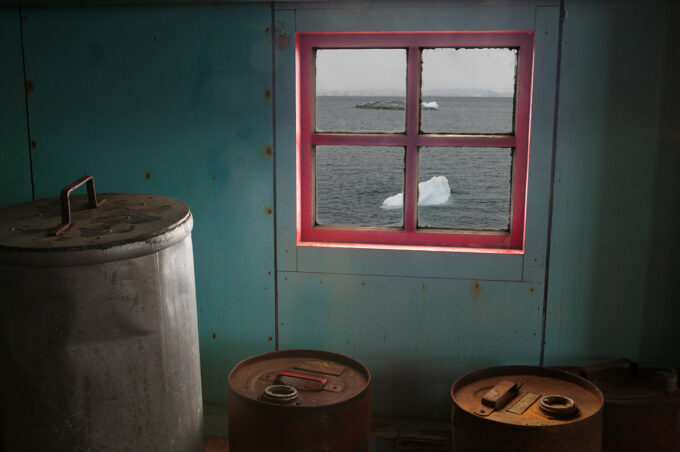

 Happy Labor Day Weekend!