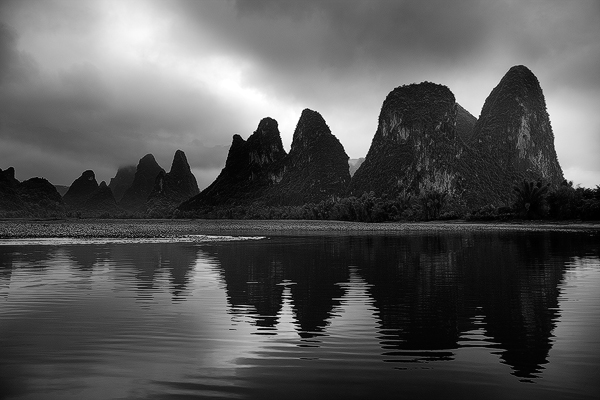
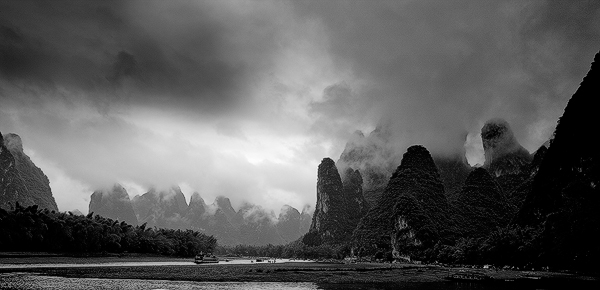
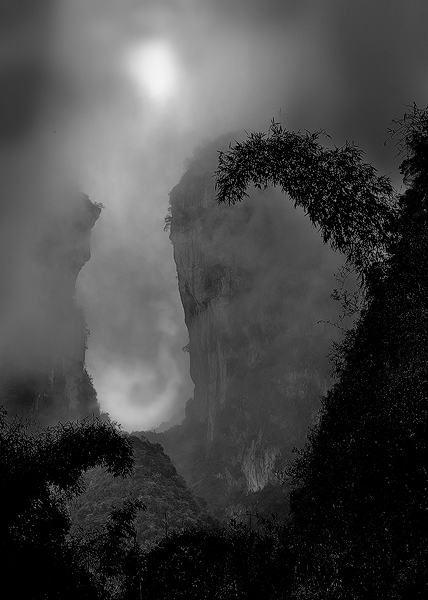
Never discount the ability to create effective photographs during a rainy overcast day!
On my last day in Yang Shao, China we were hit with some pretty bad weather. Instead of staying in the hotel, I traveled to a view point along the Li River to shoot some limited edition, fine art black and white images. I knew from experience that images taken on a day like this could yield dreamy photos with just a basic amount of dodging and burning once converted from a color capture.
My workflow for these images was fairly simple. I created a virtual copy in Lightroom, desaturated the image by dragging the Saturation Slider to 0 and then using the Brush Tool to selectively dodge and burn areas of the sky to make the clouds pop. Then, Jay Goodrich, my co-leader on this trip, opened the images in Photoshop and added an Auto Curves adjustment layer that, to my surprise, made the images just jump off of the page. When I have more time than I do on location, I will further refine the black & white image by using NIK Software’s Silver Efex Pro 2 software. This will allow me to really fine-tune the image.
I am always amazed at how many ways there are to process an image to get the results that I am looking for in my pursuit of creativity.
Every successful image is comprised of several key elements that define its character: exposure, the balance and movement of the composition, the interplay of tone and color. Focal point and depth of field are critical components as well.
Picking a focal point and highlighting it with shallow depth of field makes the subject “pop“,but one risks over-revealing. Sometime the eye has nothing to do except dwell on the primary subject. Watch people in a gallery. They pass by an over-simple image in moments while an interesting composition engages them for a while.
I usually prefer to draw the eye across the frame, placing the focal point deeper in the composition. The focal point could be a strong design element, but nothing attracts the eye like brightness or a splash of vivid color.
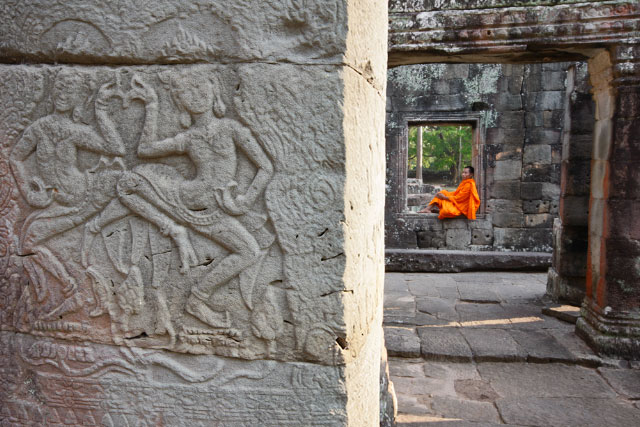
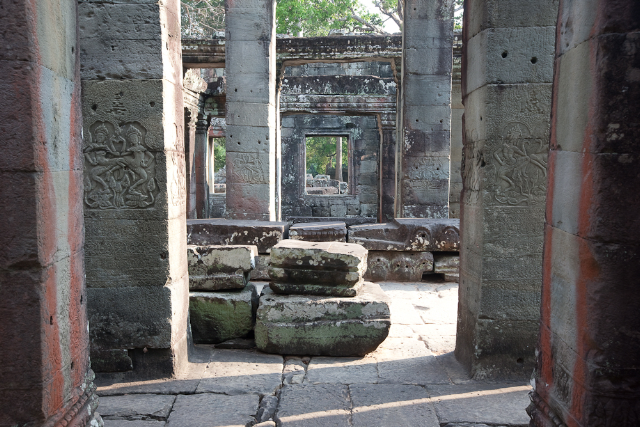
When I construct a composition, something in the scene catches my attention. I immediately try to distill the image to its essentials, looking for anything that gets in the way of the design elements that attracted me in the first place. I feel my way toward the final composition. I don’t actually photograph each step of the journey, but I did here to illustrate the process.
I shot this series in the ruins of a temple near Angkor Wat in Cambodia. In the first image (above) we see some strong vertical lines, but nothing grabs the eye. The bits of white sky are distracting; it is almost monochromatic, which is not a virtue with this composition.
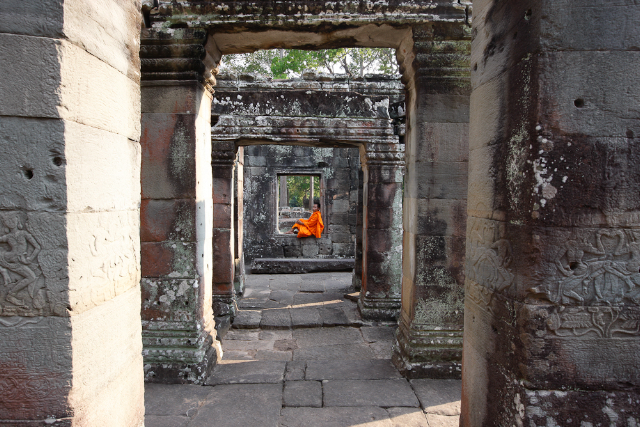
In the second image we see a Buddhist monk in orange robes in the distance. We now have our point of interest, but it’s overwhelmed by the temple, and the bright sky continues to move the eye away from the real subjects.
When in doubt, get closer. I moved in a little closer and zoomed to crop out sky above the doorway into the right. At the same time the sun on the floor is almost removed. Our monk is now a little larger, but there are still too many distractions from the main composition in the form of the remaining sky and foreground.
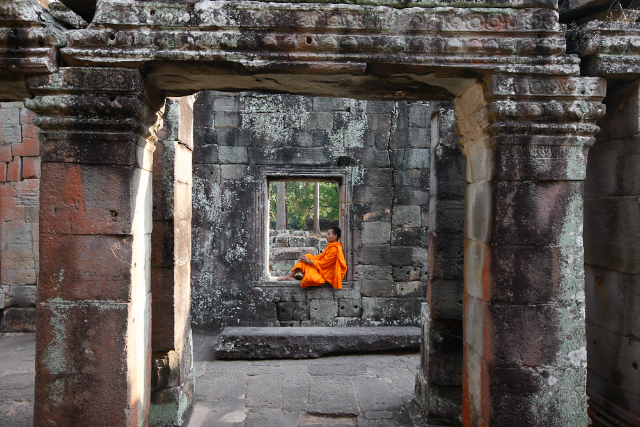
This time I got a lot tighter, driving extraneous elements out of the frame. (Cambodia4). The sky and bright triangle of light on the floor have been removed and there’s no question that the monk is the center of interest. However, the composition has become too symmetrical, too static for my taste. This is an acceptable image that I want to push a little farther.
This photograph is well-balanced, and all those bothersome highlights are gone. The eye jumps to the monk but then there is more to see in the forms of the pillars. The monk is looking out of the frame, which is a minor issue that I could tolerate.
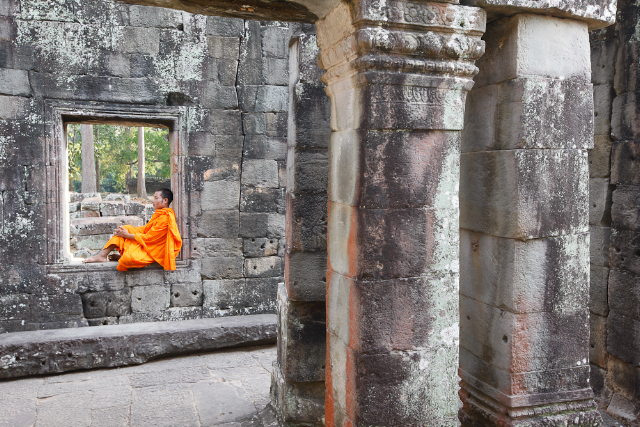
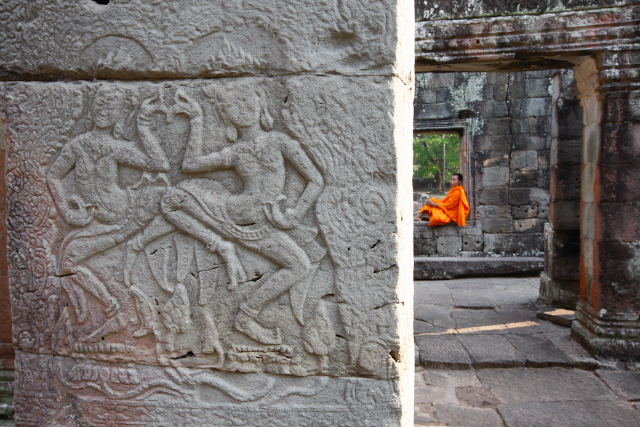
These final two images last two images work the best for me. They have strong graphic elements and can be read a number of ways. Although the monk still draws the eye, the bias relief of the dancing apsara (supernatural women, the wives of Indra’s court servants) is the first thing to draw the eye. Then, the bright orange forces your attention across the frame. Ordinarily, the bright vertical strip of sun lit sandstone would bother me, but in this case it seems like a border between the past and present and accentuates the verticals of the temple’s pillars. The monk seems a little crowded in the first photograph so I gave him a little more room in the final image.
The Eagle Hunters of western Mongolia are a proud and hearty people that have an immense sense of culture. They also practice a particular form of falconry in which they hunt with eagles. My goals for photographing them within the context of their environment were three-fold: convey the expansive landscape of the region, feature the power of the eagle, and highlight the traditional dress that is ever fading in the historical cultures of the world today.
1.) This first photo establishes where are, and our starting point. A pair of eagle hunters traverse the open landscape bordering western Mongolia and Kazakhstan with their avian assistant with horse in tow. While it does show the landscape, there is little drama and the other goals are not present.
2.) Here you can see I move in close to my subjects; I’m using a 16-35 wide angle lens which allows me to keep the three subjects in prominence while also capturing a dramatic background. The lighting looks a bit flat in this shot, but up close I am able to find better results. We keep the horse out of the shot – we don’t want competition for our focus – the men and their eagle.
3.) In my third image, which is at a right angle to the direction of the sun, I have attached a polarizer to my wide angle. You can see how much more dramatic the light appears. This image also highlights the problems of working with dramatic light – very harsh shadows were cast every time the eagle moved its wings.
4.) The wing of the eagle is now down, but the man that’s controlling the eagle is casting a shadow on his assistant. As my goal is to bring this culture into the light and share it, it’s not an ideal result to have half of my subjects in shadow.
5.) I decided to get lower and shoot upwards to bring in some of the openness of the sky in hopes of creating more of a story than in the previous shots. Always keep experimenting within your photographic goals!
6.) The result is that I don’t have nearly the problems of the previous images with the shadows. This is a very satisfying image to me and meets the goals I set for myself in terms of capturing the men, animal, and landscape. This is where some may stop, thinking they’ve captured the shot they are looking for. In an effort to see what else is achievable, I begin working the scene a bit more.
7.) I’m standing at eye level again with the hunters, but the problem with this shot is that the man closet to me is staring straight at me. I like to maintain anonymity when I am taking pictures, and would prefer that the subject is not staring straight into my camera.
8.) I ask him to look straight ahead, but now with movement of doing so, it’s the eagle mugging for the camera. This isn’t necessarily a bad composition, but I would prefer the eagle in a different position.
9.) I move a little bit further around and discover I love the way the light is falling across the main eagle hunter and his beautiful fox fur hat. However, as you can see, I have moved in too close to get all three subjects in the frame.
10.) I decide to back off a little bit, and now I am getting what I am looking for. I love the fact that the man in the middle is kind of looking my way without staring straight into the camera, the assistant is looking off to his left, and the eagle is conversely looking off in the opposite direction. There is a nice balance to this image, with no shadows on their faces. In addition, the eagle has nice light on his eye. This to me is a winner.
11.) I also like this last photo because it has a nice sense to it; the eagle is looking further opposite now, and is even more absorbed in what is going on in the landscape, rather than in what the photographer is busy trying to achieve. Both of these final two images are very strong photos for me, and I am very happy with the results.
A good balance of compositon, dramatic light, openness of the land, traditional wardrobes – it all comes together in a very nice way in these last two images!
Hot on the heels of my Greenland trip and the heavy focus on ice, it seemed like an appropriate time to revisit compositions utilizing icebergs, though in Antarctica for this particular shoot.
Icebergs and ice are an increasingly important topic in recent years, as climate change is becoming more of a resounding, everyday issue. On a recent trip to Antarctica I developed a personal project of capturing the ice in as artistic of a way as possible. During the day, cruise ship passengers disembarked in Zodiacs to go ashore and view penguins. I have photographed a lot of penguins, so my mission became the ice that was floating in the vicinity. On this particular trip I asked a Zodiac driver to take me over to a distant iceberg that I could see towering over all of the other icebergs. It looked almost like a cathedral, standing out there over a 150 feet above its surrounding neighbors.
This first image shows the dramatic angle of the pinnacle of ice as it’s surrounded by smaller icebergs. As usual I circled my subject and look at it from all angles before settling on an image.
As we travel around the iceberg it takes on a slightly different shape. This new vantage point allows me to incorporate more of the surrounding icebergs in the foreground.
Here I am able to incorporate a foreground “bergie bit” (little piece of iceberg) that is found floating around its larger cousins. I am using a 16-35mm wide angle zoom lens and a polarizer to compose this image. My main objective is to balance the foreground ice with the iceberg in the distance.
I put on my 70-200mm zoom and circled back around to the location where I captured my initial composition in image 1. I chose to shoot a vertical to emphasize the vertical sweep of this dramatic iceberg.
I noticed a distant iceberg with an arch and directed the Zodiac to it. As we headed over to it I put my wide angle zoom back on. I circled this iceberg looking for a point of view in which to include with my initial perspective.
This composition reveals the first iceberg in a very beautiful way. I also love the way the green arch surrounds the distant blue icebergs, and how the wide angle gives the image a nice perspective by incorporating some of the blue green ice just below the surface.
I decided to go back to my 70-200 to try to pull in that distant iceberg. This lens allowed me to compress the scene while still keeping the strong foreground element of the arched iceberg in my composition. However, because I am further away now, you can see the blue sky above the arched iceberg. I have lost the drama that I had with the last image.
I zoomed in to try and eliminate the sky from the previous shot,but in doing so I have lost the top of the distant iceberg.
This is my favorite image in the series. It conveys the drama of the arch, it frames the iceberg in the distance perfectly, and it has a nice sense of color with the blues and greens.
The result is 3 or 4 distinctly different compositions of the same iceberg, which demonstrates how perseverance and a change of perspective can yield a stronger set of images.
These unique perspectives are the kinds of things I’m always looking for in any location I visit. To learn more, check out my workshops page and explore them yourself! We have a couple exciting events coming up – join me next week in my home state of Washington and photograph the lush Olympic forest at the Lake Quinault Photography Retreat, and in November I will be leading a photography workshop to explore Hawaii from new and exciting perspectives. See you there!
When you visit some of the world’s great landscapes, it can be easy to miss the beautiful details beneath your feet. Using a tripod and a small aperture, capture the details that will make your photographs unique and personal while giving context to the location you’re shooting.
For more tips and techniques, my Photography As Art seminar may be coming to a city near you soon!
You’ve probably heard many photographers talk about getting shots during the “magic hour”, other people may call this “at sunset”. Learn how to get the best sunset photos, shot on location in Baja.
Want more composition tips? I am offering several more composition tips through my Photography as Art seminars this year throughout the U.S.
Due to popular demand Art has decided to schedule a follow up course to his popular “Composing Effective Images: Field Edition”. This is an amazing opportunity for you to get expert review on your artwork. It is not every day that you get a chance to have a master of the trade provide you with an intricate critique of your work.
What: Photography Assignment & Assessment with Art Wolfe
When: February 1-2, 2014 with an evening reception January 31.
Where: University of Washington Arboretum
Graham Visitors Center
Sign up now & get a special early bird rate ($45 off) by using coupon code EBIRD2014.
Join Jay Goodrich as he gives us his Top-5 new favorite things to look forward to in Lightroom 5. The Beta release just came out and there are some exciting new things to get excited about.
>>REGISTER for Jay’s in-depth Lightroom 5 class coming up September 14-15, 2013
Join the Burke Museum at the Neptune Theatre for an evening of fast-paced talks on the enduring relationship between the human imagination and the natural world. Inspired by the International Conservation Photography Awards exhibit, Short Takes features a stellar lineup of artists, scientists, students, and scholars. Speakers include internationally-renowned photographer Art Wolfe, curators from the Burke and the Seattle Art Museum, and explorers of the seas and the stars. Ten short talks, each illustrated with 20 slides, will take us on a journey from humanities’ first artistic impulses to our latest glimpse into the far reaches of space.
>>CLICK HERE for Short Takes topics and more information.
• Art Wolfe, internationally renowned photographer, host of “Travels to the Edge with Art Wolfe”, and founder of the International Conservation Photography Awards
• Katie Bunn-Marcuse, Assistant Director of the Bill Holm Center, and a Curatorial Associate of Native American Art at the Burke Museum
• Allison Fundis, Education and Public Engagement Liaison, Ocean Observatories Initiative/Regional Scale Nodes, University of Washington
• Shaun Peterson, a pivotal figure in the revival of Coast Salish arts
• Ellen Dissanayake interdisciplinary scholar and writer, Affiliate Professor in the University of Washington, School of Music
• Wendy Call, 2012 Writer in Residence for the North Cascades and Joshua Tree National Parks
• Dan Ritzman, Northwest and Alaska Regional Director of the Sierra Club
• Brad Rutherford, Executive Director of the Snow Leopard Trust
• Phil Rosenfield, Graduate Student, Astronomy, University of Washington
• Patricia Junker, the Ann M. Barwick Curator of American Art at the Seattle Art Museum
Dear Art Wolfe – I have long admired your images of stars and star trails and have tried in vane to take some images like this myself but just can’t seem to figure it out. Can you share some of your secrets?
Chris B.
Nebraska
Chris – I’d be happy to and it’s really not a big secret. When you are photographing stars and star trails at night, first figure out which type of composition you are looking to create – pin points of star light or the long streaks of star trails.
For pin points, set your shutter speed to 30 seconds, any longer and the points of light start to become ovals and the image takes on a blurry look-especially if you are including the Milky Way. Set your lens to it’s widest aperture, ISO 1600 or higher and expose. Noise in an image is most prevalent in the darkest areas, in photographing stars you will have a lot of deep dark areas between the stars so turn on your long exposure noise reduction to help minimize what gets transmitted to the image.
If you are shooting star trails, the elongated streaks of light that arc across the image, you will need much longer exposures than 30 seconds, namely 10 minutes on up to several hours, just exactly how long depends on the focal length of your lens and the effect you wish to create. Just as longer telephoto lenses will “magnify” movement, such as camera shake when you are trying to hand hold your camera, the longer the lens the less exposure time needed before you start to see effective star trails. Essentially the telephoto lens is zooming in making small things larger, so in as little as 5 minutes of exposure a 400 mm lens will yield short but definite star trails. With a wide angle lens, say 16 mm, you will need at least 30 minutes of exposure before you will begin to see decent star trails in your final image. For arcs of light that traverse the majority of the night sky you are generally looking at exposures of 2-5 hours.
In the days of slide film you would simply leave your shutter open for the entire exposure using the bulb setting to manually open and close the shutter and your wristwatch to time the event. However in the age of digital you can not leave the shutter open for that long without risk of damaging the sensor and an ever increasing build up of noise in the image. Rather than exposing for 2 hours straight, you shoot 240 thirty second exposures (to equal 2 hours) and then later “stack” them using any variety of software tools such as Adobe Photoshop or Imagestacker.
So how do you take 240 pictures over the course of a couple of hours? You could sit there with your cable release and click the button every 30 seconds, and if you only ever plan on trying this once perhaps that’s what you would do. However if this is something you would truly like to explore (and you won’t “get it” just trying it once) you should invest in a cable release called an Intervolemeter. This is essentially a computer that allows you to program the camera to shoot those 240, thirty-second exposures through the night while you get a little bit of sleep before setting up for the next shot.
The most important part of shooting stars is to pay just as much attention to what is on the ground as to what is in the sky. You will want to incorporate some interesting elements from the landscape around you, mountain peaks protruding into the sky, whole trees or tree branches, rock formations, saguaro cactus, etc… you need to tell the complete story so the viewer can appreciate not only the stars but where you were when you created such a striking image.
When including the foreground elements you have several choices as to how to handle them. First you can allow them to be silhouettes by simply photographing the scene after the sun has set using their forms as artistic elements in the image – this is perhaps the easiest and most common approach. The second approach is to begin creating your photograph prior to the setting of the sun, at dusk. Capture your lower foreground elements in an image at sunset and then leave the camera undisturbed on the tripod. Once the sun has completely gone and you are ready to shoot the star trails as before. Later in post processing when you are stacking your images together you will have the dimly lit view of the landscape to include in your overall composition. Now is this cheating? No. This is simply the same technique I have used for years with slide film when I would create a dual exposure on the same slide, one at sunset followed by a several hour exposure later in the night without moving the camera. Stacking is simply how you achieve the same result in the digital age due to the delicate sensor.
The last technique I have used involves artificially lighting the foreground elements in your landscape. Using a light source such as a flashlight, powerful search light or even a flash unit you can manually paint light over the foreground images during your 30 second exposures. It takes practice to go over the foreground elements just right, if you pass over an area too many times you will create a hot spot, miss an area and it will be dark, but when all you have is a flashlight to “paint with” there is nothing to tell you where you’ve been and where you have yet to go. So practice with this and over time you will be pleased with what you are able to paint in the dark. Here in the northwest snow camping is a popular winter time activity and lights inside of your tent or igloo make for wonderful glowing foreground elements in these compositions.
When shooting star trails you have two basic choices for where to point the camera. You can either create concentric circles of light around a single point in the sky by aiming at the the North Star (Polaris) for those photographing in the Northern Hemisphere, or arcs of light by pointing your camera in any other direction. Be aware of which you are choosing to compose and include your foreground elements for framing and balance accordingly. Unfortunately there is no convenient star in the southern hemisphere to point your camera directly towards so you’ll need to find that magic spot some other way.
Lastly there are some atmospheric conditions to be concerned with when photographing all night – namely condensation on the lens. I have shot start trails in many areas of the world such as the dry deserts of Utah and Namibia where condensation is not a concern but if you were to shoot them with say the sea stacks of the pacific coast you’ll be battling fogging on your lens throughout the night. One approach is to use a small battery operated fan to blow a steady wind across your lens to keep it dry. A second, perhaps easier approach, is to tape hand warmers around your lens, the kind hikers and skiers use. You’ll need several and they are only good for one night worth of shooting but they will help keep your lens warm and dry.
Lastly it goes without saying you need really dark skies. Pick a time when there is no moon or just barely a sliver and choose a location as far away and sheltered from the lights of near by cities as possible. For the pacific northwest where I live this means heading into the mountains, which make for great foreground subjects to include in the composition.
Enjoy your adventure – Art Wolfe
If you have a question for Art that you would like to see answered in an upcoming Newsletter email us putting “Ask Art” in your subject line: info@artwolfe.com