This May, I’ll be leading a brand new retreat originating in Pacific Grove, California with an exclusive opportunity to join for just five participants. We will capture the beauty synonymous with this location as well as integrating many of the themes of my Abstract Astoria and Atlanta Workshops, as well as my Photography As Art seminars.
Without further ado, here are the Top 10 Reasons to Attend the Pacific Grove Retreat in May!
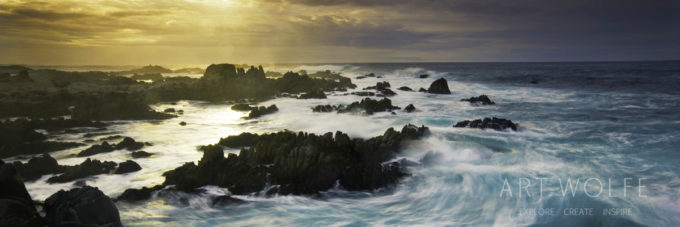
1. Visit a gorgeous location on California’s fabled Monterey Bay!
2. Limited to just five attendees, there will be plenty of face time for each participant.
3. Take your photography to the next level in this masterclass with two world-class instructors.
4. Free entry to the Monterey Bay Aquarium, where I will be giving a brown-bag lunch talk.
5. Go kayaking and photograph otters with the world’s premier nature photographer; if you’ve never kayaked before, rest assured we will have trained guides so you can focus on your photos!
6. Great food! We will be celebrating Cinco de Mayo in a region renowned for its great cuisine. We will dine together, and I *may* have a margarita or two!
7. Explore the region that inspired the likes of Ansel Adams and Edward Weston.
8. Get your photography portfolio reviewed! Gavriel Jecan and myself will look at everyone’s work and provide constructive feedback that you’ll be able to carry with you onto future trips.
9. Receive a copy of my limited edition book HUMAN CANVAS.
10. Experiential learning at its best. It’s my hope that the lessons you learn on this retreat will be referenced on your travel and photography adventures moving forward.
Spaces on this retreat are extremely limited, and some are already spoken for – sign up today to ensure your spot!
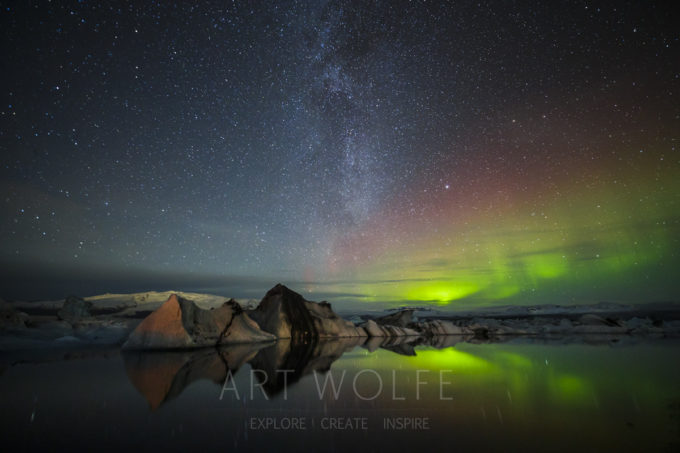
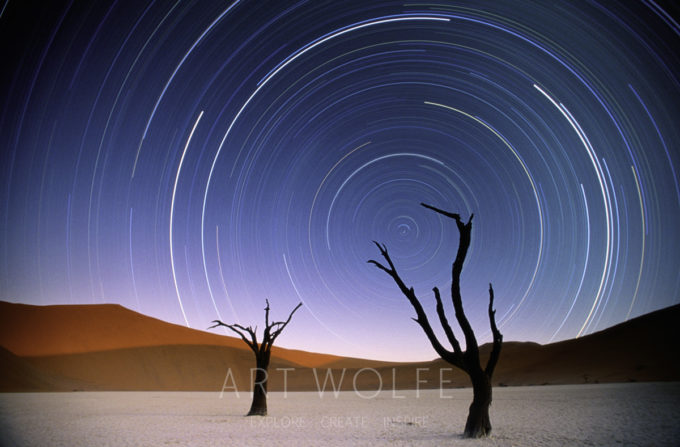
When photographing stars and star trails in the night sky, you’ll first need to decide which type of composition you are aiming to create – pin points of light, or long streaks of star trails. Ideally you’ll also want to find a location away from populated areas to ensure as little artificial light as possible is illuminating the atmosphere.
Now is a great time to experiment with photographing stars as the week of the new moon in April has been designated “National Dark-Sky Week“, when all are encouraged to turn their down or out at night to decrease light pollution. I wouldn’t count on all your neighbors to participate in this little-known event and advocate getting far away from population centers to achieve the best possible results – but it’s definitely something to mention when you are posting your fantastic new star photos to social media to raise awareness!
For pin-point stars, set your shutter speed to 30 seconds; any longer and the points of light start to become ovals and the image takes on a blurry look – especially if you are including our own Milky Way galaxy. Set your lens to it’s widest aperture and the ISO to 1600 or higher and expose. With a high ISO some noise will be apparent, especially in the darker areas of the image. Editing software like Lightroom or Photoshop can help reduce noise quite a bit.
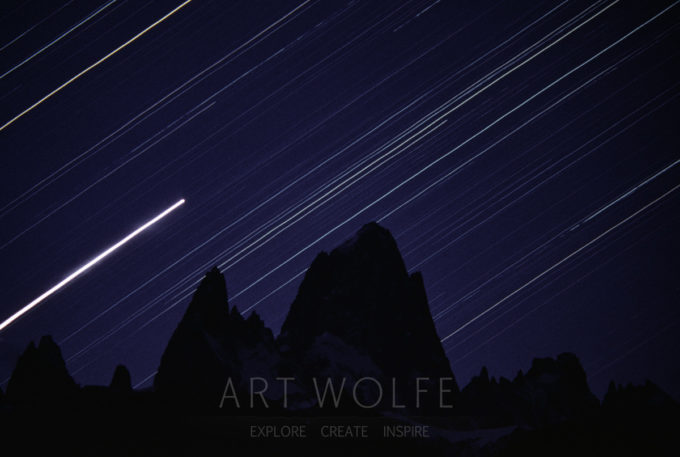
If your goal is to capture star trails – the elongated streaks of light that arc across the image, you will need a much longer exposure than 30 seconds – anywhere from 10 minutes to several hours. how long depends on the focal length of your lens and the effect you wish to achieve. Just as longer telephoto lenses will “magnify” movement such as camera shake while hand-holding it, a longer lens means less time before star trails become apparent in your image. Telephoto zooming will make the small details larger, so using a 400 mm lens will yield short but definite star trails. With a wide angle lens, a 16 mm for example, you will need at least 30 minutes of exposure before you begin to see decent star trails in your final image. For arcs of light to traverse the majority of the night sky you are generally looking at exposures of 2-5 hours.
In the days of film, you would simply leave your shutter one for the entire exposure using the bulb setting to manually open and close the shutter and your wristwatch to time the event. However, in the digital age you cannot leave your shutter open for that long without the risk of damaging the sensor and creating an exponential build-up of noise in the image. Rather than exposing for 2 hours straight, for the purpose of this example, you can shoot 240 thirty-second exposures (to equal 2 hours) and then later “stack” the images using a variety of software packages like Adobe Photoshop.
So then the question becomes “How do I take 240 exposures over the course of a couple hours?”. Certainly you could sit there with your cable release and click the button every 30 seconds, and if you only ever plan on attempting this technique once, perhaps that sounds like a fun way to spend a few hours. If you’d like to truly explore photographing the stars in this way, you’ll want to invest in a cable release with an interval timer, or an “intervalometer”. This device can be configured to work with your camera to control it in a number of ways. In this case you could set it to trigger your exposures for 30 seconds over a course of several hours while you catch some rest before setting up for the next shot.
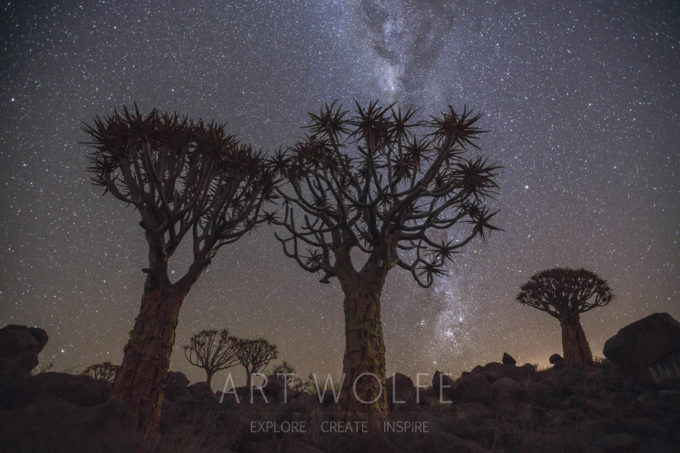
One of the more overlooked and crucial aspects of capturing quality images of stars is to pay just as much attention to what is on the ground as to what is in the sky. You’ll want to incorporate interesting elements from the landscape around you; mountain peaks protruding into the sky, whole trees or branches, rock formations, saguaro cactus – etc. You will need to tell the complete story so the viewer can appreciate not only the stars but where you were when you created such a striking image.
When including the foreground elements you have several choices as to how to handle them. First you can allow them to be silhouettes by simply photographing the scene after the sun has set using their forms as artistic elements in the image – this is perhaps the easiest and most common approach. The second approach is to begin creating your photograph prior to the setting of the sun, at dusk. Capture your lower foreground elements in an image at sunset and then leave the camera undisturbed on the tripod. Once the sun has completely gone and you are ready to shoot the star trails as before. Later in post processing when you are stacking your images together you will have the dimly lit view of the landscape to include in your overall composition. Now is this cheating? No. This is simply the same technique I have used for years with slide film when I would create a dual exposure on the same slide, one at sunset followed by a several hour exposure later in the night without moving the camera. Stacking is simply how you achieve the same result in the digital age due to the delicate sensor.
The last technique I have used involves artificially lighting the foreground elements in your landscape. Using a light source such as a flashlight, powerful search light or even a flash unit you can manually paint light over the foreground images during your 30 second exposures. It takes practice to go over the foreground elements just right, if you pass over an area too many times you will create a hot spot, miss an area and it will be dark, but when all you have is a flashlight to “paint with” there is nothing to tell you where you’ve been and where you have yet to go. So practice with this and over time you will be pleased with what you are able to paint in the dark. Here in the northwest snow camping is a popular winter time activity and lights inside of your tent or igloo make for wonderful glowing foreground elements in these compositions.
When shooting star trails you have two basic choices for where to point the camera. You can either create concentric circles of light around a single point in the sky by aiming at the the North Star (Polaris) for those photographing in the Northern Hemisphere, or arcs of light by pointing your camera in any other direction. Be aware of which you are choosing to compose and include your foreground elements for framing and balance accordingly. Unfortunately there is no convenient star in the southern hemisphere to point your camera directly towards so you’ll need to find that magic spot some other way.
Lastly there are some atmospheric conditions to be concerned with when photographing all night – namely condensation on the lens. I have shot start trails in many areas of the world such as the dry deserts of Utah and Namibia where condensation is not a concern but if you were to shoot them with say the sea stacks of the pacific coast you’ll be battling fogging on your lens throughout the night. One approach is to use a small battery operated fan to blow a steady wind across your lens to keep it dry. A second, perhaps easier approach, is to tape hand warmers around your lens, the kind hikers and skiers use. You’ll need several and they are only good for one night worth of shooting but they will help keep your lens warm and dry.
Finally, to reiterate one of my first points – you need really dark skies. Pick a time when there is no moon or just barely a sliver and choose a location as far away and sheltered from the lights of near by cities as possible. For the pacific northwest where I live this means heading into the mountains, which make for great foreground subjects to include in the composition.
Enjoy, and I hope to see your photos show up on my social media pages in the coming weeks, and don’t forget to mention National Dark-Sky Week!
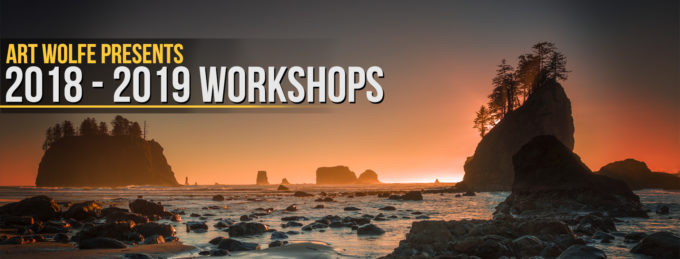
Due to popular demand I’ve added several new workshops and retreats to the 2018 calendar, as well as an epic photo journey to Japan in February of 2019! Many new additions involve the Pacific Northwest, so If you’ve been meaning to join me in the part of the world I reside in and know inside and out, now is the time to get signed up for a workshop!
Building on the success of last year’s Hawaii retreat, we’ve added another to the calendar this year. As always, my goal in visiting each location is to teach you to see and capture the shots you won’t find anywhere else; the interesting perspectives and details that will give your photographic eye unique vision to capture the less obvious.
These workshops tend to fill up quickly – many 2018 workshops are already full – and several are right around the corner! Sign up today to ensure your spot!
An intimate and extensive new Photography Retreat is just around the corner! On the heels of wonderful feedback regarding both our Abstract Workshops and the more intimate Photography Retreats, I’m pleased to offer up the opportunity to join me on a very exclusive trip to Pacific Grove, California where we will spend four days and nights together photographing the beautiful sights of this location.
Gavriel Jecan and myself will lead a group limited to just five participants for full days working in the field, critiquing your captures, and dining together at several of the area’s reputable restaurants. We will focus on capturing unique abstract landscapes, and will also emphasize introducing you to new ways to see and capture the beautiful natural landscapes to ensure that you come away with much, much more than just your standard travel photos. My goal as usual is to challenge you the same way I challenge myself to come away with unique visions rather than simply parroting the standard postcard shot you might find at the local gift shop.
Assuming cooperation from local wild life, we also plan to photograph sea otters via kayak from the serene waters of the local sloughs. Fear not if the idea of kayaking is new to you – the waters are placid and we will have guides to ensure safety!
This workshop is coming together very quickly and beings on May 2nd. Only a few spots remain available so visit the events page for more information and sign up today!
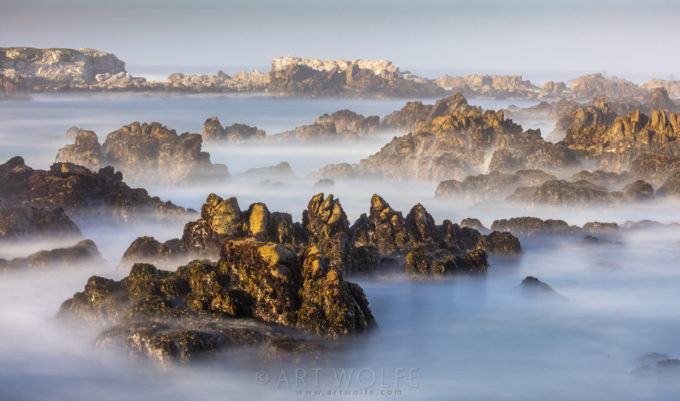
Now that Spring is officially a week away and the weather is warming up a bit here in the Pacific Northwest, it’s a great time to get out and shoot. Winter rains can be cold and nasty, but throughout the spring and early fall rainy overcast days that aren’t also affected by extreme temperatures and winds are the best days to get out and photograph! I woke up this morning to some cloud cover, light showers, and a relatively balmy 60 degrees, and was inspired to get the word out about how great such conditions can be for capturing fantastic images.
People are often surprised that I don’t run outside with my camera on a beautiful blue sky day. The clouds on an overcast day act like a huge softbox to soften the light, reduce contrast, and open up the shadows to details that would be completely lost on a bright sunny day. Falling rain diffuses and evens out the light even more. Some of my favorite images have been captured on gray rainy days.
You’ll need to check your lens frequently for spots but with a little care you can use the rain to your advantage. Use a tripod, polarizer, small aperture and long shutter speed to keep from recording individual falling drops of rain and maximize atmospheric softening. Additionally, the polarizer removes the shine from foliage for the richest colors possible. It’s rare that I don’t have a polarizer on the front of my lens. With standing water in your frame the falling rain will ripple the surface. The long shutter speed will blur movement the same way a waterfall can be rendered as a soft ethereal white drape over rocks.
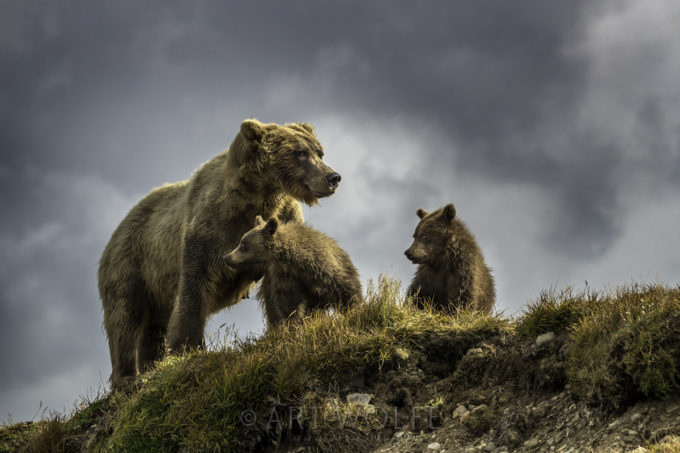
A brown bear sow watches over her cubs as they survey the landscape, Katmai National Park, Alaska, U.S.A.
Save 20% on “Motherhood” in our online store through the end of the month!
Art has chosen images that trace back to his arts education background for his Limited Edition Fine Art Collection. Images with the same sensuous tones and textures realized by watercolor painting were selected. They are printed on EPSON Metallic Luster or Somerset Velvet watercolor paper using archival EPSON Ultrachrome inks. After each print is approved, it is then titled, numbered and signed by Art. Only 100 of each will be made.
Print sizes are approximate based on image or format. Canvas prints on EPSON Exhibition Canvas are available. Contact our office for more information.
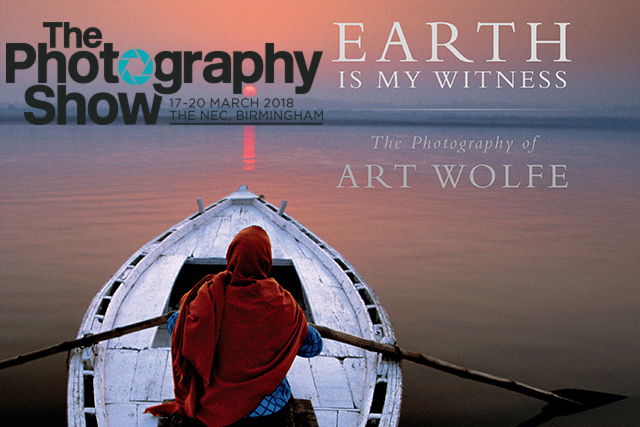
This month I’ll be skipping across the pond to attend and present at The Photography Show in Birmingham, England. This will be the fifth consecutive year the show will be held at the National Exhibition Centre (NEC). From hobbyists and enthusiasts to seasoned professional photographers, this show will have plenty to offer everyone including demonstrations of the latest technology from leading manufacturers utilizing their latest gear offerings. Conferences, talks, and seminars from a variety of speakers will have something to offer everyone of all skill levels. Come and check out the photography event of the year!
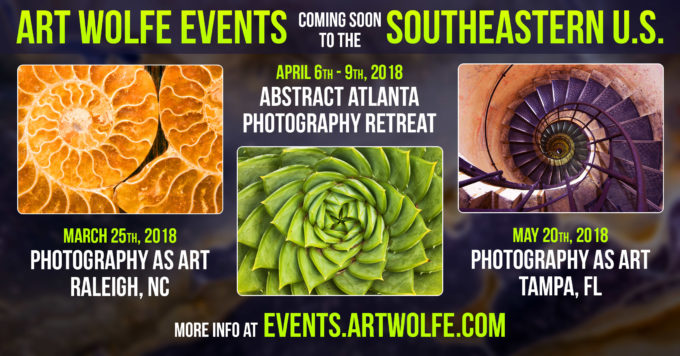
Spring is just around the corner, and after heading to the U.K. to present Earth Is My Witness at the Photography Show in Birmingham, I’ll be returning stateside for a few events in the Southeast.
Photography As Art happens on March 25th in Raleigh, North Carolina and I’ll be visiting Florida in May to present the seminar in Tampa as well. In between, I’ll be bringing a west coast favorite to Hotlanta with the inaugural Abstract Atlanta workshop, a new riff on what’s become an annual favorite that originated in Astoria, Oregon.
After being cooped up for so long, I can’t wait to get back out there refreshed and with new perspective. Hope to see you there, or at any of the other upcoming events! For those of you interested in hanging out with me in my own back yard, check out the recent post on Pacific Northwest Events.
Space is limited, and many of these events are nearing capacity. Hop on before they sell out!