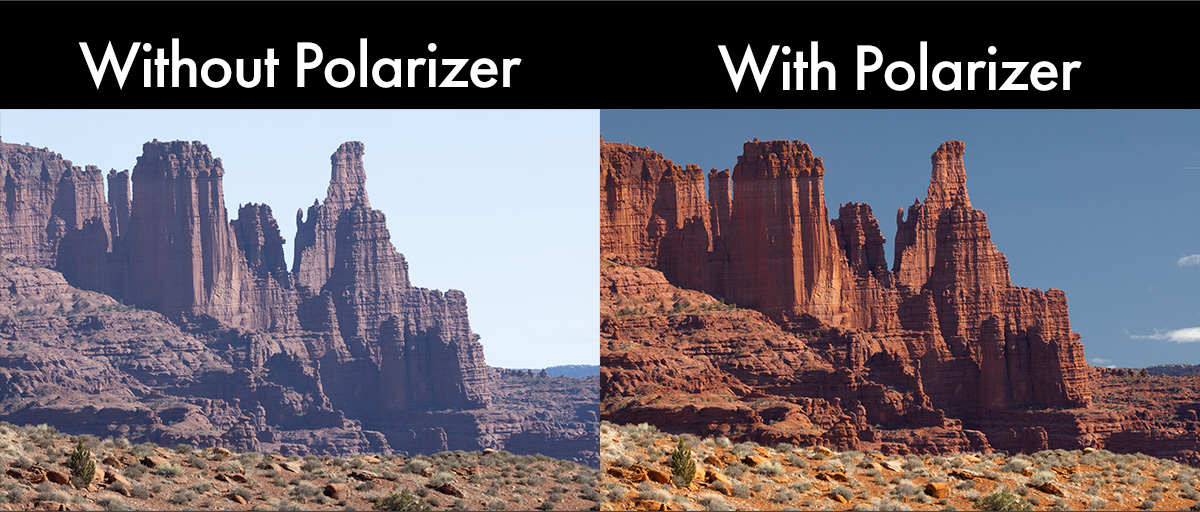
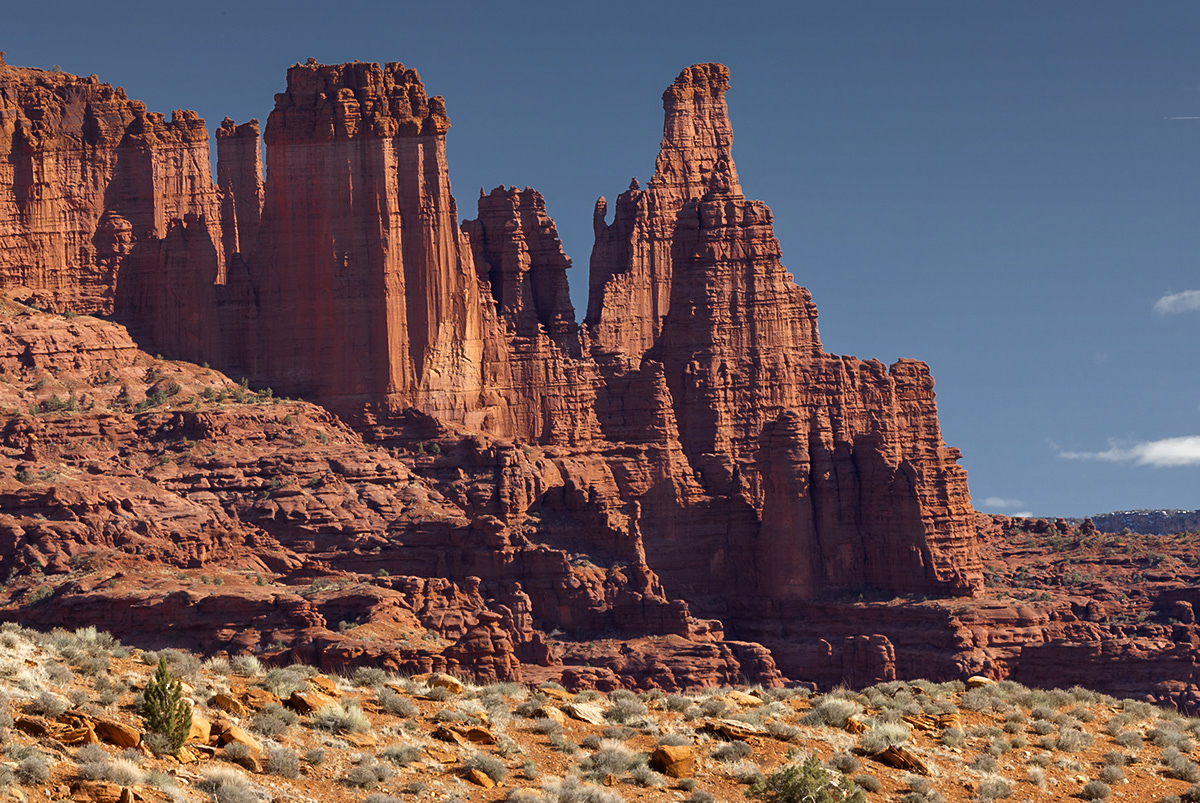
One of the most common and frequently-utilized pieces of equipment in my kit is also one of the most commonly overlooked components – A circular polarizer, or “CPL” as you’ll see them sometimes called. Without getting into the weeds on the science, essentially a polarizer controls the amount of reflected light reaching your sensor, resulting in more saturated higher-contrast images. Although filters have largely been replaced by post-processing RAW images, a polarizer is still an essential component of any kit.
There are two kinds of polarizers – make sure you pick the right one. You’ll want a circular (not linear) polarizer with quality glass. No sense in ensuring you have quality gear only to skimp on the glass at the end of your lens! I use the fantastic filters from breakthrough photography. Polarizers also come in warm and neutral tones. A warm polarizer does the obvious – warms up the colors of your shot! It also has the added bonus of helping to cut through haze and atmosphere. A neutral filter will give you something more, well, neutral – making it a great place to start post-processing.
Using a polarizer is fairly simple. There is more to just slapping one on and shooting, however. Polarizing filters have a ring to adjust the amount of the effect. I watch my LCD screen while rotating the filter to see the results happen in real-time. This is useful when shooting water as well. I will dial between capturing a perfect mirrored reflection on the water’s surface, or bypassing the reflections entirely to see into it’s depths. The later helps me immensely when photographing subjects like the salmon-hunting bears in Katmai.
If you’re photographing landscapes a polarizing filter is a must-have. Leave a comment below if you have a polarizer you’d recommend. I also love hearing about the creative ways you’re using them!
Some of the most common questions I receive from photographers of all skill levels and backgrounds are in regards to the equipment I use and recommend. While I always emphasize the importance of understanding fundamental art and design principles first and foremost when it comes to taking great photos, finding the right equipment in a sea of options can be understandably overwhelming.
I’ve put together a gear page you can check out here that highlights some of the equipment I use and recommend, as well as some of the brands and companies I trust. Bookmark this page and check back often, as I’m constantly trying out new equipment!
***For an updated list of gear I currently use, check out my Gear Page!***
This is a question I get asked all the time, “What sort of equipment do you use?” The answer is usually less than you would expect. In general I shoot with Canon’s 5DS R and 1Dx cameras. For my new Human Canvas photos I am using a Leica S. Digital technology has far surpassed what film was ever capable of and has completely changed the game for what one can shoot in the field.
Where ISO 50 was the norm with film, I am shooting into the 1000s without reservations now. The ability to confirm “you got it” immediately after the shot, zooming in to ensure critical focus, evaluating the histogram for exposure, means that today I shoot far less than I would have in the past. I can shoot half a dozen frames, know I got what I wanted and move on. With slides I may have shot a couple of roles of a single subject before I was satisfied that at least one of the images in the batch would satisfy me later – and later could be several months before I knew what I had.
I have shot the majority of my images with just two lenses over the last few years. Both are “L” series lenses, Canon’s professional designation, the 16-35 f/2.8 L II and the 70-200 f/4 L IS. I’ll use extension tubes for macro work with the 70-200 and add in a 1.4x extender for additional reach when I need it as well. These are my workhorses and they are always in my bag regardless of where I’m headed.
While I may have dismissed the middle range in the past, more and more I am finding myself reaching for a 24-105 f/4 L IS. It is a great walk around lens for shooting in crowded markets, portraits, architecture
On occasion I’ll pack a long lens. Years ago I loved my Nikkor 200-400mm lens for wildlife work; now I use the Canon 200-400 1/4 L IS USM Extender 1/4x.
I’ll also bring a fish eye lens, the 15mm f2.8, for special effects, just to mix things up a bit – but it’s not a lens I would rely on daily by any means.
In addition, I carry a light weight, sturdy carbon fiber tripod. I like Gitzo’s GT3542XLS Carbon Fiber Tripod. They make a fine product and it is light enough that I won’t hesitate to bring it wherever I’m going. I am using a Kirk BH-1 ballhead mounted to a flat plate (no center column). Here is an important tip about tripods – purchase a tripod that is just a little too heavy and you won’t use it. Purchase one with a wobbly center column and you’re better off without it. So spend a little more money up front and you won’t have to do it again for many years. Mirror lock up and a cable release are also a part of the stabilization equation.
Then there are the miscellaneous bits and pieces. An intervelometer for shooting long exposures and stars, circular polarizers for all lenses, a couple of 2-stop, hard step graduated neutral density filters, extra batteries for the camera and intervelometer, hex wrenches, lens cleaning cloths, and of course, a couple of portable hard drives, extra memory cards, and a MacBook Pro. I pack all of this in a Tamrac Anvil 27 bag- simple, lightweight, and effective for me to travel the world.
I have been using a Phase One camera system for my Human Canvas images over the past couple of years. At 60 megapixels the detail and resolution is so sharp I can enlarge the final images to life size and beyond, critical for this body of work. I have always shot with it in a studio, where the camera was mounted 16 feet above the floor in a warehouse ceiling and tethered to a laptop where it was triggered with a key-stroke. That was a collaborative experience, so I wouldn’t say I really got to experience the Phase One one-to-one.
So, that begs the question…what about using it outside of the studio setting?
I recently set out into the Cascade Mountains to find out. Even though it is a medium format camera system, the Phase One still fits into my same old camera bag. I just needed to move one little Velcro divider around to accommodate it.
It was far from an ideal day for photography – there wasn’t a cloud in the sky, the sun was at its peak overhead, it was hot, mosquitos were out and nothing was really calling out to me. With lunch in mind I saw a large patch of snow in the distance with a stream running out from under it. Since I’d hiked above the tree line, this was the only potential shade within reach. In anticipation of dipping a handkerchief in the cold water and eating some lunch, I set out for the snow bank. And that’s where I saw it…
The stream and winds had carved out a large tunnel under the snow, and even from the entrance I could begin to see shades of blue, deep in the cave. I’ve been a mountaineer almost my entire life, climbing the volcanoes in the Northwest, crevassed glaciers, even climbing to the lower level camps with an expedition on Mt. Everest, so I knew this situation had “extreme caution” written all over it. Looking over the snow, wall thickness, and arch of the top, I decided to proceed as one would on a snow bridge over a crevasse – very cautiously.
I stuck very close to the side walls; if the roof was to collapse this would have been the safest place to be. Moving into the cave was like entering a cathedral. A reverence for the beauty of the unexpected display was overwhelming.
Immediately I saw the potential in abstracting the icy blue glow of the ceiling fueled by the direct sun overhead. I used a 55mm lens (34mm equivalent), my attention fully focused on the otherworldly qualities of the ceiling. Looking through the viewfinder of the Phase One, the patterns and lines abstracted into soft human forms, suggestive of the Rubenesque feminine ideal form.
At other times I was drawn to the lines within the form, like the layers of geological time recorded in a rounded stone found alongside a river. The colors varying between blues and yellows only added to the final composition.
Shooting and shifting my point of view I worked the ceiling as a subject finding more and different compositions with each new angle. I could have stayed with this subject for hours. It was so unexpected – a real treat for what had promised to be a rather bland day.
The Phase One system is very intuitive with a huge LCD and touchscreen menus. I was able to easily navigate the functions to set up the camera for the way I like to work, even in the cave. When you are talking about a medium format system, it’s all about image quality – and this one delivers. The system combination of superb Schneider Kreuznach leaf shutter lenses, 645 DF Camera body and IQ 160 digital back produce the sharpest and most detailed images I have ever shot.
So what’s next? I’m currently on tour through Europe visiting familiar landscapes as well as some new ones. I have the Phase One with me and I can hardly wait to see the results when I get home and begin enlarging these images to prints. This camera system is able to capture the grand scenic landscapes in unprecedented detail and clarity. If only I could have had my hands on one since 1978.
When it comes to the big picture, Phase One wins out. ~Art Wolfe
Join me on the Phase One Digital Artist Series (PODAS) Workshop in Kimberley, Australia in June, 2013. >>MORE INFO
I have recently picked up a Canon 1DX, the latest flagship camera for Canon and, spoiler alert, I am thrilled! This camera represents a whole new world for photography. It’s not so much about how many megapixels the camera has, we’ve essentially passed the resolution of the best slide film in its day, now it’s all about the performance at higher ISOs and Canon has re-set the bar with this latest model.
If you know me, or have been to one of my seminars you know I am an artist first, a photographer second and a technical anything is not even on my list. The camera is a tool for me, just like my brushes and paint, thus I will leave the technical reviews to the likes of Jay Goodrich and others who play in that arena. This write-up is more my impressions of what it’s going to be like using this next generation camera going forward.
I have been shooting for over 30 years now, back in the good old days when you had to walk uphill in the snow both directions to get a shot of a moose, the ISO speed was 25. Yes, that’s not a typo for those of the internet generation, ISO 50 didn’t come around for many years after I began my career, and 100 was largely unheard of for professional photographers. You panned with your subjects, not always for the effect but because you had to, even wide open you couldn’t always get a shutter speed fast enough except in the brightest of conditions. Hand holding was just a fantasy that we all had to disregard.
So when did I make the switch to digital? As soon as it was available as mass market product. I was in a small inflatable zodiac in Antarctica photographing iceberg formations with an 11 megapixel Canon 1Ds. It was my first time using this camera and I was shooting at ISO 100 when the opportunity to photograph a leopard seal that had just hauled itself out on the ice. Remember, this was my first time shooting with digital and when I was able to bump up the ISO to 400 and capture a decent shot of the seal while bouncing on the waves and then try another at 800, I was sold. I never loaded another roll of film again and I came home with 300 rolls of unexposed slide film, that I sold the very next week.
Up through the 1DS Mark III and 5D Mark II, I was comfortable pushing the ISO to 400, but not much higher. The grain and noise that came in at higher ISOs began to impact the image enough and the gains of one more stop simply didn’t buy me enough to justify it, it was still a tripod, mirror lock-up situation afterall.
But not any more…
With the 1DX, I can easily see going up to ISO 6400 and perhaps further, I haven’t tested much beyond 6400 as the idea is so absolutely foreign to me. Unless I’m looking for slower shutter speeds to blur the motion of a river or pan with a moving animal, I don’t imagine I’ll even set it any lower than 1600 on most days. This is an absolute game changer for me. With this camera I will return to try and capture old subjects that I would have otherwise passed up earlier in my career. I can return to photograph swift moving animals in the forest canopy in the late afternoon where there simply was not enough light to allow for a fast enough shutter speed. I have never favored flash unless it was absolutely necessary, and even then the results rarely made the cut.
Now shooting at ever changing ISOs being the highlight for me, Canon has located the ISO button perfectly, even differentiated with a raised bump such that I can switch settings with my eye to the camera as easily as I would change the aperture.
Shooting at higher ISOs also opens up new worlds for controlling Depth of Field. A slight breeze while photographing flowers in the meadows of Mt. Rainer meant choosing between tack sharp foliage vs. a depth of field appropriate to the composition. A compromise, and rarely a good one. People even marketed “plant clamps” to hold the foliage steady for you. Now I can simply dial up the ISO to get the shutter speed I need without sacrificing F-Stops and Depth Of Field.
Though I have said it many times in the past – “If you want to improve your photography get a tripod, cable release and mirror lockup, and use it…” you will find me hand holding the camera more and more often in the future. I am not religiously tied to a tripod, they are excellent tools allowing you to shoot with slower shutters speeds, but if I can bump up my ISO to 4000 and still come home with sharp images, I will. It will allow me to be more nimble, more reactive to moving animals and people.
I’m often asked about the one that got away… It was in Varanasi, India. I was walking down the back streets of the bustling city trying to keep up with the guide and my friends, but I knew I was falling behind overwhelmed by all the sights and smells, a photographer’s paradise. As I glanced down an alley way I saw a dog curled up sleeping on top of a cow taking advantage of the warmth and comfort it offered. It was a spectacular shot especially considering my book “Dogs make us Human” had yet to go to press and I could potentially include this image…Alas, had I chosen to get my tripod out, set up and get the shot, I would have had one more great shot in the bag and the guide would have been long gone leaving me completely lost in the back allies and small streets of this enormous city. He was just out of earshot given the ambient noise, I couldn’t call out, I just had to enjoy the moment and press on hurrying to catch up with the guide. Had I been carrying the 1DX…I would have simply shot it at ISO 6400 and been able to easily hand hold the camera for the exposure racking off several frames (up to 12 in a second actually) and then hustled on to keep the back of my guide’s head in sight.
During August I led a tour to Lake Clark Alaska with Jay Goodrich and 9 participants. The shot that made the trip for me was when a young mother grizzly came within view trailing 3 very young cubs. We were told that she was new to the area and uncertain of the surroundings. In the deep grass a pair of otters scurried through, unable to see what had made the noise, she immediately let out a sharp grunt calling her three cubs to her side. One by one the three cubs reached mama and stood at attention ready to head her next command. With the camera set at ISO 1600 I was able to capture the scene with sharp focus from the mother bear to the last cub in line – absolutely perfect! It was a fleeting moment and one I would have missed with a lessor camera in the past.
Canon has dramatically changed the focusing system as well, and for the better. While I didn’t specifically test out the focusing abilities of the 1DX, I was in Brazil recently shooting with the new Canon 5D Mark III which has a similar focusing system. The 5D Mark III allows you to not only pick from 61 different focusing points (in a variety of automated ways) it allows you to choose different scenarios to track the subject from erratic to predictable. While in Brazil at the Buraco das Araras (the Hole of the McCaws) the colorful birds were moving in and out of the canopy as if they were sparrows. They’re not like our bald eagles here in the Pacific Northwest – gently and predictably soring over the ground…They would dart in and out of my frame as they quickly moved from tree to tree. The advances in focusing made it possible for me to get tack sharp images of these birds in flight as I watched the scene through the viewfinder reacting to flashes of color as they made swooping passes across the open spaces. The camera accurately tracked their movements maintaining the focus for me. Could I have shot this scene in the past? Yes, but with far fewer successful exposures. It would have been much more of a “shoot a lot and hope for a little” situation. With this new focusing system, I was able to get vastly more keepers for the archives.
For all of the complexity Canon has done a great job with their menus and labels – this was my first time out with the camera (the manual safe at home of course) and I was able to navigate the settings to reprogram the shutter release and other buttons and general setup to suit my preferences. It’s also a very solid camera, well built, it feels like the professional tool in my hands that it is.
The extent of the buttons that can be utilized while your eye is to the camera to adjust and change settings is wonderful. I can (now more easily) check the depth of field, switch between focusing modes, change the ISO settings, and adjust exposure; most everything I can foresee needing will be at my fingertips now, rather than having to pull away from the camera and navigate through menus and potentially missing a shot.
Yes, I’m sold on the new 1DX, and while I’m sure I’ll stop giggling eventually, every time I look in the LCD to see sharp images at incredible ISOs, I think of where technology is going next. There are going to be a lot of firsts with this camera over the next year or so – first time reacting to a charging lion at sunset, first time with birds in flight at F13 without a tripod, first time stopping the motion of a wheat field with sharp focus throughout…It’s going to be a good year.


, Lake Clark National Park, Alaska")